1. QUICK GUIDE TO THE RISK MANAGER
- Subscribe to the SoftComply Risk Manager app via the Atlassian Marketplace. This step requires Jira administration permissions;
- After the successful installation, open the “Risk Manager” app from the drop-down menu of “Apps” and select “Create a New Risk Management Project”;
- Follow these 3 steps:
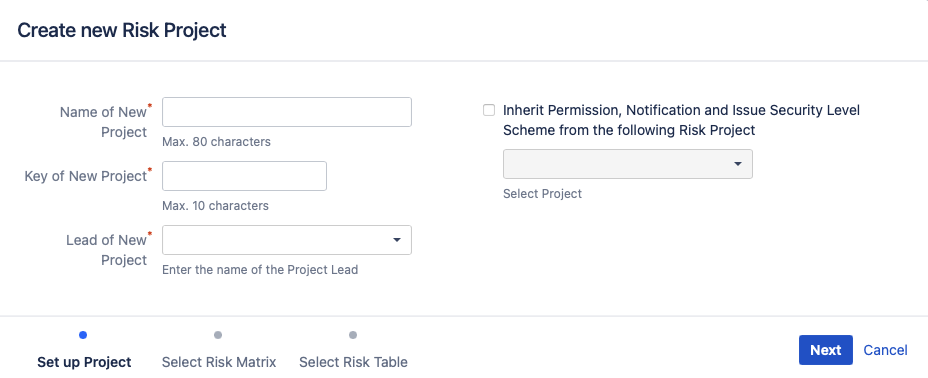
- Enter the project name, the key and the lead;
- Select a suitable risk matrix from the templates (it can be customised later);
- Select a suitable risk table template and click “Submit”.
Success! You have just created your first risk management project and you can now start managing risks.
Here is a short video tutorial guiding you through these steps – SoftComply Risk Manager Quick Start Guide.
2. CREATE A NEW RISK PROJECT
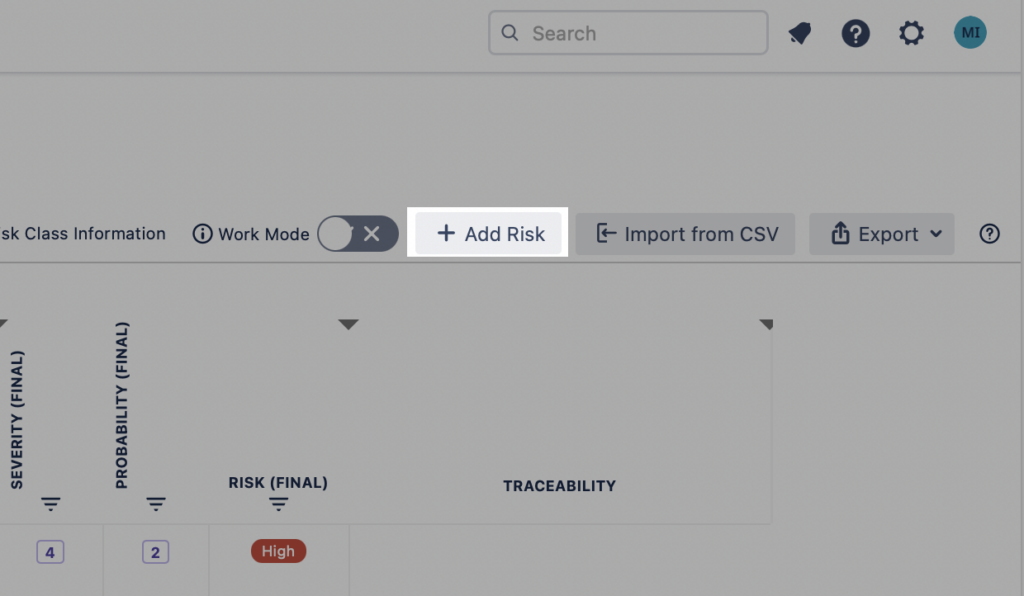
Open the Risk Manager app from the dropdown list of Apps.

When you click on the Risk Manager, the front page with a “How-to” manual is opened and two blue buttons appear on the top right corner – “Create New Risk Project” and “Create New Risk Project from Existing Project”.
| Use the “Create New Risk Project“ button when creating your first Risk Project. Or in case you want to create a new risk project with a completely different configuration from the earlier ones that you have created before. |  |
| Use the “Create New Risk Project from Existing Project” button when a risk project already exists, and you want to apply the same configuration to your new risk project. |  |
Follow these steps to create a new Risk Management project from scratch:
2.1. Name and Assign the Project
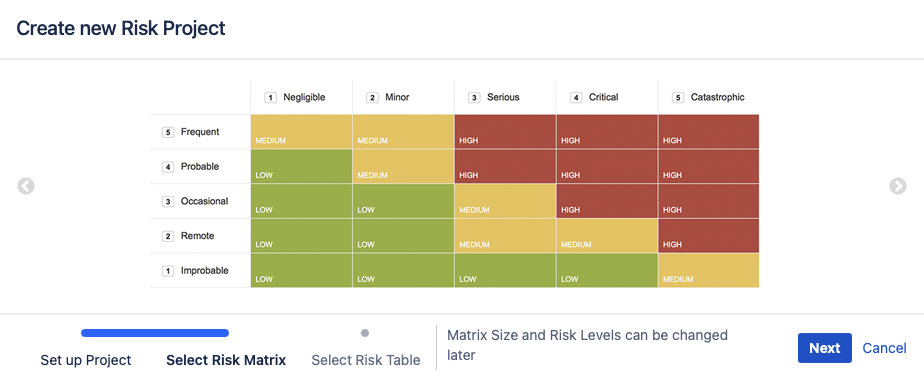
2.2. Select the Risk Matrix
You can select a Risk Matrix between 4 Risk Matrix templates that is closest to the one you need in size. Your chosen matrix can further be customised later according to your specific needs.
2.3. Select the Risk Table
We have 4 risk table templates for you to choose from. You can customise these later on but the closer the chosen template is to your risk management process, the less time you will have to spend on the customisation. The risk table provides an easy overview of all your risks with a great sorting and filtering possibility. As an alternative, you can also manage your risks in the Jira issue view.
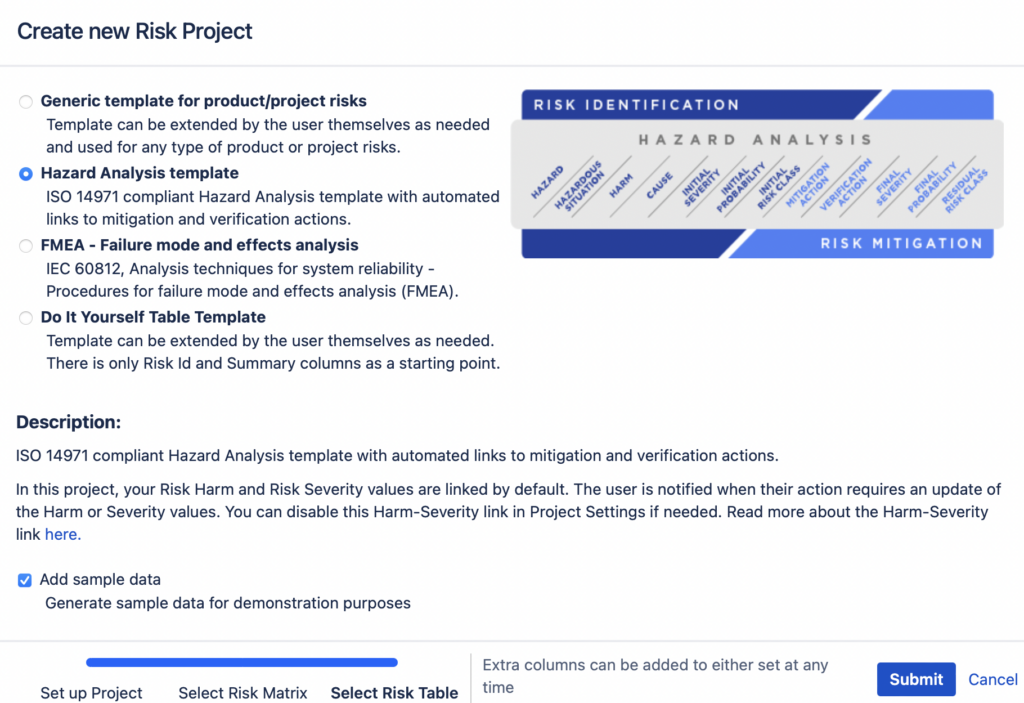
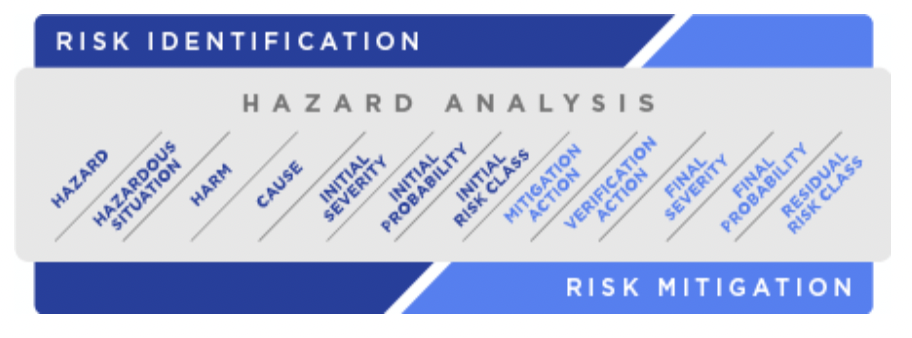
When choosing a template, an image of the columns that will appear in your Risk Management Table is displayed. See below for the close-ups of the table templates:
1. Hazard Analysis template is based on ISO 14971 for a top-down risk assessment process that is mandatory for medical device developers as a minimum.
Note: In Hazard Analysis template the Harm and Severity are linked by default as instructed in ISO14971 to keep your risk data consistent, i.e. when you have several risks with the same Harm, then their Severity value has to be the same. The app will keep the values consistent, i.e. when you change the Severity value of one of these risks, the Severity value will also be updated for all the risks that share that Harm. Although not advised, you can disable the link in project settings.
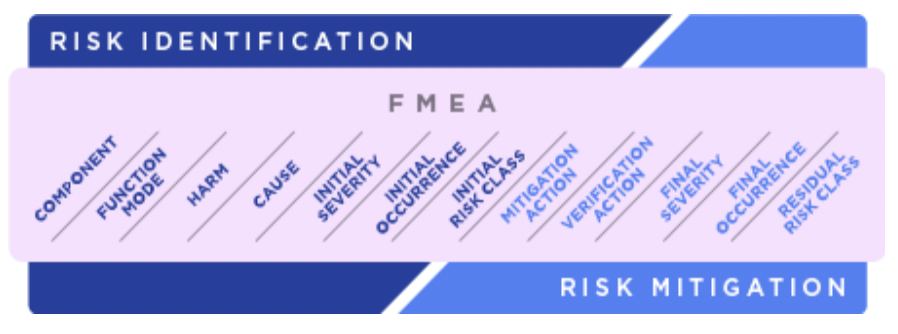
2. Failure Mode and Effect Analysis (FMEA) template for a bottom-up risk assessment method used to assess potential failures in the device itself (or one of its components). Recommended to be used for managing safety-critical software product risks.
Note: In the FMEA template the Harm and Severity are linked by default to keep your risk data consistent, i.e. when you have several risks with the same Harm, then their Severity value has to be the same. The app will keep the values consistent, i.e. when you change the Severity value of one of these risks, the Severity value will also be updated for all the risks that share that Harm. Although not advised, you can disable the link in project settings.
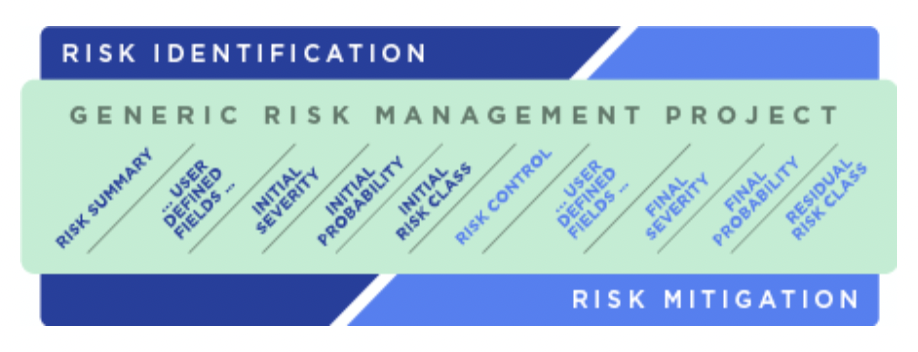
3. Generic Risk Management Project template is a good place to start when managing project risks. The table will have only Risk Class calculation related fields pre-populated and users are free to add columns that they would need from thereon.
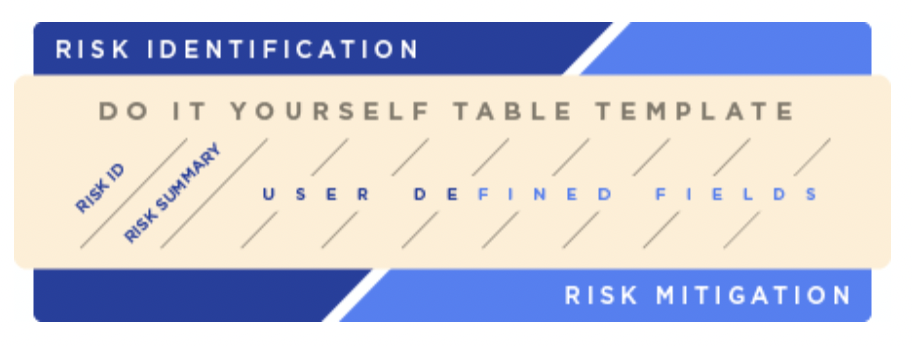
4. Do It Yourself template is for the occasions in which your risk process differs considerably from the earlier options. The only columns in this table will be Risk ID and Risk Summary, both of which are mandatory. Users can add any columns as they need to the table from thereafter.
Once you are ready with the selection of the table template and have pressed the “Submit” button, your project will be created and you can start with managing your risks.
 | Once the project is created, two new lines will have appeared on your Jira sidebar – Risk Matrix and Risk Table. First, take a look at the Risk Matrix. The matrix size is the one you selected earlier when creating the risk project. You can further customise it by adding or removing severity and probability levels, and by defining corresponding risk classes within the matrix cells. Make sure to finalise the matrix customisation prior to adding and managing risks as the risk classes will be automatically calculated in the risk table based on your configuration of the Severity and Probability levels as well as Risk Classes in the Risk Matrix. Be sure to also add description of the Severity and Probability levels as this information will be used later when the Risk Plan and the Risk Report are generated. See section (LINK) for further instructions. NOTE – when you make changes to the Risk Matrix after having identified and assessed risks, the data in the Risk Table may be affected. For example, if you remove a Severity or a Probability level, the risks that you had assigned to those levels will now appear as not assessed. After finalising the configuration of your Risk Matrix, you are ready to start managing your risks in the Risk Table which you can access by the Risk Table tab. You will see a spreadsheet view, pre-populated with the columns from the template that you selected. This is the Risk Table, your main workspace for identifying, assessing, mitigating and verifying your risks. |
2.4. Create the New Risk Project from an Existing Risk Project
This option provides you with the quickest way of creating a new risk project when you already have created some risk projects before. Choosing this option will copy the risk matrix and risk management table configurations together with the configuration schemes from your chosen existing project to the new one. You can customise the new project further as needed.
Risk data itself will not be copied from the existing project.
3. RISK MATRIX and Customisation
Before managing your risks, it’s best to configure your risk matrix as the risk class values are automatically assigned to your risks based on the setup of the risk matrix. Risk matrix configuration describes your risk Severity, Probability and Risk Acceptability Levels.
To be able to make changes to the Risk Matrix you will need to have Administrator permissions. To learn more about permissions, please read about them in the Risk Manager Security page.
Selecting the Risk Matrix icon on the sidebar, you will see two matrices – one for the initial risk assessment and the other for the residual risk assessment. The matrices are interlinked – if you configure one, the same changes will take place in the other. This is to keep the consistency of the assessment framework.
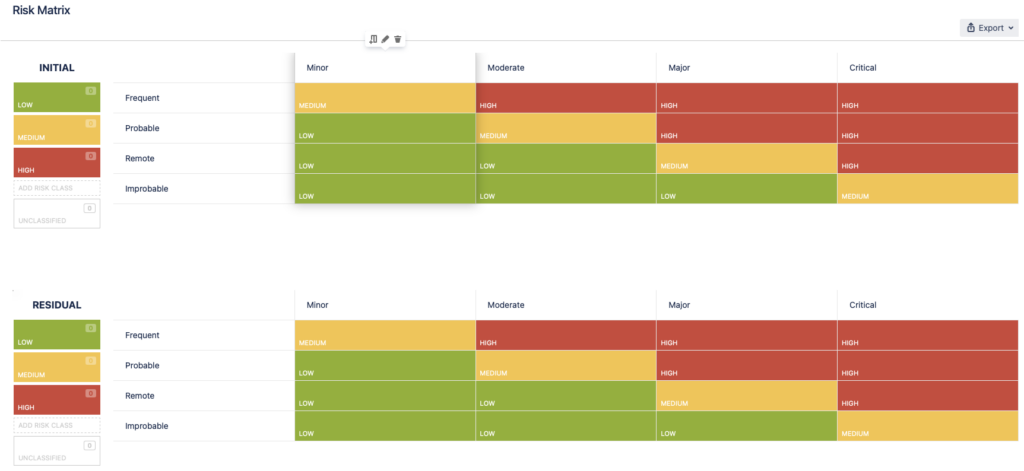
Hover across the Risk Matrix to access the editing options
The matrix is fully configurable. To edit the severity or probability levels and the risk classes simply hover over them and click on the pen icon.
Here’s what you can edit:
a) Add/Remove/Edit Severity Levels and their descriptions;
b) Add/Remove/Edit Probability Levels and their descriptions;
c) Add/Remove/Edit Risk Class values;
d) Change Risk Class values in the matrix.
4. RISK TABLE and Customisation
Now that you have finalised the configuration of the risk matrix, you are set to start managing your risks in the fully customisable spreadsheet view. The pre-defined templates are a good place to start to further customise the table to fit the risk management process of your organisation.
The Hazard Analysis and FMEA (Failure Mode and Effects Analysis) templates are from ISO 14971 and IEC 60812, respectively, pre-populating the risk table with minimum required set of fields as columns. Should you be working in a safety critical domain, these templates would be a great place for you to start. Hazard Analysis template provides you with a top-down and the FMEA template with a bottom-up risk analysis approach.
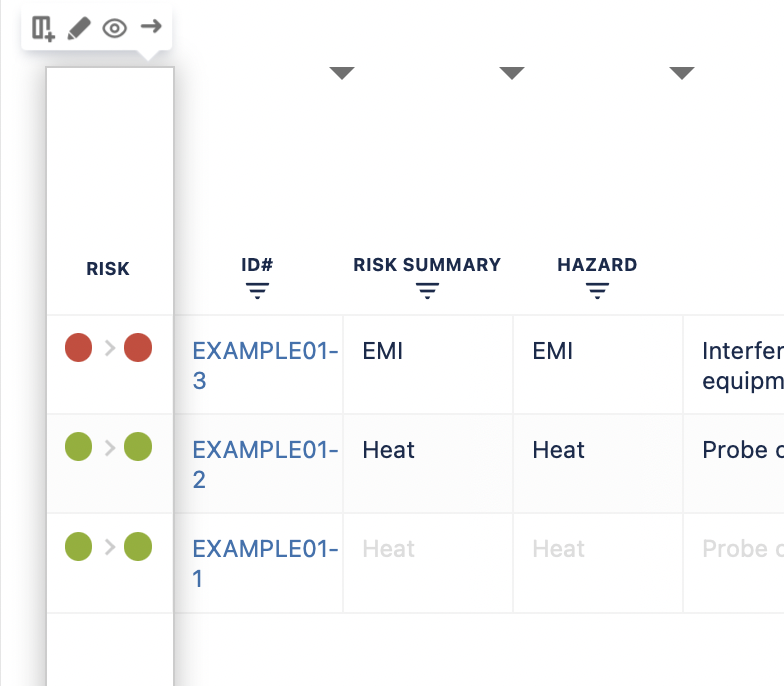
The first column gives you a quick overview of the status of the risk where the first bubble is the Initial Risk Class and the second bubble the Residual Risk Class, which if not assigned is grey. The left side of the table corresponds to risk identification ending with the Initial Risk Class calculation. The right side of the table corresponds to risk mitigation and verification ending with the Residual Risk Class calculation and automated traceability generation.

Here’s what you can customise:
a) Rename the column names and descriptions;
b) Add/Remove columns with different types (e.g. Text, Number, Date, Jira Issue Link, and a lot more);
Note: You cannot delete the mandatory columns of Risk Summary, Harm, Severity (Initial and Residual) or Probability (Initial and Residual); and Risk Class (Initial and Residual).
c) Hide columns for better general overview;
d) Change the column order by clicking on the right/left arrows in the floating menu that appear when you hover over the column header.
e) Resize the column width by dragging the triangles on the headers of each column to expand or decrease the column width.
f) Sort the data by a column of your own choosing. See further instructions here – sort the data.
You can access those actions by clicking on the menu that opens while hovering over the table header:
4.1. Add, Edit and Remove Risks
The Risk Management Table view is the main place for managing your risks.
HOW TO ADD A RISK
There are several options for adding new risks to the risk table:
1. Adding a risk manually
Click on the button “+ Add Risk” above the table. This creates a top row to the risk table with empty values. Fill in the necessary values and click “Confirm” on the floating menu or press “Enter” on keyboard to save the risk.
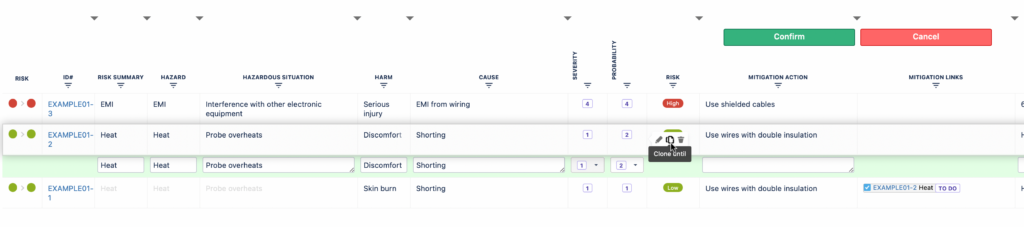
2. Clone a risk from an existing risk
Risk cloning is a useful feature if you have more than one risk with the same Hazard, Hazardous Situation, or more. Often one Hazard can have different Hazardous Situations causing different Harms. It is therefore most convenient to copy all the values up to a certain point (certain cell in the row) for similar risks and fill in the rest of the fields that may be different.
In order to do this, use the “Clone until” feature from the floating menu.
Note: The cell where you choose the “Clone until” button from will be the last of the copied cells in the new risk row that is created.
3. Import risks from another system or project
If you have not yet added any risks to your project, then quick links to risk/issue import are available. If you choose to import risks from other systems (e.g. csv file, excel, other issue management systems) follow the import instructions that Atlassian provides for Jira import.
HOW TO EDIT A RISK
Editing a risk in the Risk Management table is simply done by clicking on the row where you need to edit or using the keyboard shortcut for it.
Here are all the keyboard shortcuts you may want to use when managing your risks in the Risk Table view:
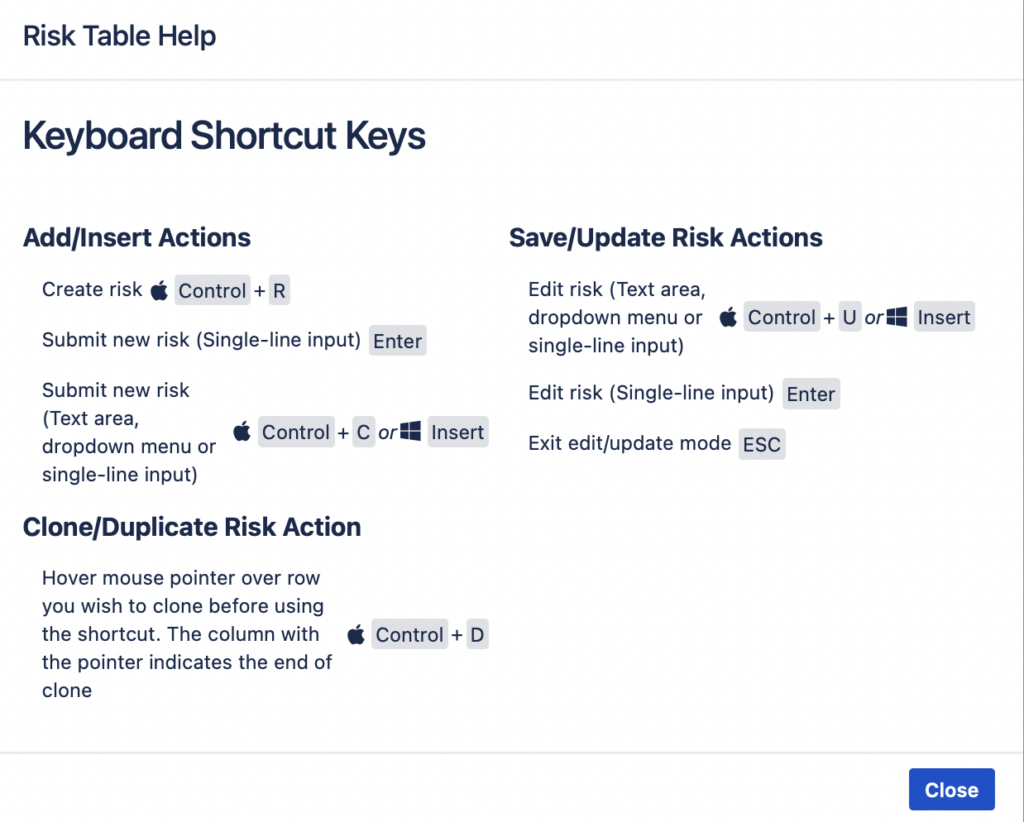
To save entered text in a cell, press “Enter”; to delete, press “Escape”.
Note: For “Severity” and “Probability” field values, double-click “Enter” to save the value.
HOW TO REMOVE A RISK
To delete a risk from the Risk Management table, select the risk from the table by hovering on it with a cursor. Then click on the “Delete” button of the floating menu.
Note that the risk itself will not be deleted! It will be changed from “Open” status of Jira issue workflow to the “Done” state. This provides you with an option to undo the delete action by opening the Jira issue view and manually changing the issue status back to “Open”.
4.2. Assign Risk Classes
After you have selected the “Severity” and “Probability” values for your risk, the risk classes will be assigned automatically according to the specific Risk Matrix of the risk project. You cannot assign the risk class manually. When the “Severity” and “Probability” values are not assigned, the Risk Class will show “TBD” (To Be Determined).
This applies for both initial and residual risk assessment.
By default, the first column of the Risk Table gives you a quick overview of the status of the risk on that row. The first coloured bubble corresponds to the Initial Risk Class value and the second bubble to the Residual Risk Class value. Grey bubbles mean that the value has not yet been assigned to the risk.
4.3. Mitigate Risks
When an identified risk is on an unacceptable level, the risk will have to be mitigated. Once you have defined the mitigation action, you will need to assign it to the risk. One way to mitigate a software risk (to lower the risk class to acceptable level) is described by another software function, i.e. the assigned mitigation action is a software requirement.
There are two columns for adding mitigation to the risk table. One (“Mitigation Action”) for entering free text – a short description of the mitigation activity, and the other (“Mitigation Links”) for including links to the requirements (Jira issues) from a different Jira project.
You can also create a new Jira issue from the risk table yourself, using the “+” sign next to the Mitigation links column.
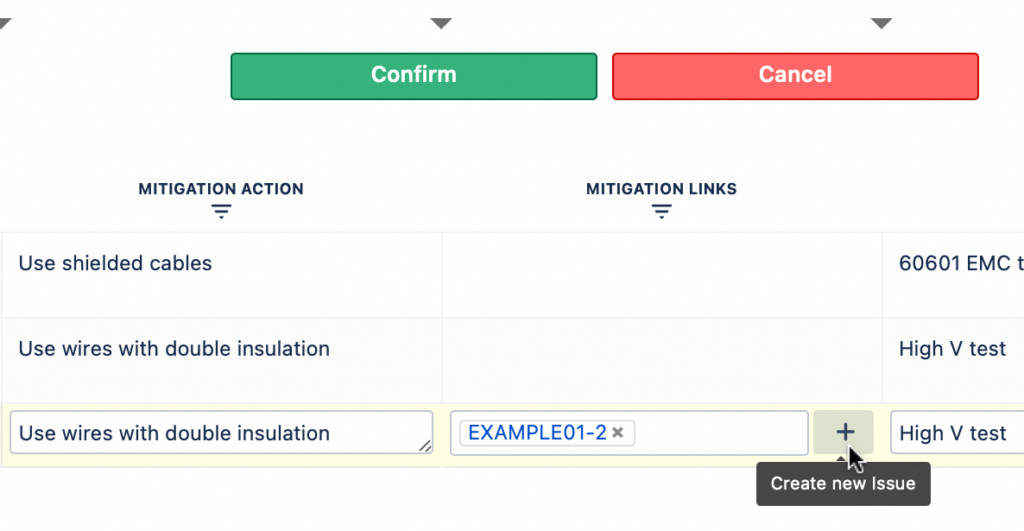
Note: In the Risk Table you can see the mitigation action issue key, issue summary and issue status. This provides you with a quick overview if actions are done, in progress, or still in the to do list.
4.4. Verify Mitigation Actions
In order to make sure that the mitigation actions that you have assigned to the risk are lowering the risk class as you expected you will have to test them. Similarly to mitigation columns, the verification actions can also be added by using the two designated columns of Verification actions. There is one column for entering free text (Verification) describing what tests are being done. And the other one for adding links (Verification Links) to the test cases from a software test project in Jira.
You can also create a new test case from the table itself by using the “+” sign next to the “Verification links” column.
Note: In the Risk Management table you can see the verification action issue key, issue summary and issue status. This provides you with a quick overview if tests are done, in progress, or still in the to do list.
4.5. Assess the Residual Risks
Now, that you have completed your initial risk assessment and defined the mitigation activities and verified their effectiveness, it is time to assess the residual risks. By entering the Residual Severity and Probability values, the residual risk class is automatically assigned to the risk.
You will be able to see the overview of the assessment row-by-row in the first column “Risk” and a complete overview of the initial and residual risks on the Risk Matrix view.
Risk Column in Risk Table
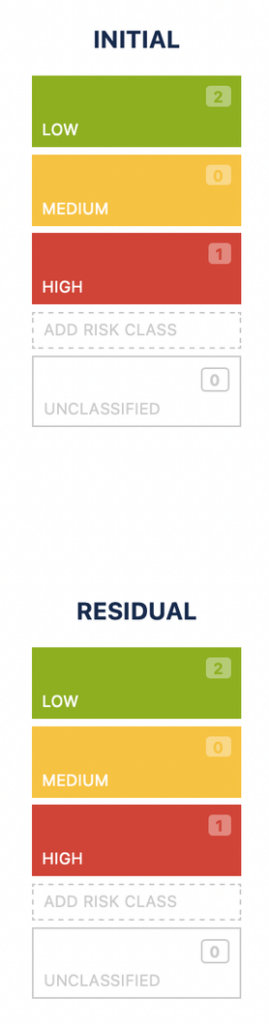
Risk Matrix view (note the count of risks in each cell)
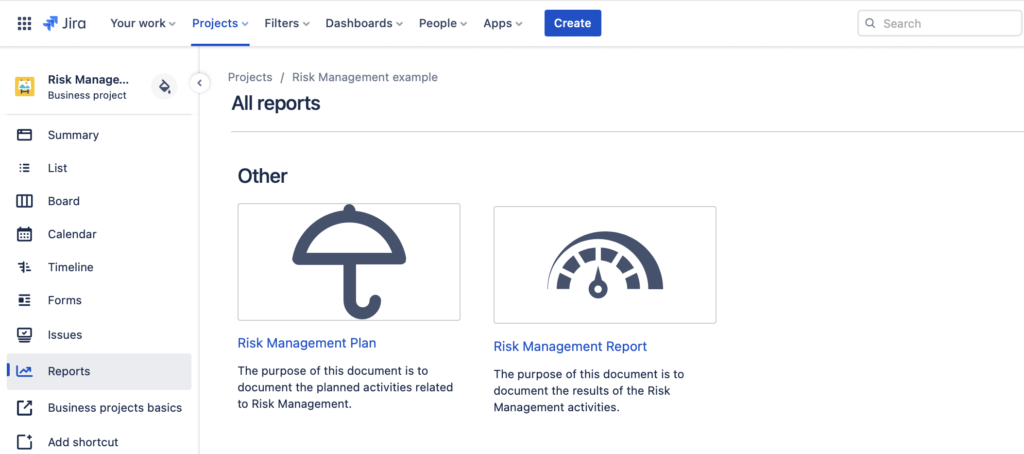
5. RISK REPORTS
There are several risk reports in the SoftComply Risk Manager.
Regardless of the platform and tools you use in addition to the SoftComply Risk Manager, you will be able to report risks in these built-in reports:
- Risk Management Plan (automatically includes the configuration of the risk matrix, i.e. risk classes and acceptance criteria, and the severity-probability values)
- Risk Management Report (automatically includes the initial and residual risk matrices together with assigned risk class values).
Both of these documents include guidelines on how to finalise the risk reports to meet the requirements of ISO 14971.
Those reports can be finalised when exported to Word or PDF. Since this is not always the ideal option, here are additional options for reporting risks – the first one for Confluence Cloud users & the second one for Jira Server/Data Center users.
5.1. Risk Reports in Confluence
Should you be using Confluence, you may want to try the SoftComply Risk Manager for Confluence Cloud free extension to report your risks.
With this app you are able to create and customise Risk Reports in Confluence by adding the Risk Matrices and Risk Tables on your Confluence pages.
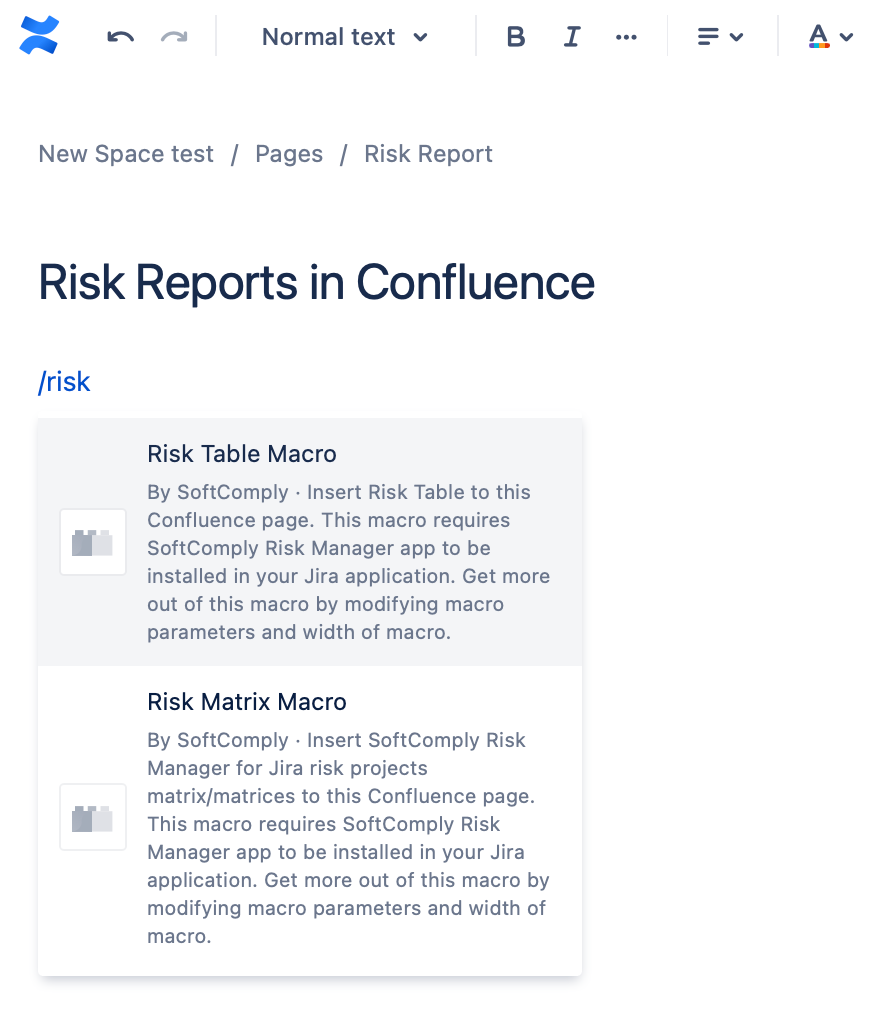
To learn more about how you can display the risks in Confluence, please continue to the SoftComply Risk Manager on Confluence Cloud.
5.2. Risk Reports in Risk Manager Server and Data Center
There are four additional reports available for the SoftComply Risk Manager app on self-hosted platforms (Server and Data Center).
Risk Matrix and Risk Table Reports display the risk matrix and the risk table, respectively.
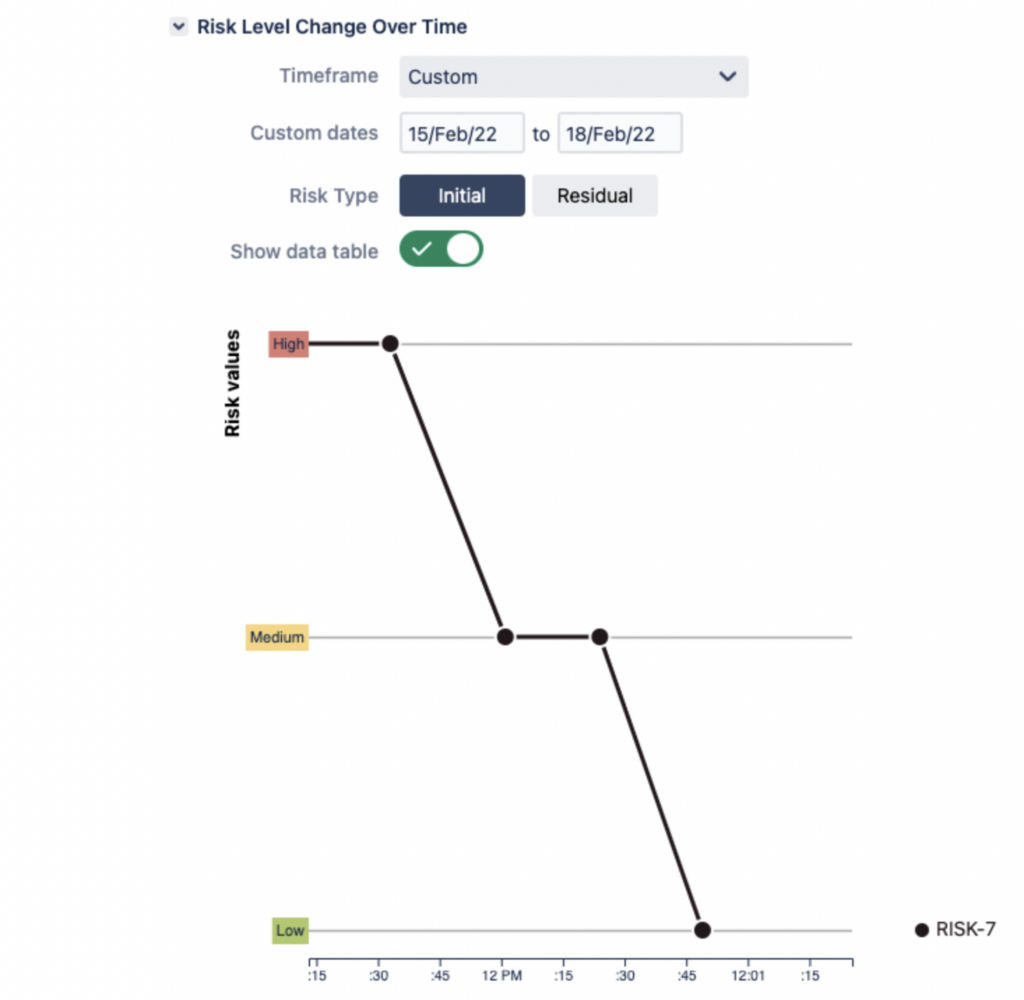
Risk History Report provides a graphical presentation of your risk assessment process over time:
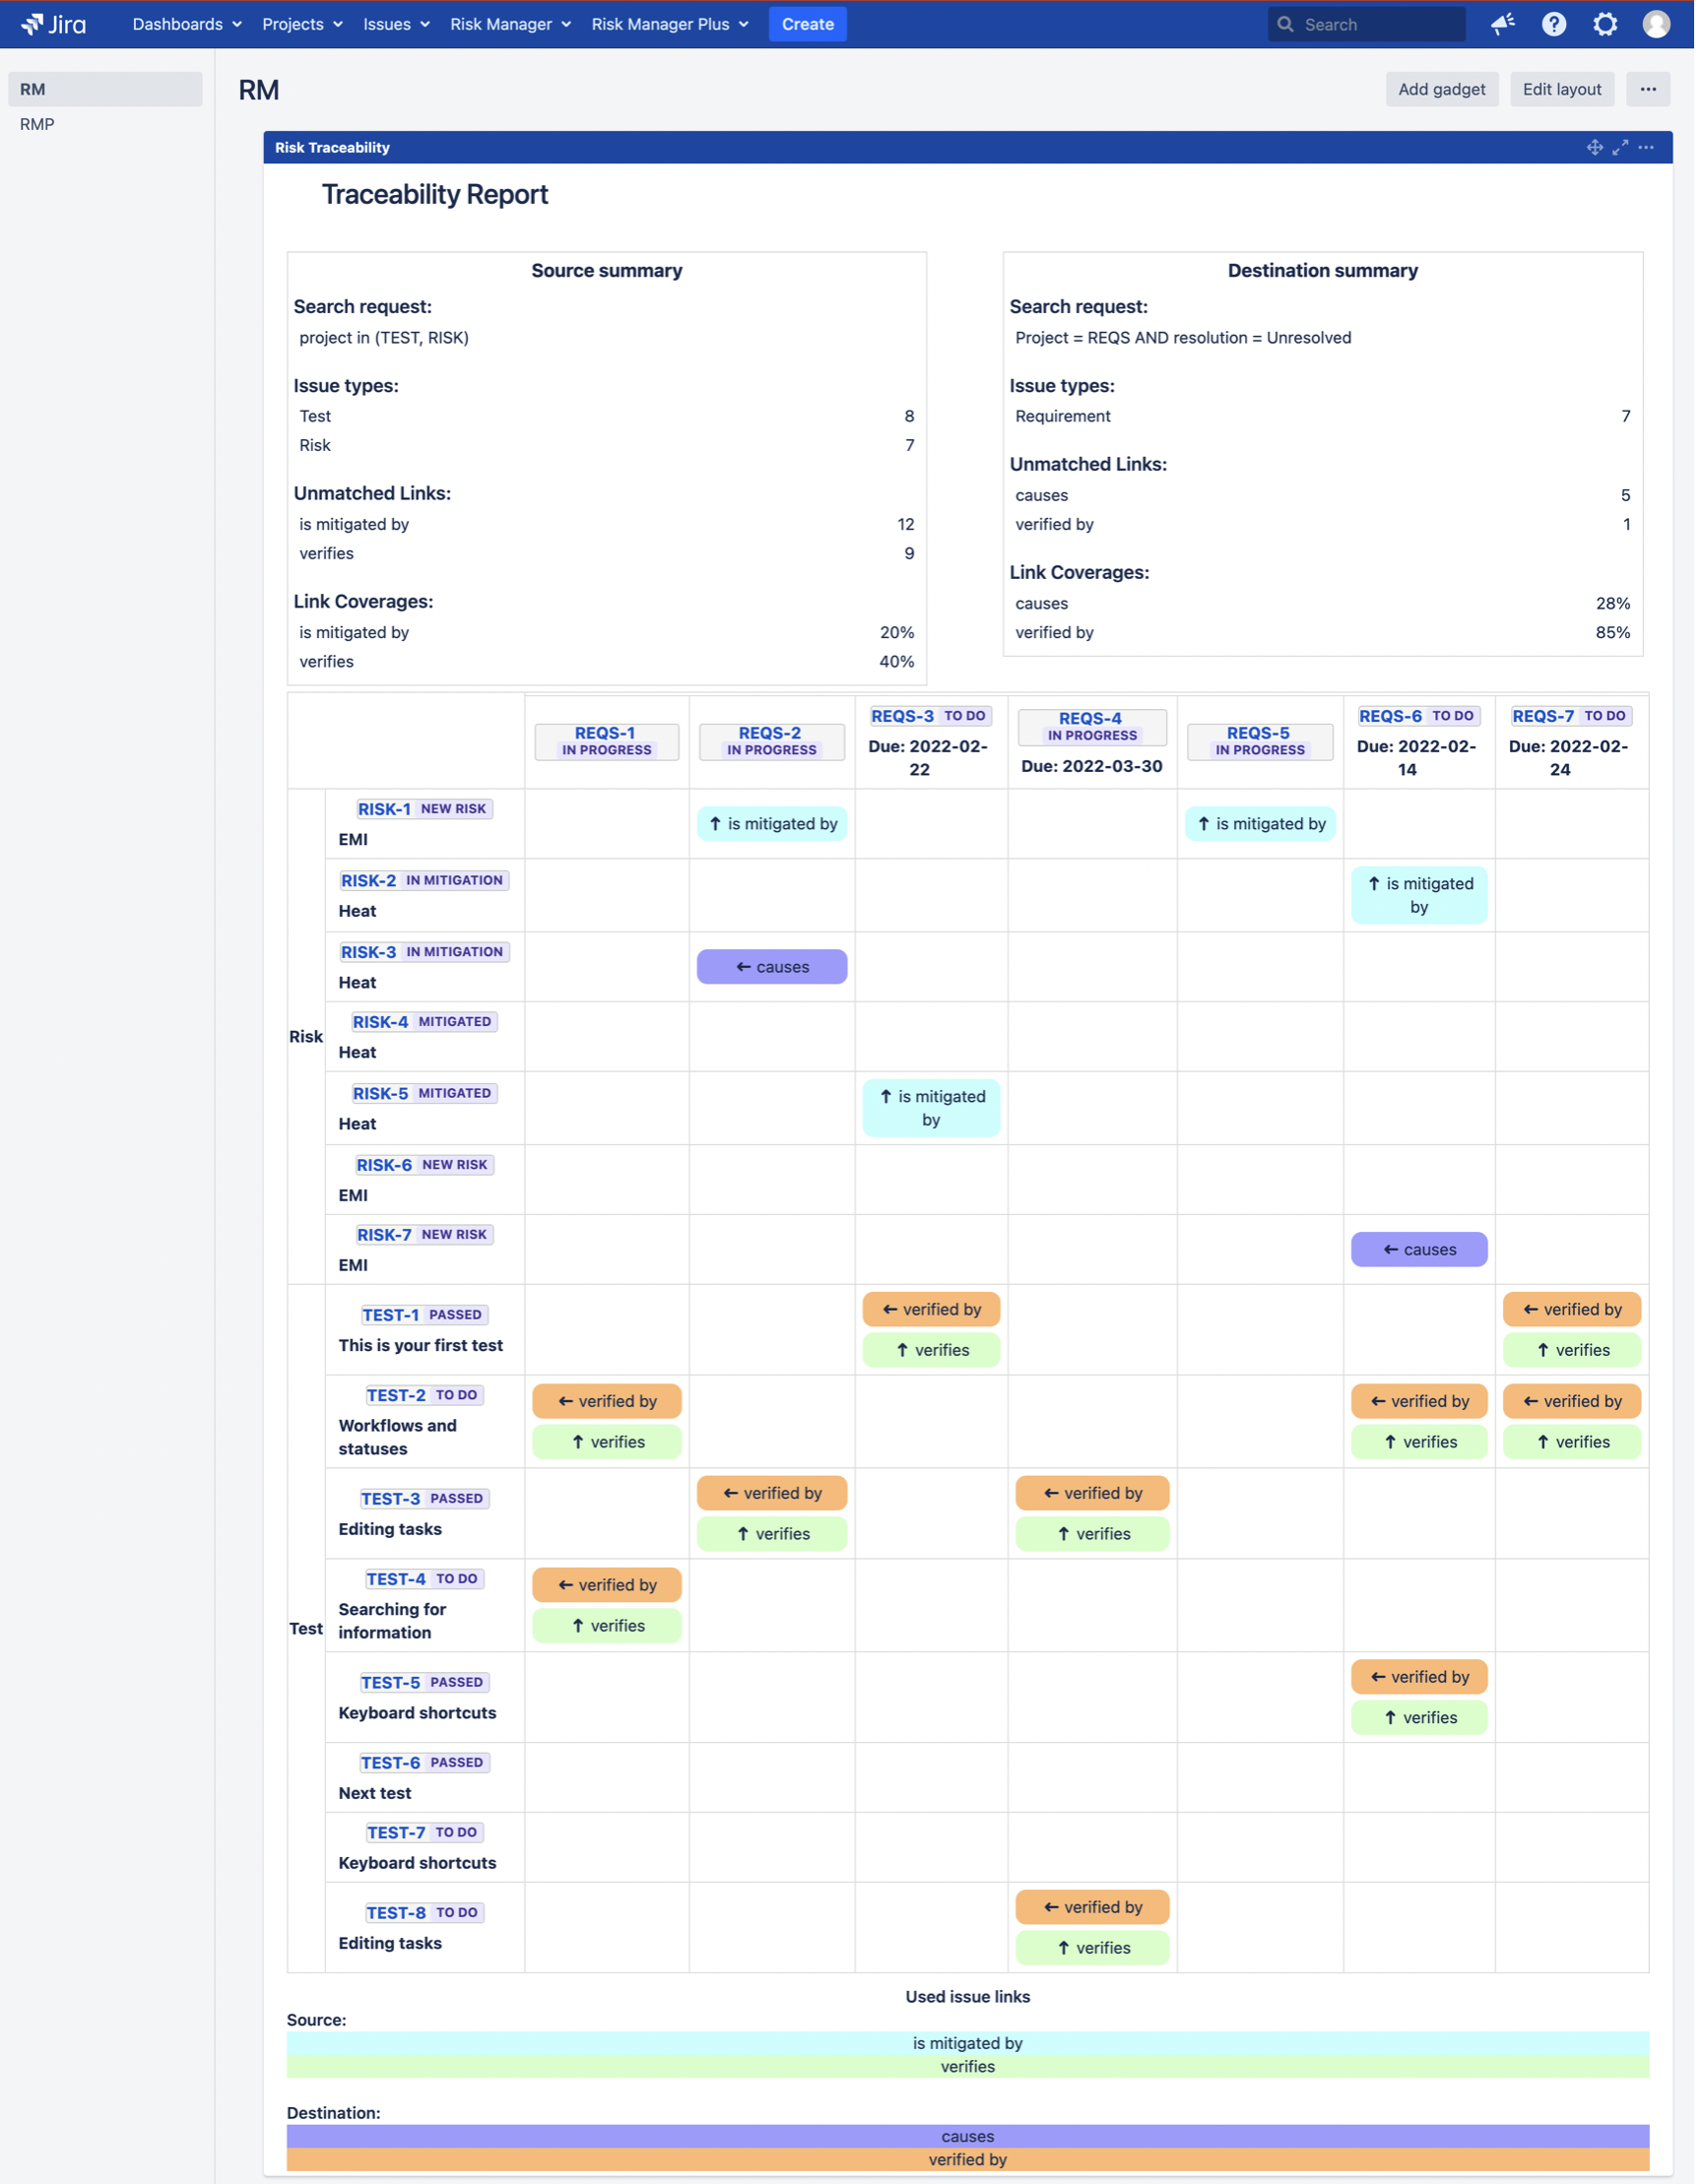
Risk Traceability Matrix Report for a full overview of all the links to and from your risks as you want to display them, e.g. mitigation and verification actions.
See further from a blog post: How to Report Risks in Jira – SoftComply
6. BOOK A DEMO
In case you would like to learn more about the SoftComply Risk Manager, you are most welcome to arrange a LIVE DEMO of the app with the SoftComply team.