
Introduction
Risk Traceability is a great way to get a quick overview of the completeness of risk management process and it is often used in the regulated industries. The traceability matrix shows the coverage of risks by mitigation and verification actions. For example, in the medical device industry, both the FDA and ISO 14971 require bi-directional traceability to be established between risks, requirements and tests.
SoftComply Risk Manager and Risk Manager Plus apps on Jira Server and Data Center can generate a Risk Traceability Report automatically for you.
Risk Traceability report is provided in the format of a two-dimensional traceability matrix displaying the link type (e.g. “is mitigated by”) and the direction (small arrow pointing to the target) between risks and other Jira issues of your choice. The matrix is fully customisable and the user can specify the risks and Jira issues to be mapped as well as the link types to be displayed.
Risk Traceability report can be viewed either in Jira Dashboard or in the custom Risk Reports view.
Following is a STEP BY STEP GUIDE TO GENERATING A RISK TRACEABILITY REPORT using the Risk Manager Plus app on Jira Server/Data Center. Exactly the same steps can be followed when generating the Risk Traceability report using the SoftComply Risk Manager app on Jira Server or Data Center.
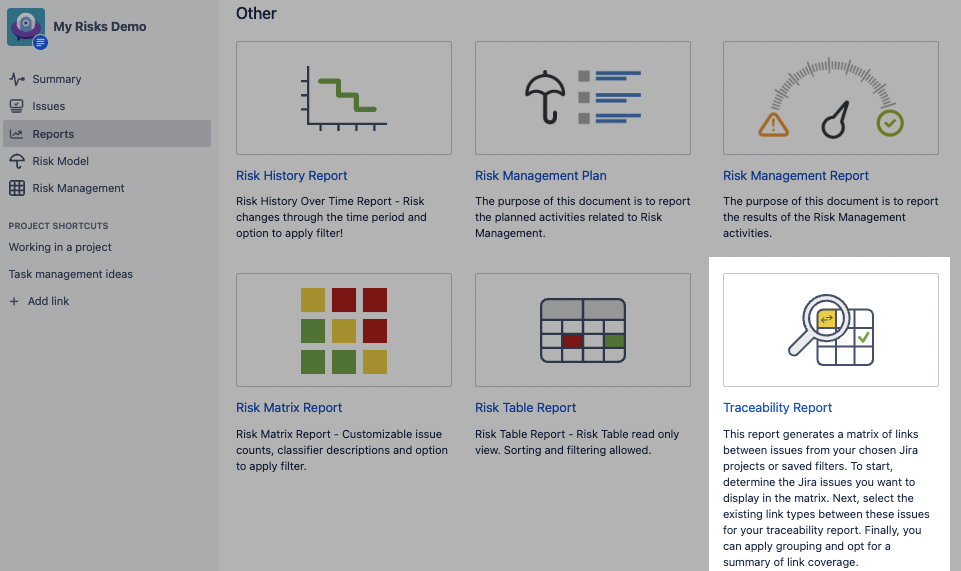
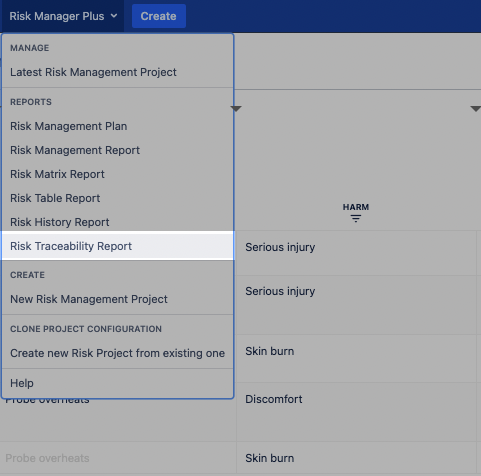
To start, you will need to SELECT THE RISK TRACEABILITY REPORT either from the Reports menu on lefthand menu bar or from the dropdown list of reports in the Risk Manager Plus toolbar menu.
Once the report has been selected, you will be taken on the Traceability Report configuration page. Here you can determine the Jira issues and the link types that you wish to display in the Traceability Matrix.
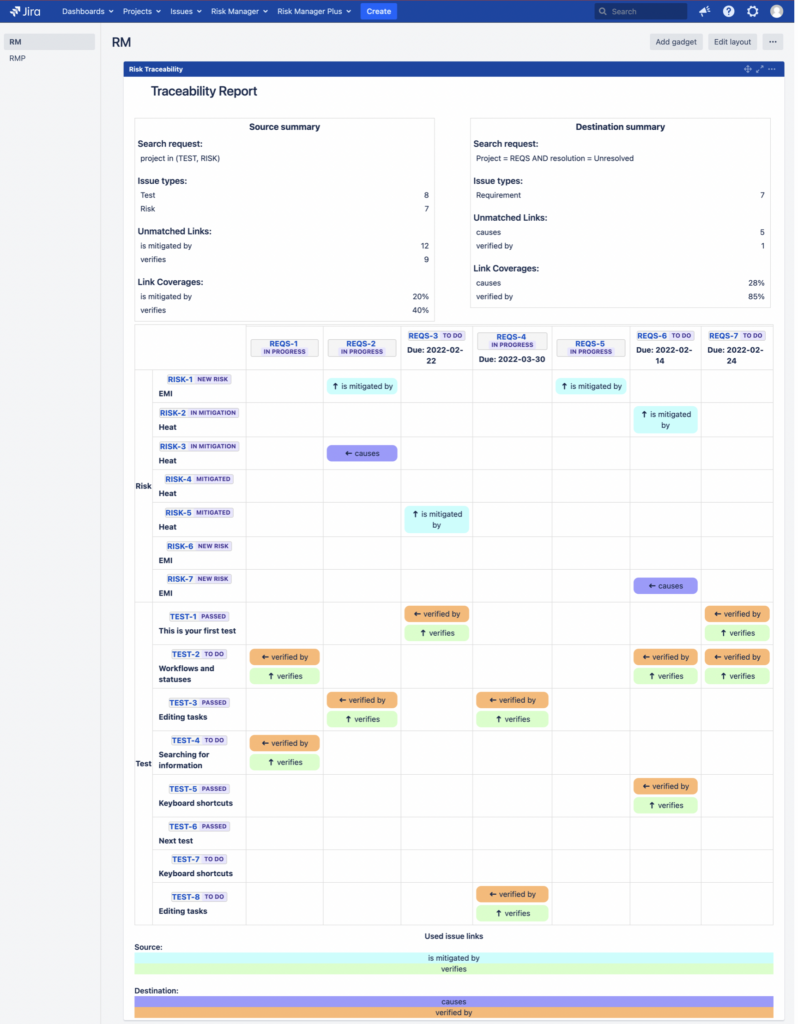
Traceability Report
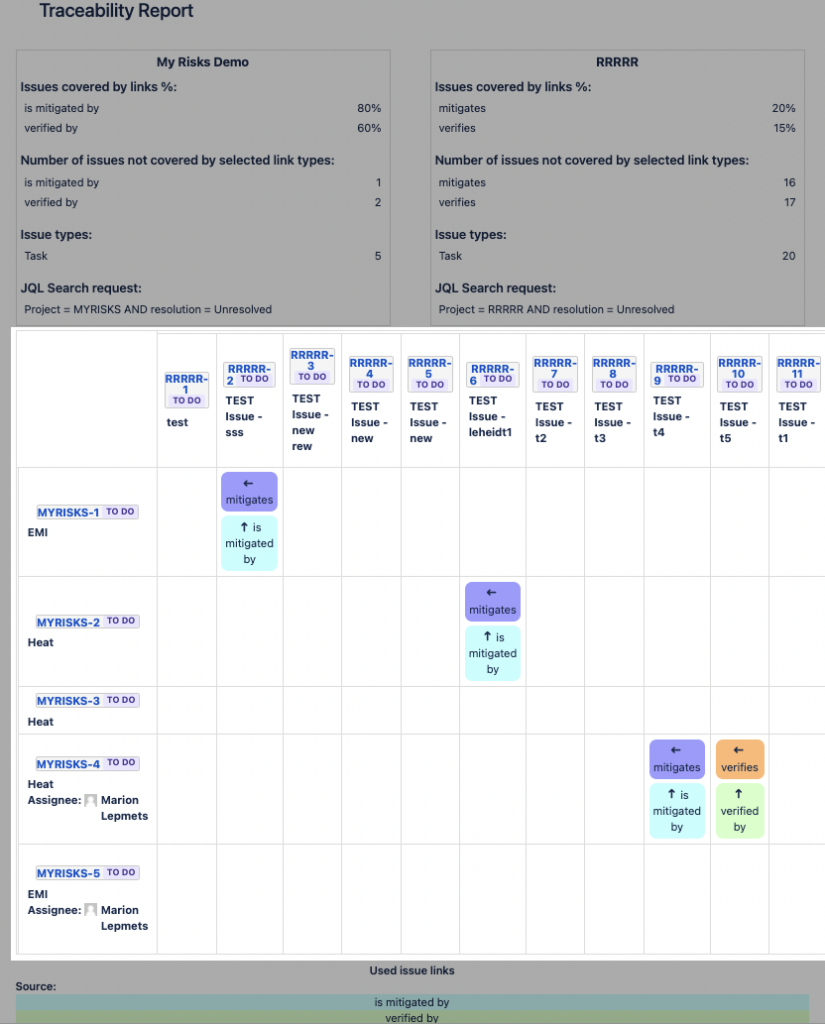
The Traceability Report itself can be viewed as having 2 parts – the summary of your chosen Jira issue coverageby selected link types (the overview table above the matrix itself) and the Traceability Matrix view below the summary table.
Above the Traceability Matrix, there is a SUMMARY OF THE JIRA ISSUE COVERAGE that provides you with an overview of your chosen Jira issues’ coverage by the selected link types:
Below the issue coverage summary, there is the TRACEABILITY MATRIX VIEW of the Traceability Report itself:
 How to Configure the Traceability Report
Next is a step by step tutorial on how to configure the Traceability Report in order to get the most useful information into the report.
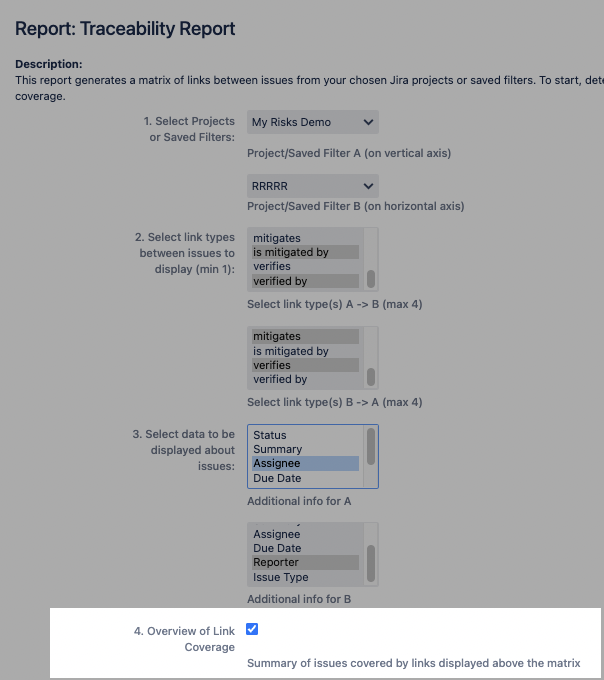
(1) THE FIRST STEP is to DECIDE WHICH JIRA ISSUES you would like to display IN THE TRACEABILITY MATRIX, i.e. between which Jira issues do you want to display the links in the matrix. Once you know that, you can choose either the Jira project or the Saved Filter for your chosen Jira issues.
The Jira issues you choose first (“Project/Save Filter A”), will be displayed on the vertical axis and the Jira issues chosen next will (“Project/Save Filter B”), be displayed on the horizontal axis. Should you wish to change the issues on the axis, simply swap the chosen projects in this configuration dialogue step.
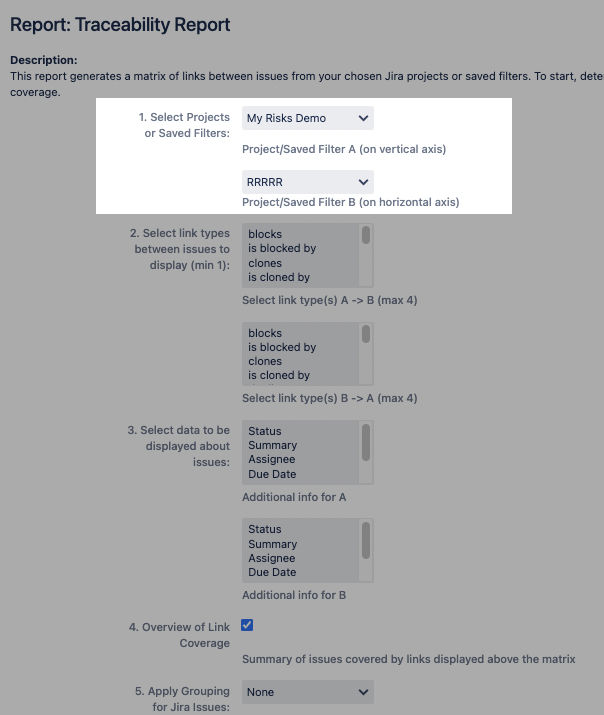
Now you have chosen the issues which will be displayed in the Traceability Matrix.
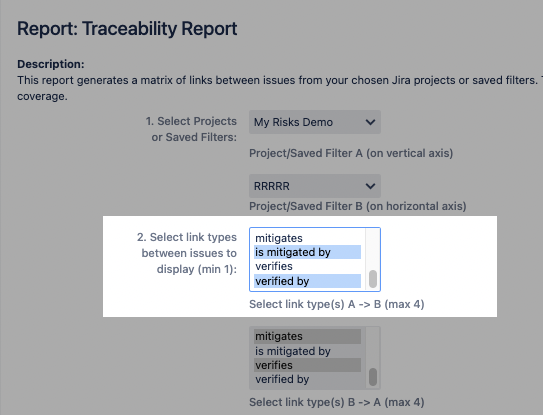
(2) NEXT, you will need to SELECT THE LINK TYPES that you would like to see displayed BETWEEN YOUR CHOSEN JIRA ISSUES in the Traceability Matrix.
Note that all existing link types across your Jira instance are displayed in the provided dialogue box. To make sure that you get the most relevant data in the Traceability Matrix, it is best to check the existing link types in your risk project.
Once you have decided the link types you would like to see displayed, note that the first dialogue box will show these link types with the direction from your chosen project/saved filter A to project/saved filter B.
Each link type has two link directions between issues in Jira – “is linked by” & “links”.
Link direction is important in the Traceability Matrix as it will provide you with the information about the issue coverage by your selected link type with the direction that you have already used in the Risk Manager project.
As an example, in a risk project, you will first identify a risk and assess its initial risk class value. To mitigate that risk, you will most likely choose a requirement from another Jira project. The risk now has a link “is mitigated by” your chosen requirement. You now have the issue from Project A (your risk project) and the issue from Project B (your requirements project), the link type between them (mitigation) with the direction from Project A to B (“is mitigated by”) as the risk from Project A is mitigated by the requirement from Project B.
As you will move to test the requirement to determine that it mitigated the risk as you had envisioned, you will most probably use the link type “verification” and the link direction of the requirement “is verified by” a certain test case.
In our case, the chosen link types will be “Is Mitigated by” and “Is Verified by” with the direction from A to B, which means that the Traceability Matrix will display all the issues from Project “My Risks Demo” that have the link type “is mitigated by” and “is verified by”.
Side note: to select multiple link types (max 4 can be selected), press Command or Ctrl key when choosing the link types.
You have now selected the most important data for your Traceability Matrix – the issues, the link types and the link direction between them. This is the core to display the issue coverage data by your chosen link type to make sure your risks have a mitigation action and a verification action linked to them.
(3) As a THIRD STEP, you can select ADDITIONAL DATA you may want to display in the Traceability Matrix ABOUT THE JIRA ISSUES you have chosen previously.
The first dialogue box provides you with choices of additional info for your selected Project/Filter A and the second box for Project/Filter B.
Additional information you can choose from is: Jira issue Status, Jira issue Summary, Assignee, Due Date, Reporter and Issue Type.
Side note: Choose only the most important data that you want to add to the issues displayed on the axis for the best readability of the Traceability Matrix.
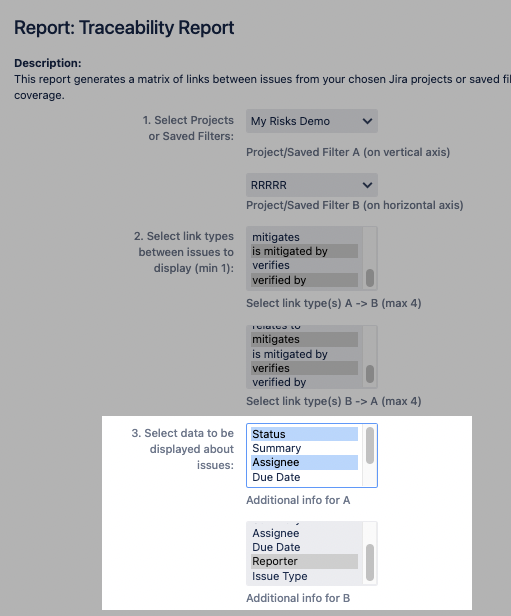
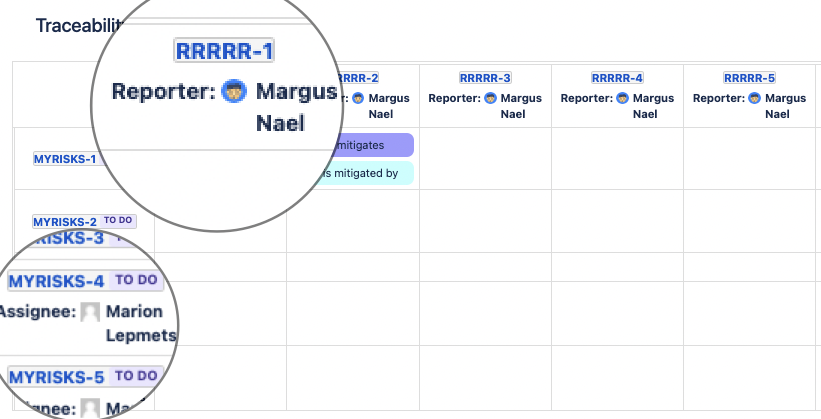
Following is a screenshot of how the issues are displayed in the Traceability Matrix when you choose to have Assignees and Issue Status for Project A (My Risks Demo) and Reporter for Project B (requirements project):
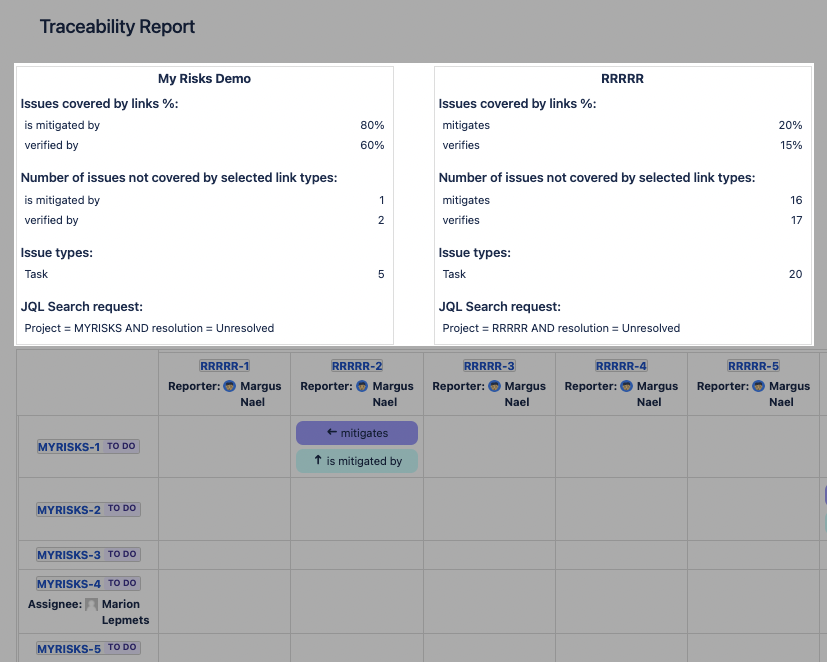
(4) As the FOURTH STEP, you can OPT IN or OUT of having JIRA ISSUE COVERAGE summarised above the Traceability Matrix itself.
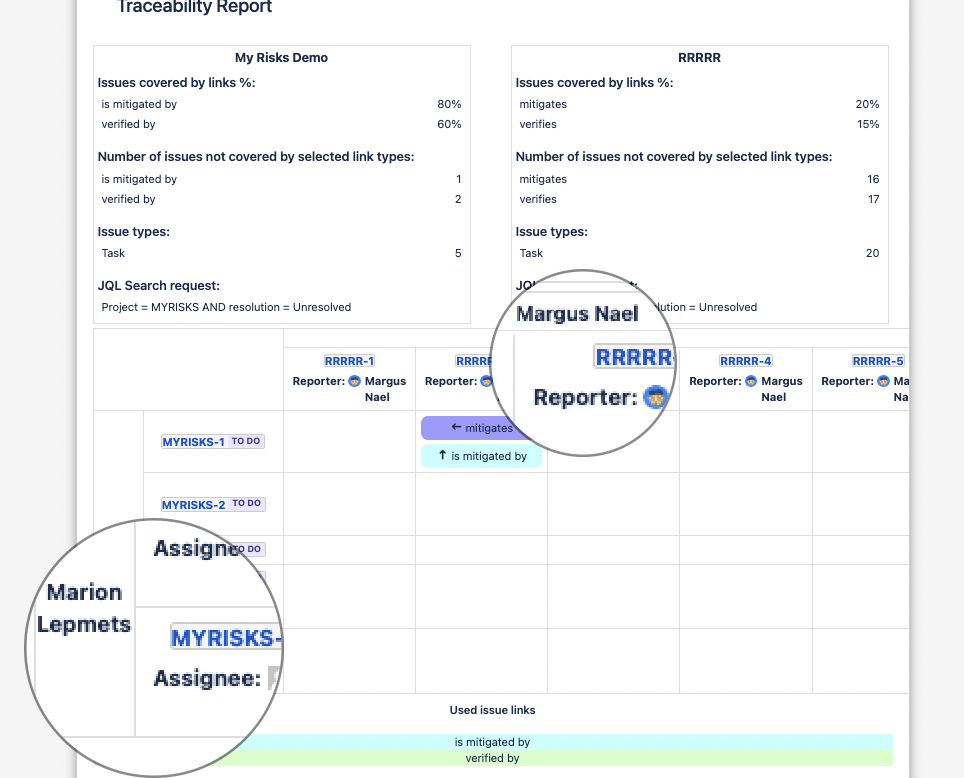
Issue coverage provides you with the following information about both of your chosen projects of saved filters:
a. Percentage of issues covered by the selected link types, e.g. 80% of risks in My Risks Demo project are covered with link type “is mitigated by”.
b. Number of issues not covered by the selected link types, e.g. 1 risk in My Risks Demo project is not covered by “is mitigated by” link type.
c. The issue type or types in the chosen project or saved filter, e.g. the only issue type in My Risks Demo project is “Task” and there were altogether 5 risks.
d. Finally, the exact JQL search request has been provided below about your chosen issues. This enables you to verify the exact query behind the data in the Traceability Report.
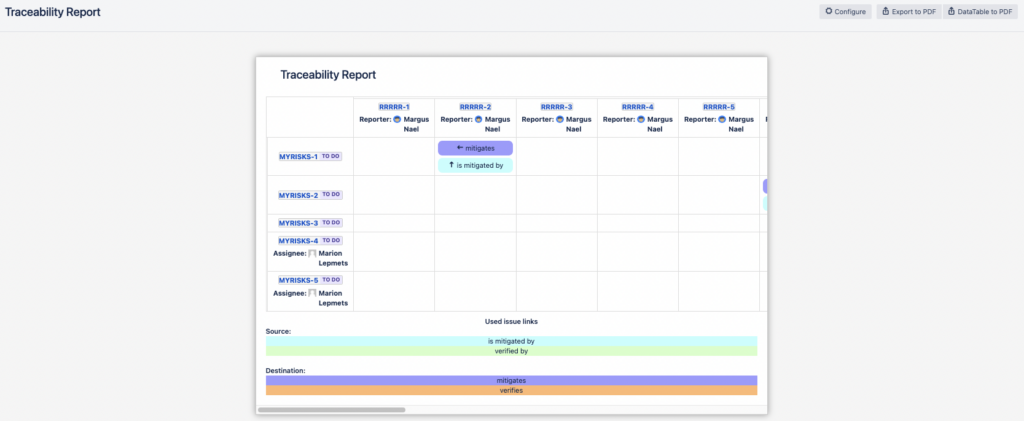
When you opt out of the coverage summary, the Traceability Report will only display the Traceability Matrix as seen on the screenshot below:
(5) FINALLY, you can GROUP the chosen JIRA ISSUES in the TRACEABILITY MATRIX by any field that you wish like Status, Version, Component, Jira issue type or Reporter.
In the screenshot below, we have chosen to apply grouping for Jira issues from Project A by Assignee and for Jira issues from Project B by Reporter:

Once the selection is confirmed, the Jira issues have been grouped by Assignee on the vertical axis and by Reporter on the Horizontal axis as seen on the screenshot below:
In addition to Jira reports, the Traceability Report can also be displayed in your Jira Dashboard. Same configuration details apply there.
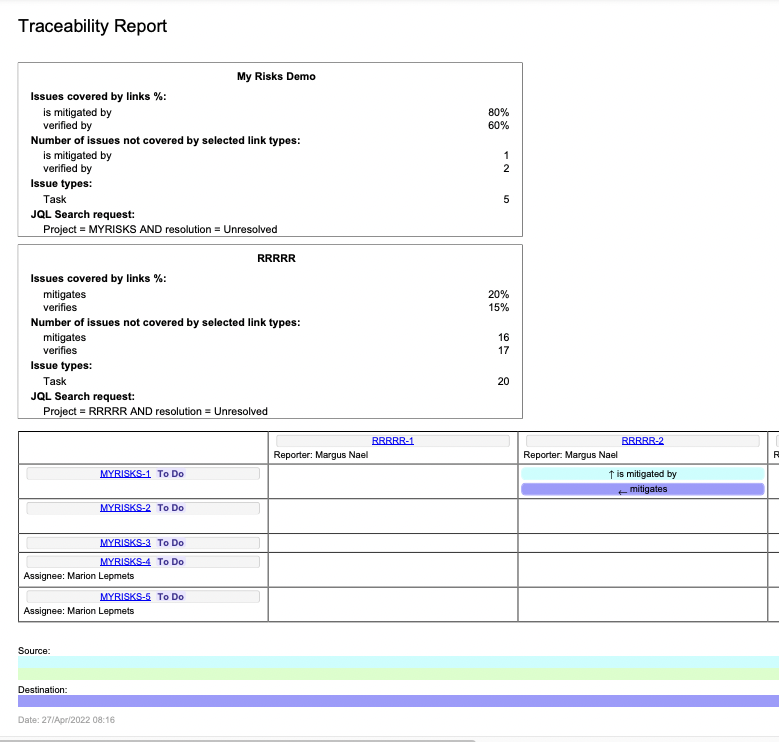
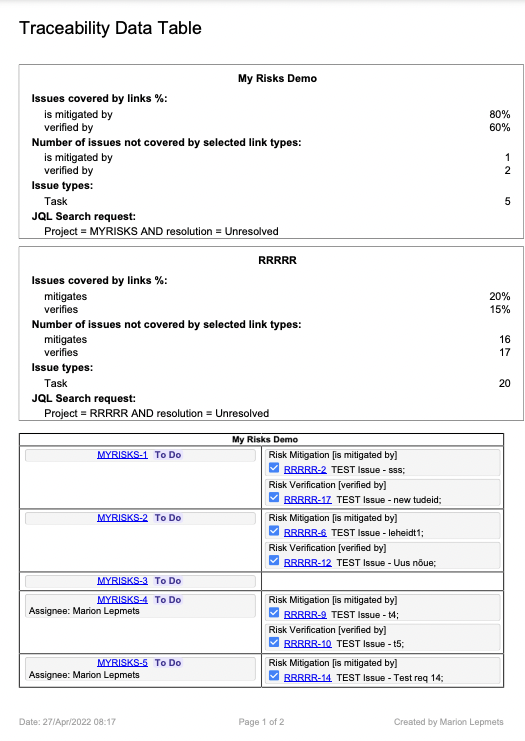
You may also want to export the Traceability Report to PDF format. There are two options to do that: either simply export the Traceability Report to PDF format or create a Data Table of the Traceability in pdf format. The former is more visual while the latter is more informative.
EXPORT of the Traceability Report in the PDF format:
DATA TABLE of the Traceability Report in PDF format:
Summary
You now have created your first Risk Traceability Report with the SoftComply Risk Manager or the Risk Manager Plus app on Jira Server or Data Center.
For additional tips and tricks on how to customise or use automation for your risk management, please check out other articles in our Knowledge Base.
In case of any questions about the Risk Manager apps, feel free to book a demo call with us.
By Marion on 27 Apr 2022