1. QUICK START GUIDE
- Open (or create) a Jira Project in which you want to manage your risks.
- Find the “Risk Management“ tab from the Project panel.
- Click on the, Risk Model“ and Enable a risk assessment model for your Project, choosing from the list of available Risk Models.
- Next, you will be guided by the tool to choose a Risk Table from the list of table templates to manage your risks.
Here is a short video tutorial walking you through the steps listed above – SoftComply Risk Manager Quick Start Guide:
2. SET UP YOUR RISK PROJECT
2.1. RISK MODEL and Customisation
A Risk Model determines the way you assess the risks – the number of risk characteristics you need and the risk evaluation method that you use.
You can create your own Risk Models from scratch, just follow the guided Create Model configuration. The existing Risk Model Templates can be fully configured, following the steps below:
- Go to “Apps” → “Risk Manager Plus” → “Risk Models” page to create your own risk models or to edit any of the existing Risk Model Templates provided.
- All Risk Model attributes are customisable, i.e. you can add and name your own Risk Characteristics (classifiers like Probability, Impact, Detectability, etc), define Risk Classes, Risk Assessment Iterations (steps like Initial, Current, Target, etc).
You can also follow this short video tutorial to set up and customise your Risk Models in the Risk Manager Plus:
Risk Models are all global templates for your team(s) working in your Jira instance and they can be used in any of the Jira projects in which you manage risks.
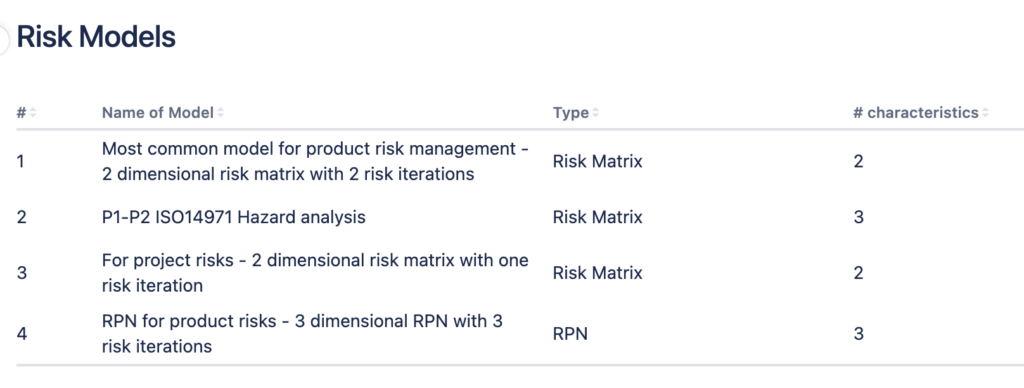 Define your own Risk Model or choose one from the listed templates
 Define the number and names for your Risk Iterations following the wizard
Unlimited configurability:
- You can have many risk assessment models in one Jira project.
- You can assess one risk (Jira issue) in different ways (multiple risk models assigned to risks).
- You can use different risk models for different risks (Jira issues) inside one Jira project.
2.2. RISK TABLE and Customisation
A Risk Table provides you with an overview of your risks in a familiar spreadsheet format – you can work on your risks either in this Risk Table view or in a Jira issue view one risk at a time, as each risk is an individual Jira issue.
A Risk Table in the SoftComply Risk Manager Plus can have several sheets to best organise your risks. You can define and name each Table sheet yourself.
You can create your own Risk Table from scratch or you may customise the existing Risk Table templates provided:
- Go to “Apps” → “Risk Manager Plus” → “Risk Tables” page to create your own Risk Table or edit any of the existing Risk Table Templates provided;
- You can also add sheets (tabs) and define columns as you would in Excel;
- Next, connect your Risk Table with a Risk Model and assign the Jira fields (column types) to your table columns for additional information about your risks;
- Each Table sheet in your global Risk Table can be connected to a different Risk Model, making it easy to work with different Risk Models in a single risk project (e.g. you can conduct Hazard Analysis on one sheet and FMEA on the other sheet).
You can also follow this short video tutorial in creating and configuring your Risk Tables in the Risk Manager Plus app:
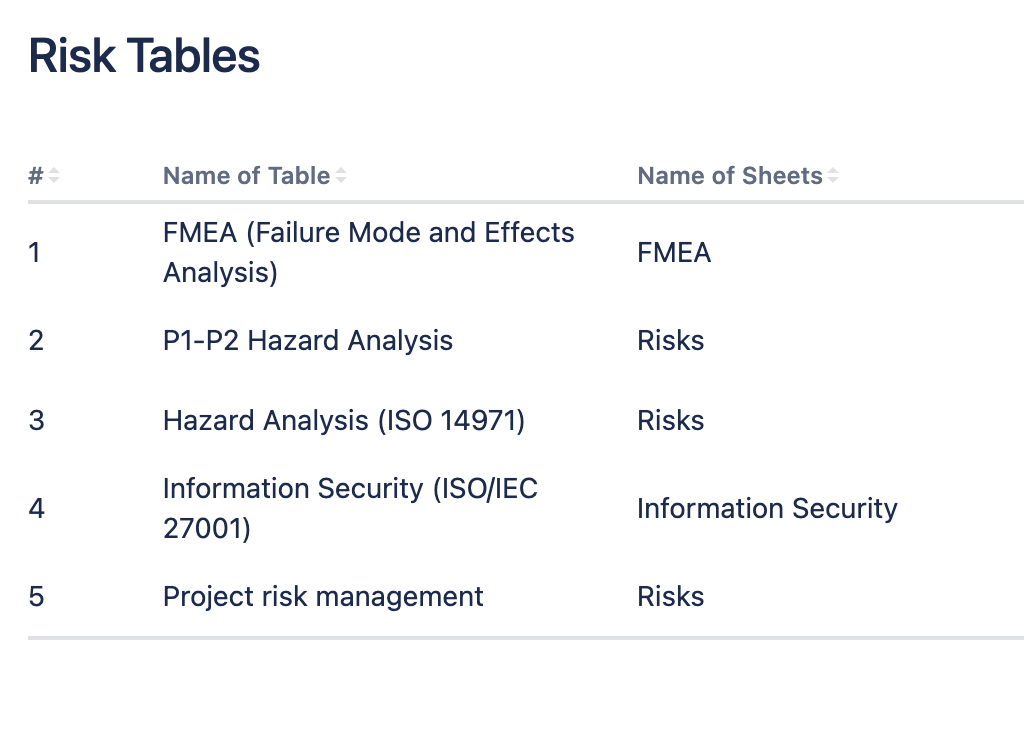 List of global Risk Table templates, their sheets and number of Jira projects the Risk Table template is assigned to
2.3. OBJECT REGISTERS and Customisation
Object Registers are a feature of Risk Manager Plus Cloud that allows you to create custom data structures (i.e. data tables) and link these structures to Jira issues like you would link other issues. Custom data structures are like database tables that you can build inside the Risk Manager Plus application. When these registers are filled with data you can link Jira issues with data objects. In other words, the registers are like complex customisable dropdown lists you can use as Jira issue fields.
There are many benefits of using Object Registers and its data, e.g. in ISO27001 there are IT risk controls. Each Control object has: Reference to ISO standard, Clause, Objective and Control description. You can list all of them to one dedicated register and reuse them in multiple risk projects. Same applies to the Hazards in ISO14971 risk management. Each Hazard can consist of Title, Group and other data fields.
You can also follow this short video tutorial in creating and configuring your Object Register in the Risk Manager Plus app:
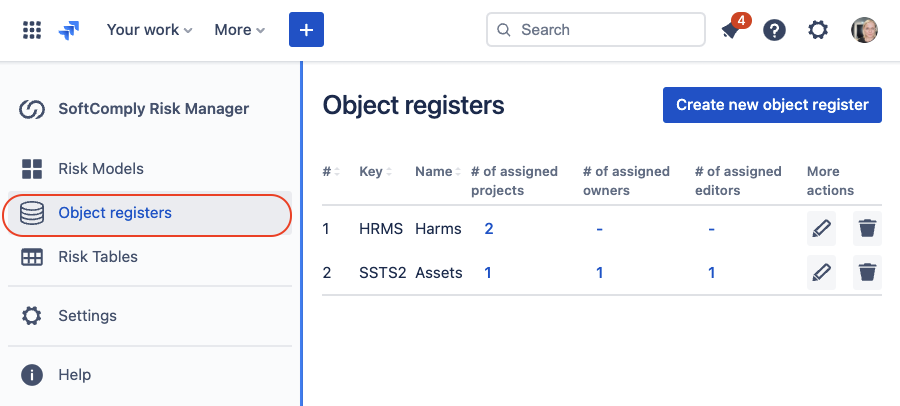
First, navigate to the Risk Manager Plus App page and select Object Registers from the left menu.
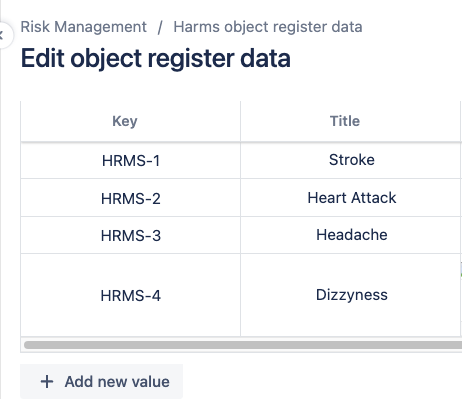
Next, you can create a new register and enter the details about your objects in it.
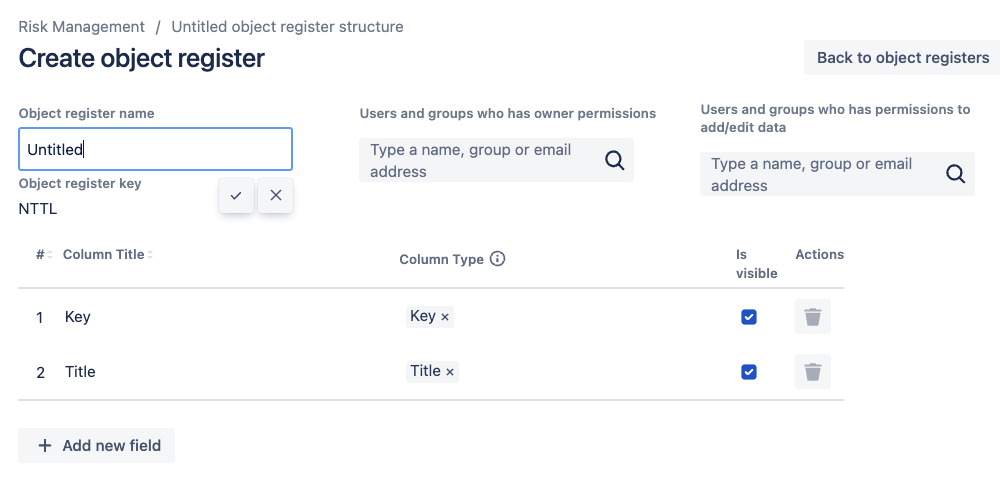
You can add fields to the register yourself to include all the data that you wish the objects to have in the register. The “Title” field will be visible in your Risk Table, so make sure you give each object a title you will later recognise:
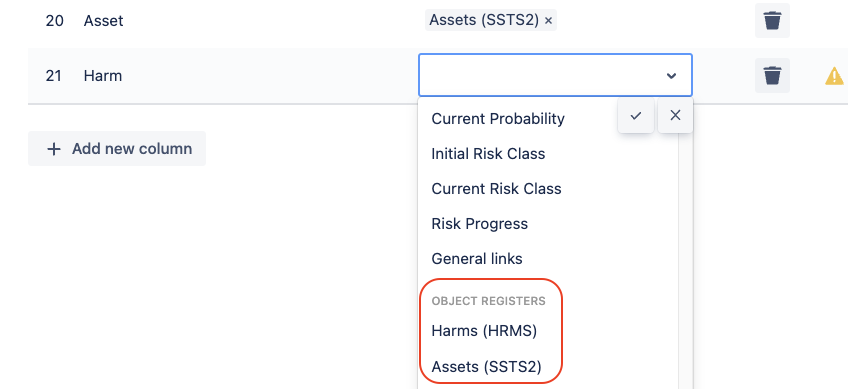
Make sure to include the Object Registers field(s) to the Risk Table template:
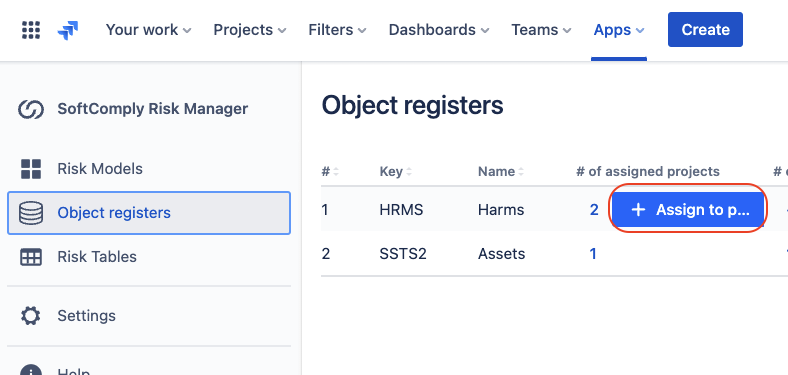
And then link the Register to a Project where you wish to use it – simply select from the list of projects. Make sure to assign the Risk Table template where you have added the Object Register fields to the same project.
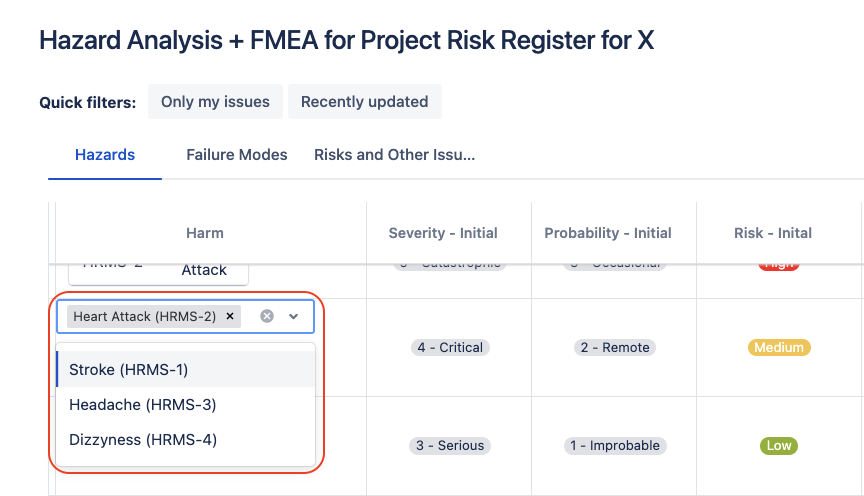
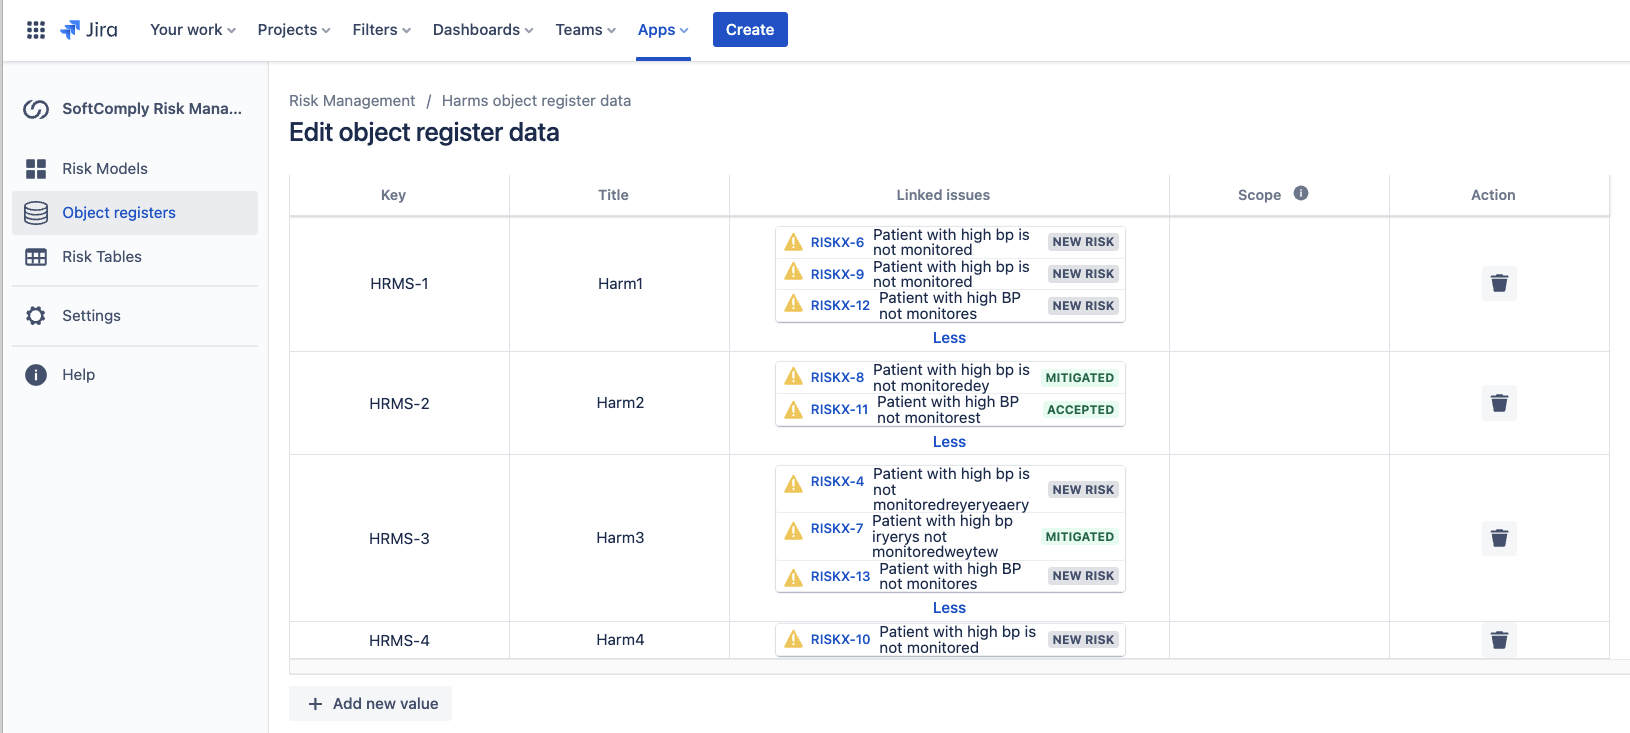
You can now start filling in your data in the Project Risk Table view:
After having entered the data to your project and linked different Objects to Risks, you will have a full overview of the risk coverage on the Object Register’s global page. You can also add links to existing Risks directly from here:
2.4. ASSESSING RISKS in Risk Table or Jira issue view
Once your risk project, risk model, risk table and object registers are set up you are ready to start creating and assessing your risks.
You can do that directly inside the Risk Table view by using the “create” button and setting the risk values in the corresponding table cells:
Creating and Assessing Risks in Risk Table View in Jira
Alternatively, you can enable Risk Panels in Jira issue view and assess your risks directly inside the Jira issue view:

Setting Risk Values in Risk Panel inside the Jira issue view
2.5. Enabling INFORMATION SECURITY & CYBER SECURITY templates
The SoftComply Risk Manager Plus app includes the full functionality of the SoftComply Information Security Risk Manager App to support you in compliance towards ISO/IEC 27001.
In order to enable the Information Security & cyber security Templates, please go to the top menu in Jira and select Apps > SoftComply Risk Manager Plus > Settings and scroll down to the Templates Library.
You can install the required templates:
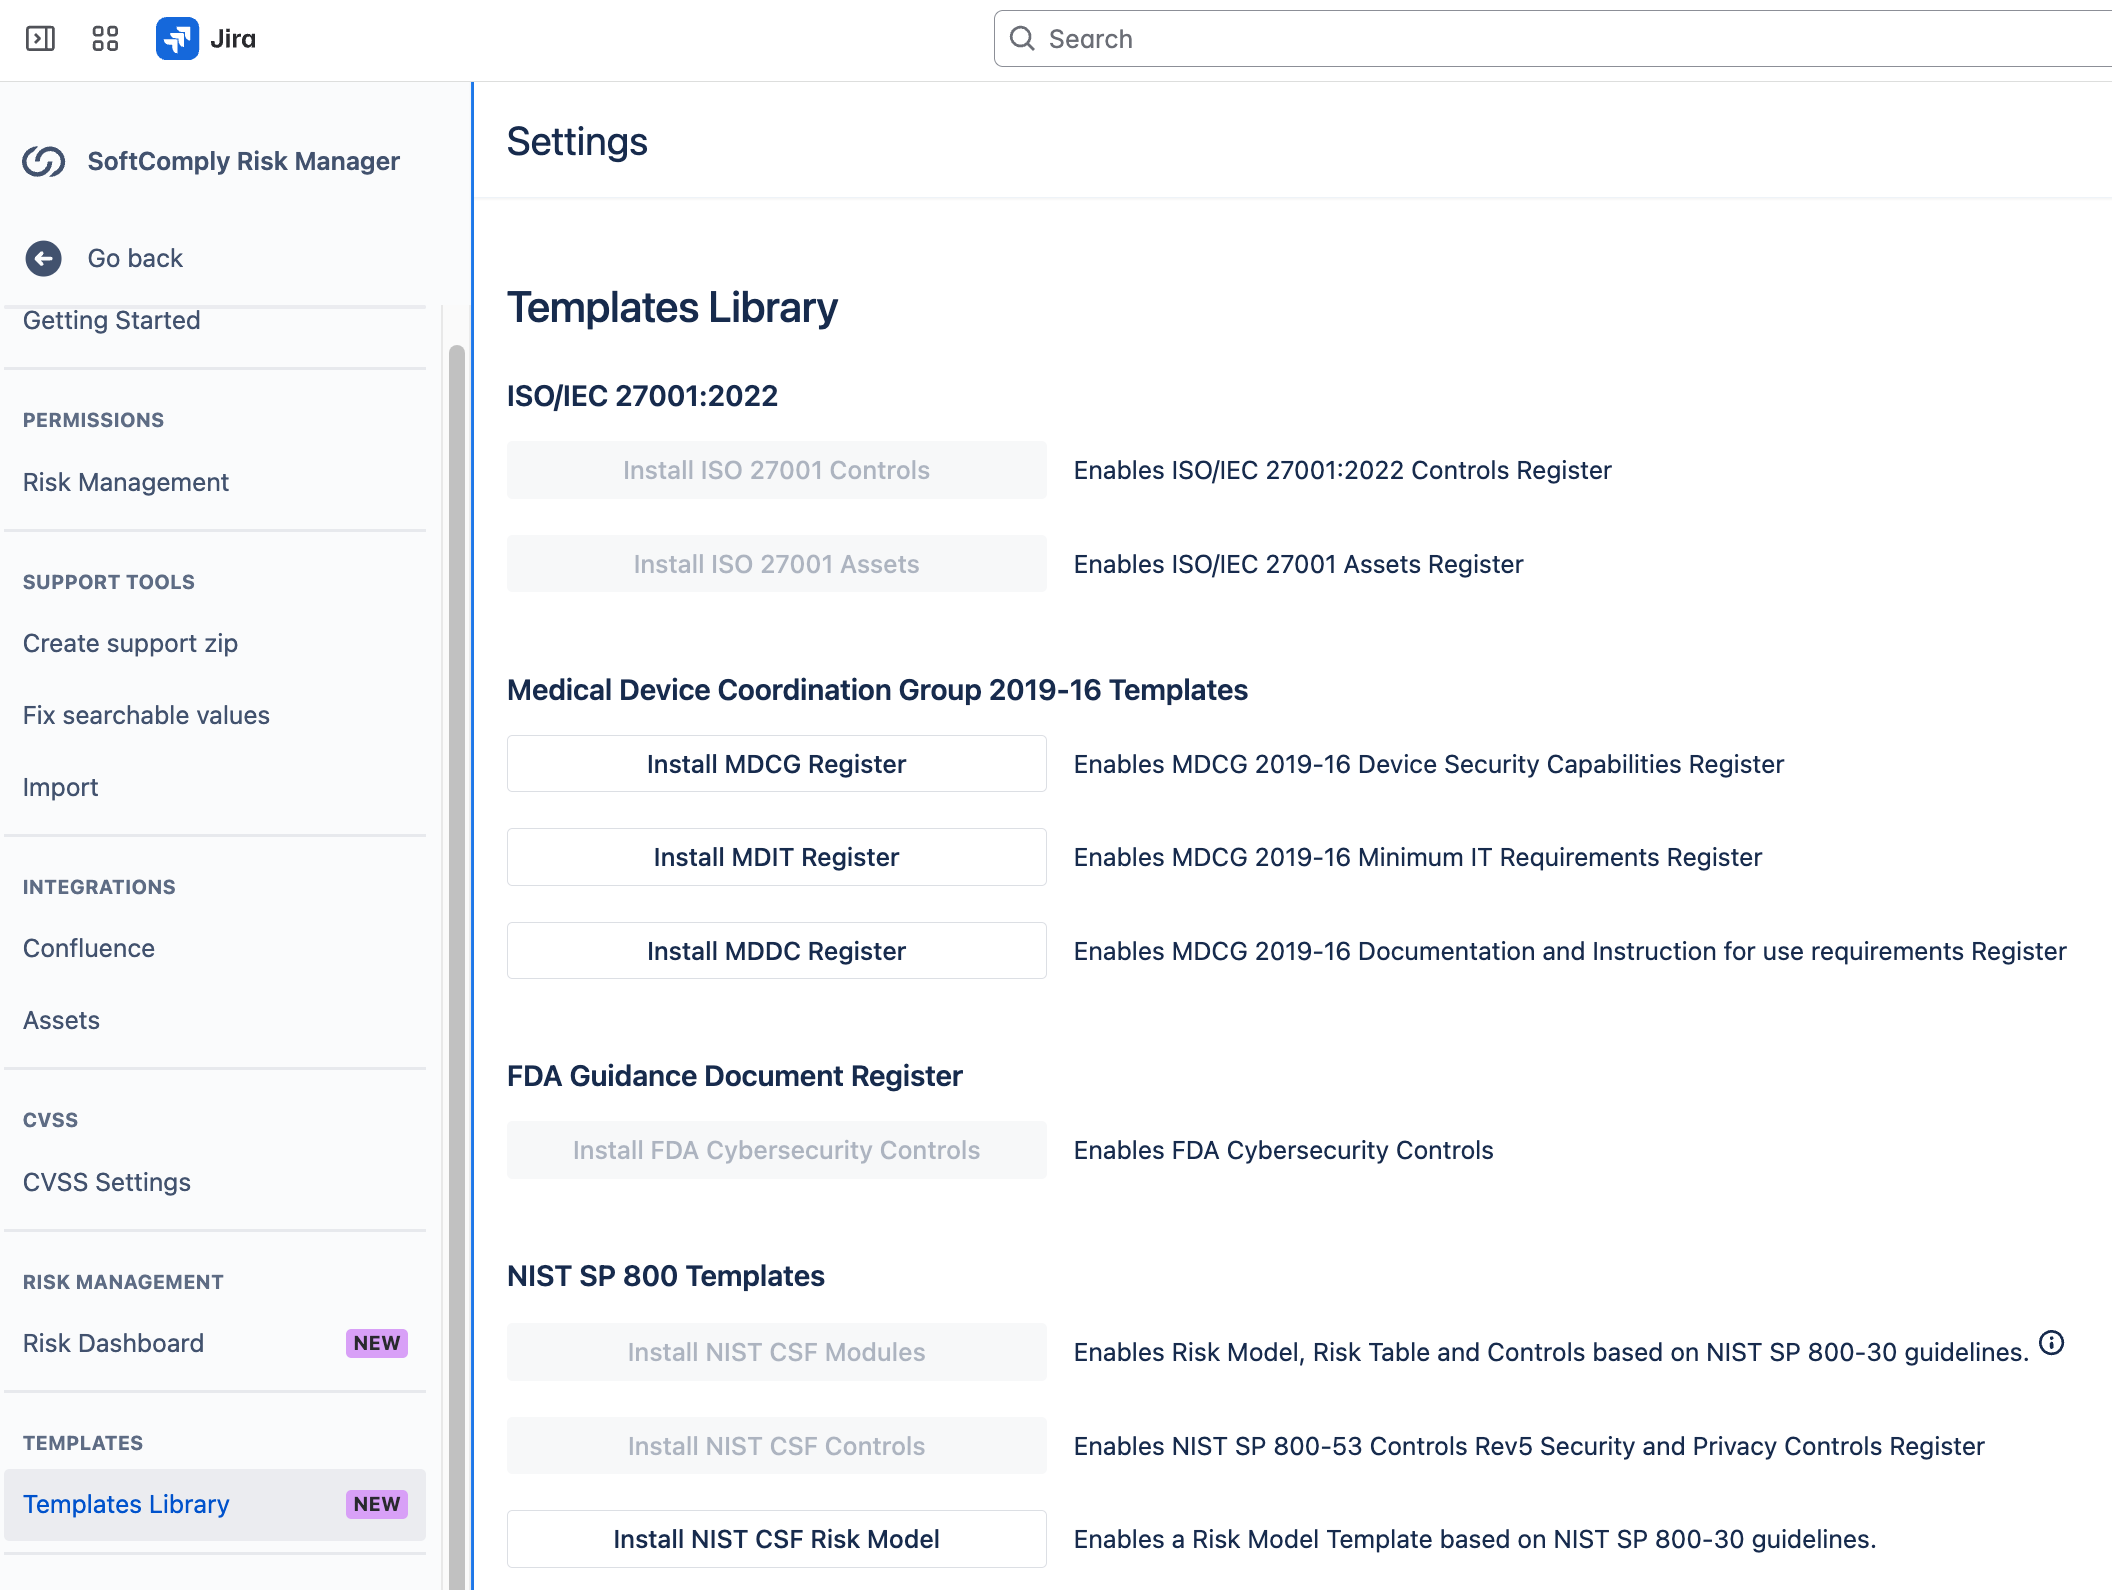
After installing the components, you will be able to use the pre-populated Controls (in Object Registers) and pre-designed Risk Model and Risk Table templates.
2.6. CVSS Metrics
The Common Vulnerability Scoring System (CVSS) Settings page in Jira allows you to manage the CVSS version used for assessing the characteristics and severity of software vulnerabilities. Follow these steps to navigate and configure the CVSS settings:
Accessing CVSS Settings
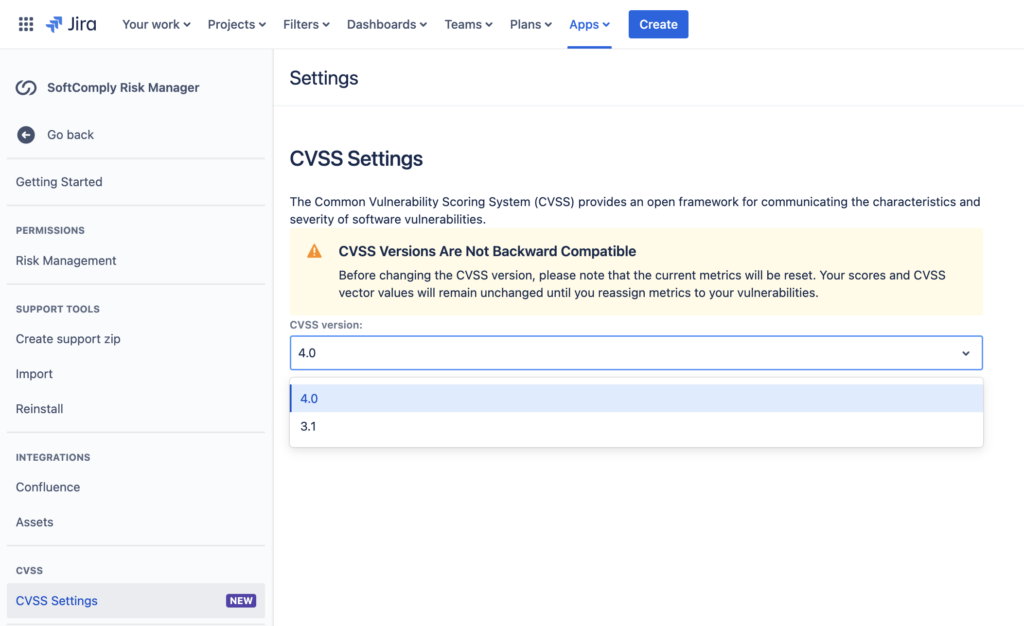
- Navigate to the CVSS Settings Page:
- On the Jira global menu open Risk Manager app page, locate the left-hand sidebar and navigate to Settings.
- Under the Integrations section, click on CVSS Settings. This will open the CVSS Settings page.
NOTE that CVSS Versions Are Not Backward Compatible:
Before changing the CVSS version, be aware that the current metrics will be reset. Your scores and CVSS vector values will remain unchanged until you reassign metrics to your vulnerabilities.
Changing the CVSS Version
- Locate the CVSS Version Dropdown:
- On the CVSS Settings page, find the dropdown menu labeled CVSS version.
- Select the Desired CVSS Version:
- Click on the dropdown menu.
- Select the desired CVSS version from the list. For example, the currently selected version is 4.0.
- Confirm Your Selection:
- After selecting the desired version, ensure to review any warnings or notices provided.
Configuring CVSS Vector and CVSS Score Field in Jira
The Common Vulnerability Scoring System (CVSS) Metrics page in Jira enhances your ability to monitor, prioritize, and manage security vulnerabilities within your Jira environment.
First, select the applicable CVSS version in the Risk Manager Plus Settings > CVSS Settings
Go to Risk Manager Plus Settings > CVSS Settings to enable the correct version
You will see the CVSS Metrics icon on the issue view top panel and you can open the assessment panel by clicking on the icon.
CVSS Metrics icon in an Issue view
Note – if you see a warning that the required field (CVSS vector) is missing, follow the steps below to configure the CVSS vector field.
Configure CVSS Vector/Score Field
- Navigate to Project Settings:
- From the Jira dashboard, navigate to the project where you want to configure the CVSS vector / CVSS score field.
- Click on Project settings in the left-hand sidebar.
- Access Issue Screens:
- In the Project settings, find and click on Issues → Screens. This will show a list of screens grouped by issue types available in your project.
- Select the screen:
- From the list of screens, select the one for which you need to configure the CVSS vector/score field. For example, if you want to configure it for a Bug or Vulnerability issue type, click on the respective screen.
- Add CVSS Vector and CVSS Score Field:
- Look for an option to Add field
- Search for CVSS vector / score in the available fields list.
- Select CVSS vector / score and add it to the issue type.
 Once the fields are configured, the CVSS score & Vector will be visible in an Issue view
Verify Configuration
- Create or Edit an Issue:
- Create a new issue or edit an existing issue of the type you configured.
- Check if the CVSS vector / score field is now available in the issue form.
- View CVSS Metrics:
- Navigate back to the CVSS Metrics page.
- Verify that the warning message is no longer displayed and that the CVSS metrics are visible for the configured issue type.
Additional Notes
- Permissions: Ensure that you have the necessary permissions to configure fields and issue types in the project. If you do not have sufficient permissions, contact your Jira administrator for assistance.
- Field Context: Make sure that the CVSS vector field is added in the correct context for the issue type to ensure it is available where needed.
Using CVSS Fields in JQL Searches and Dashboards
Once the CVSS vector and CVSS score fields are configured, they can be effectively utilized in Jira for advanced searches and dashboard reporting. You can use Jira Query Language (JQL) to filter issues based on CVSS metrics, allowing you to create custom queries such as finding all issues with a specific CVSS score range or vector value. These fields can also be added to Jira dashboards as gadgets, providing a visual representation of the vulnerability metrics across your projects.
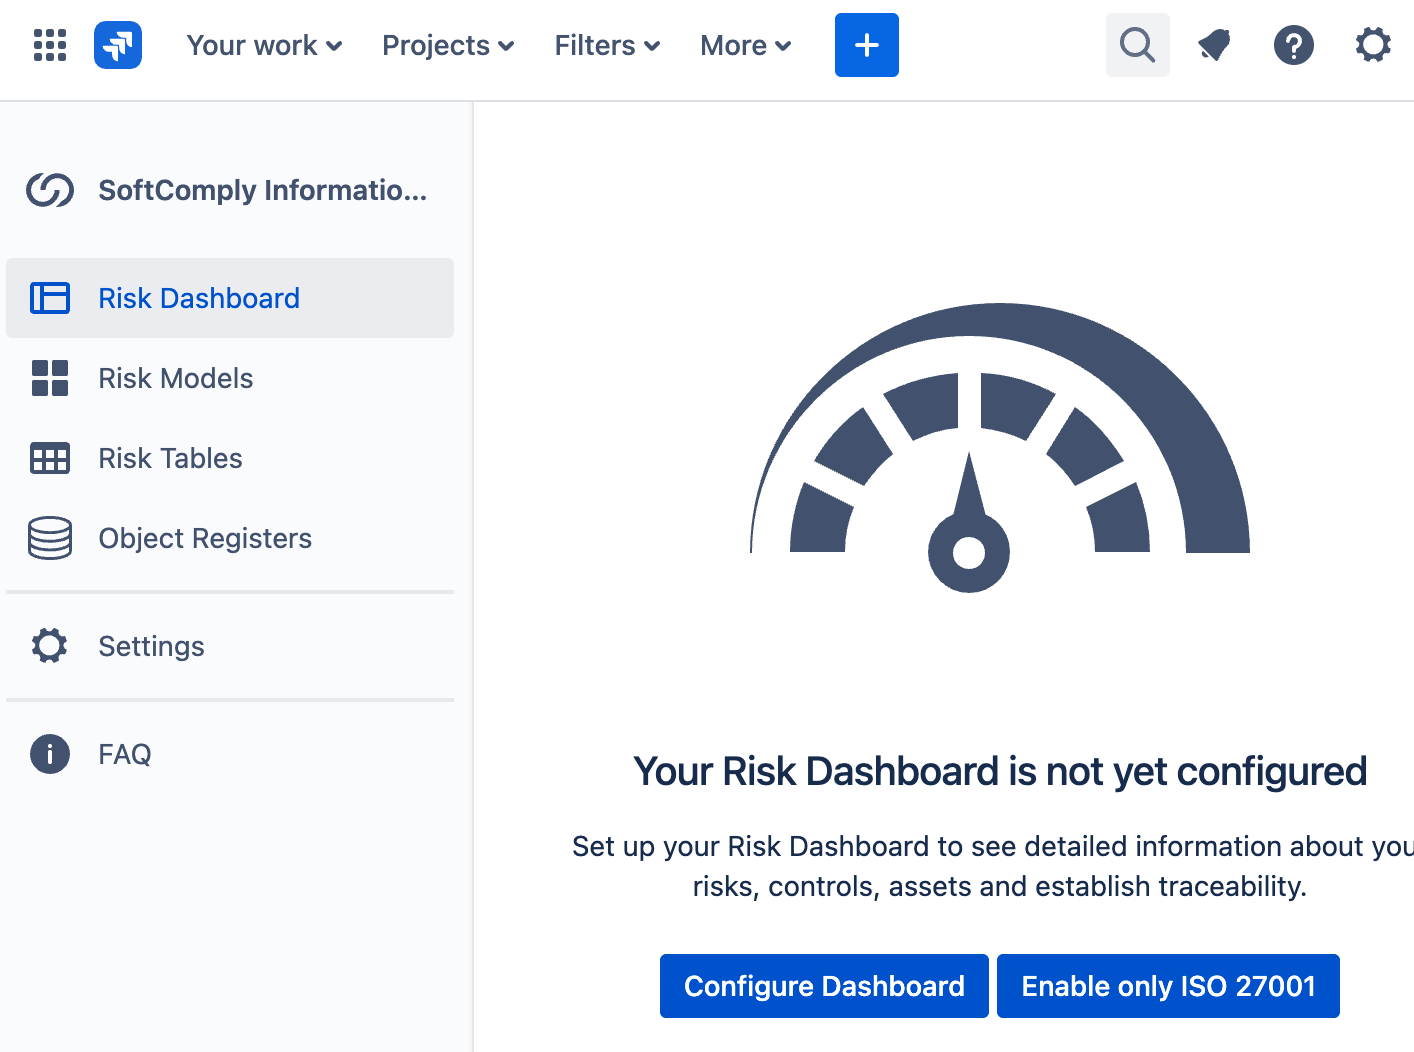
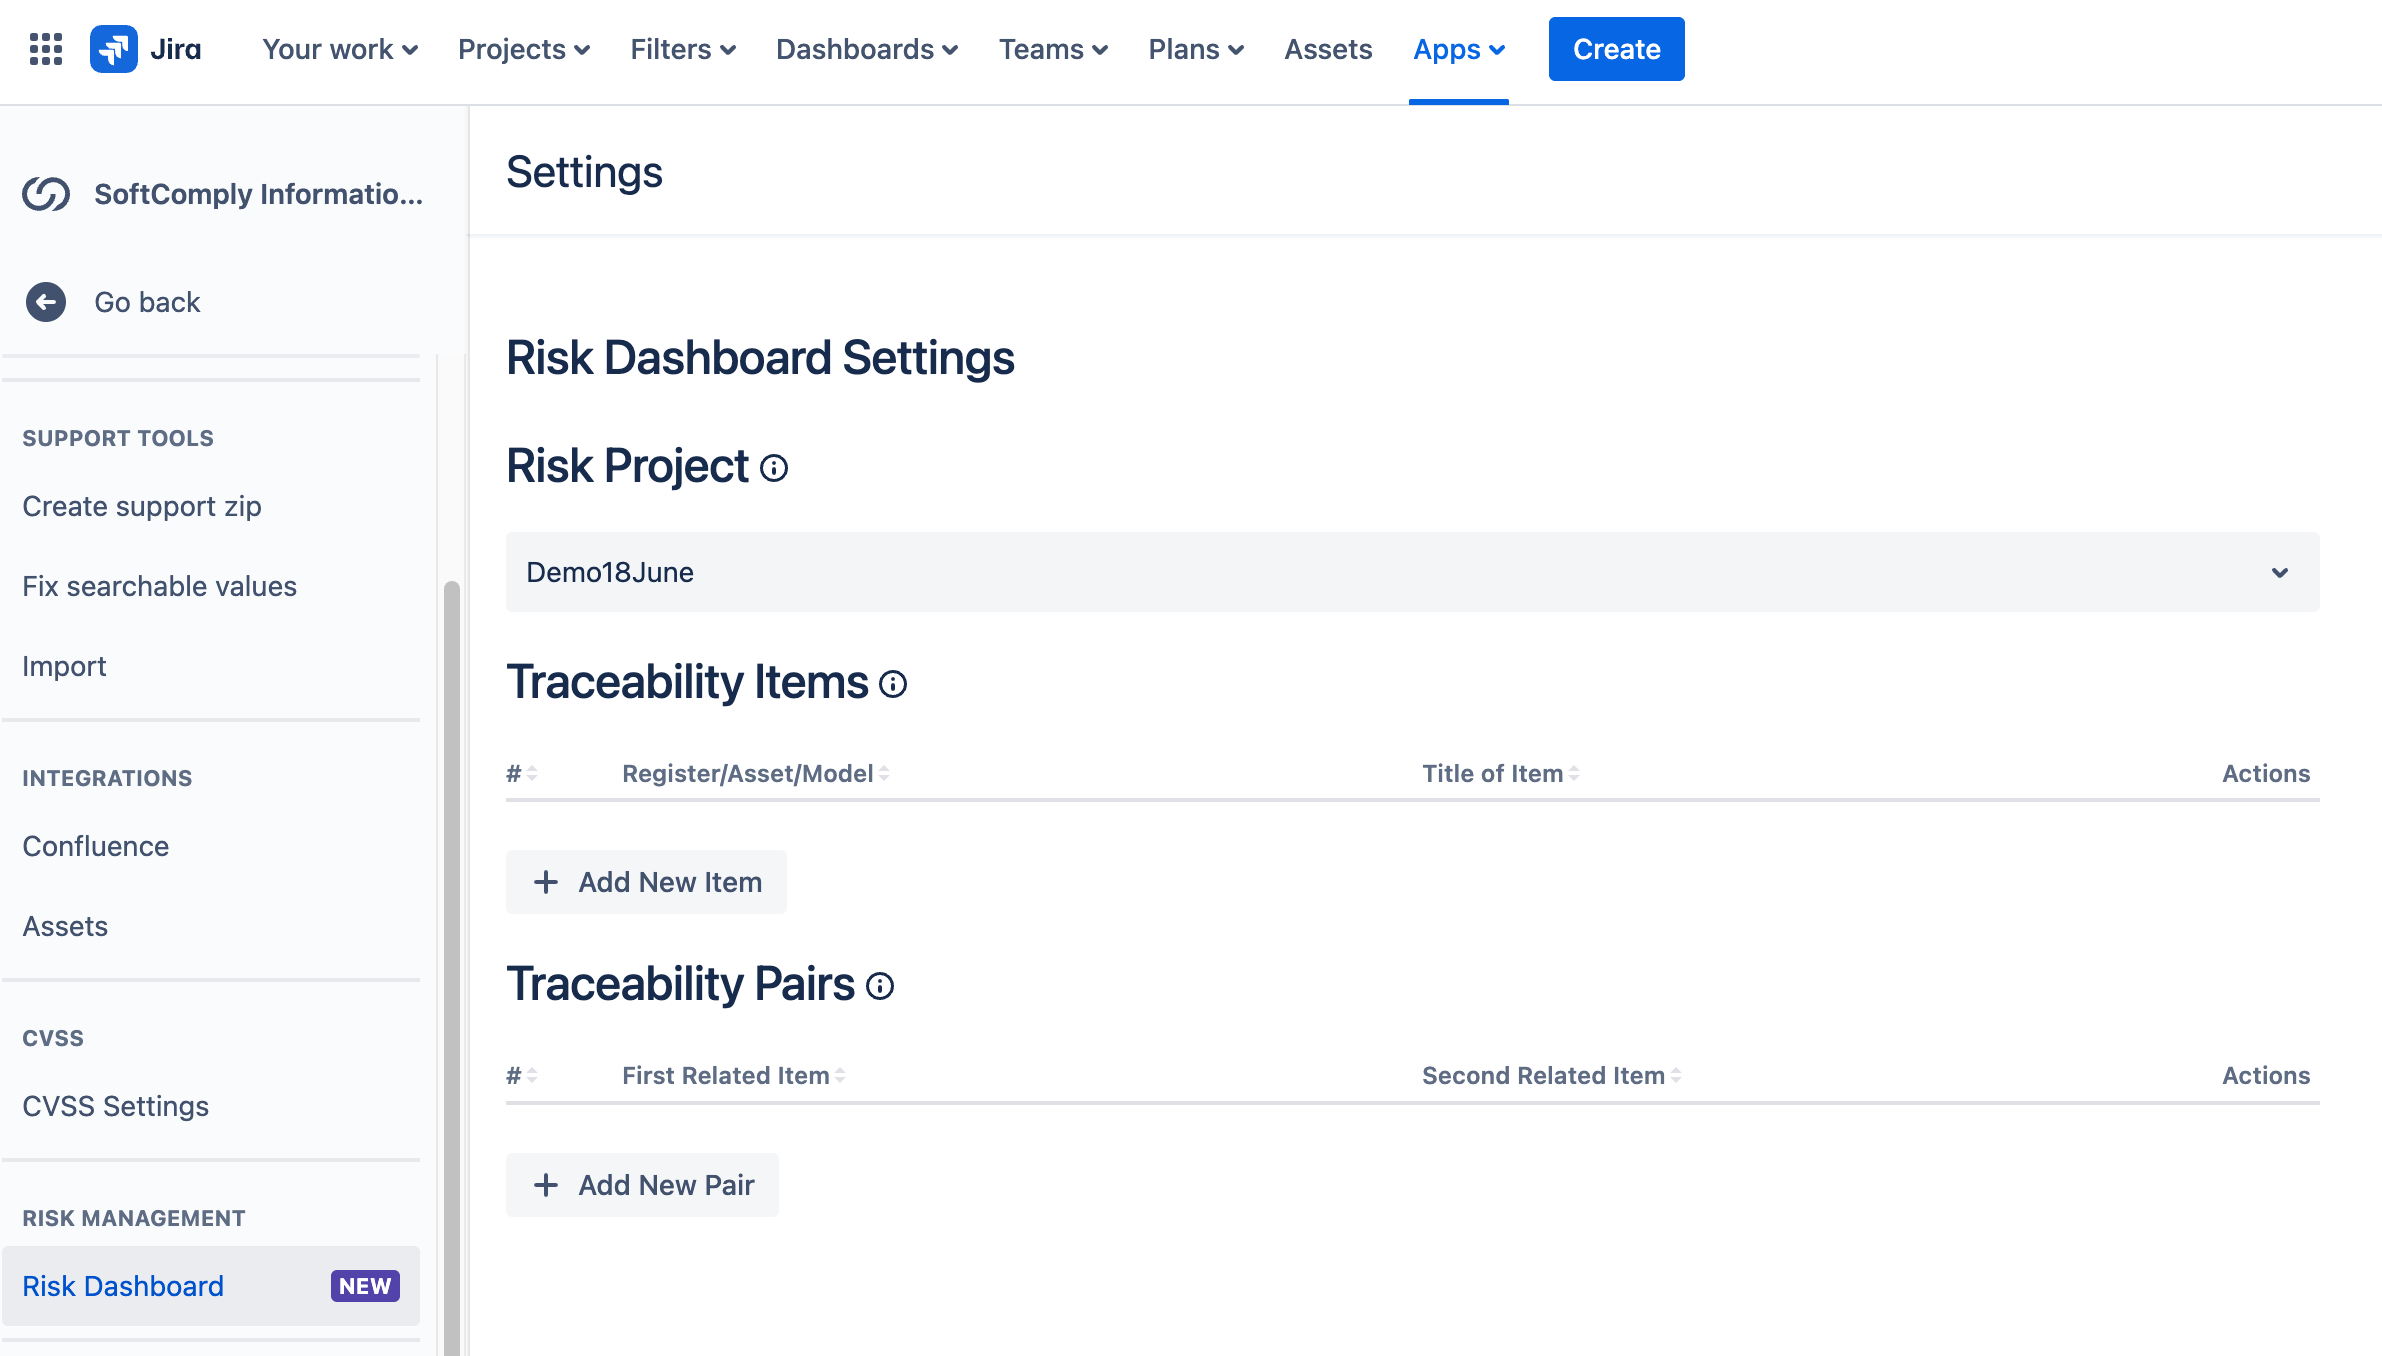
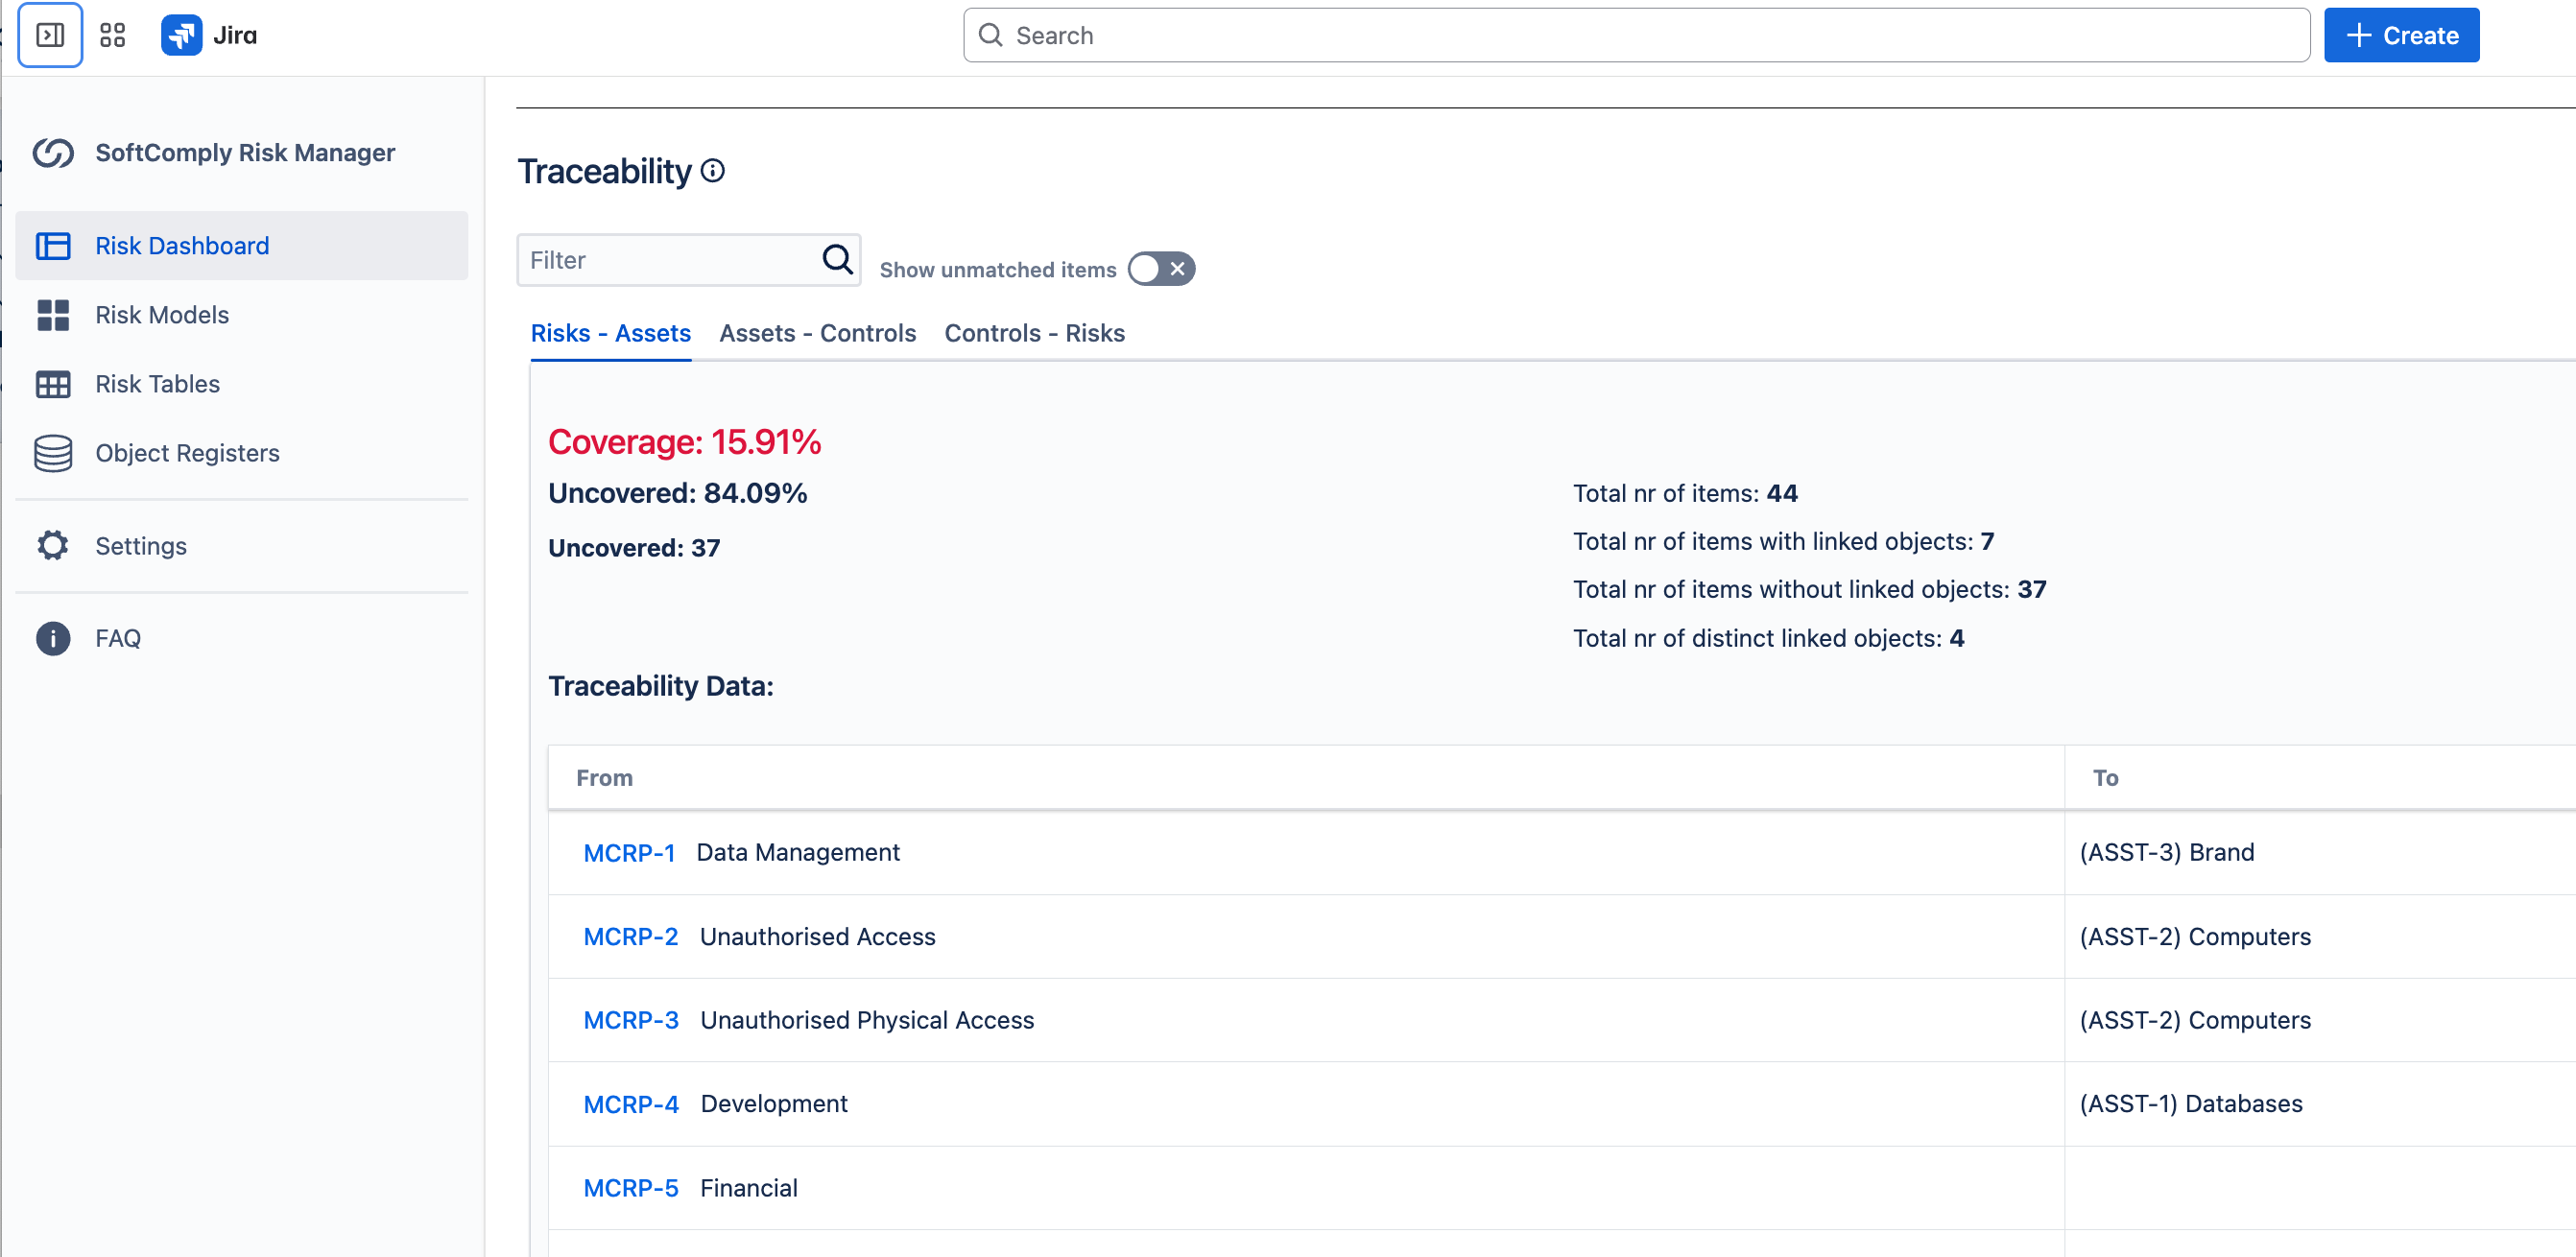
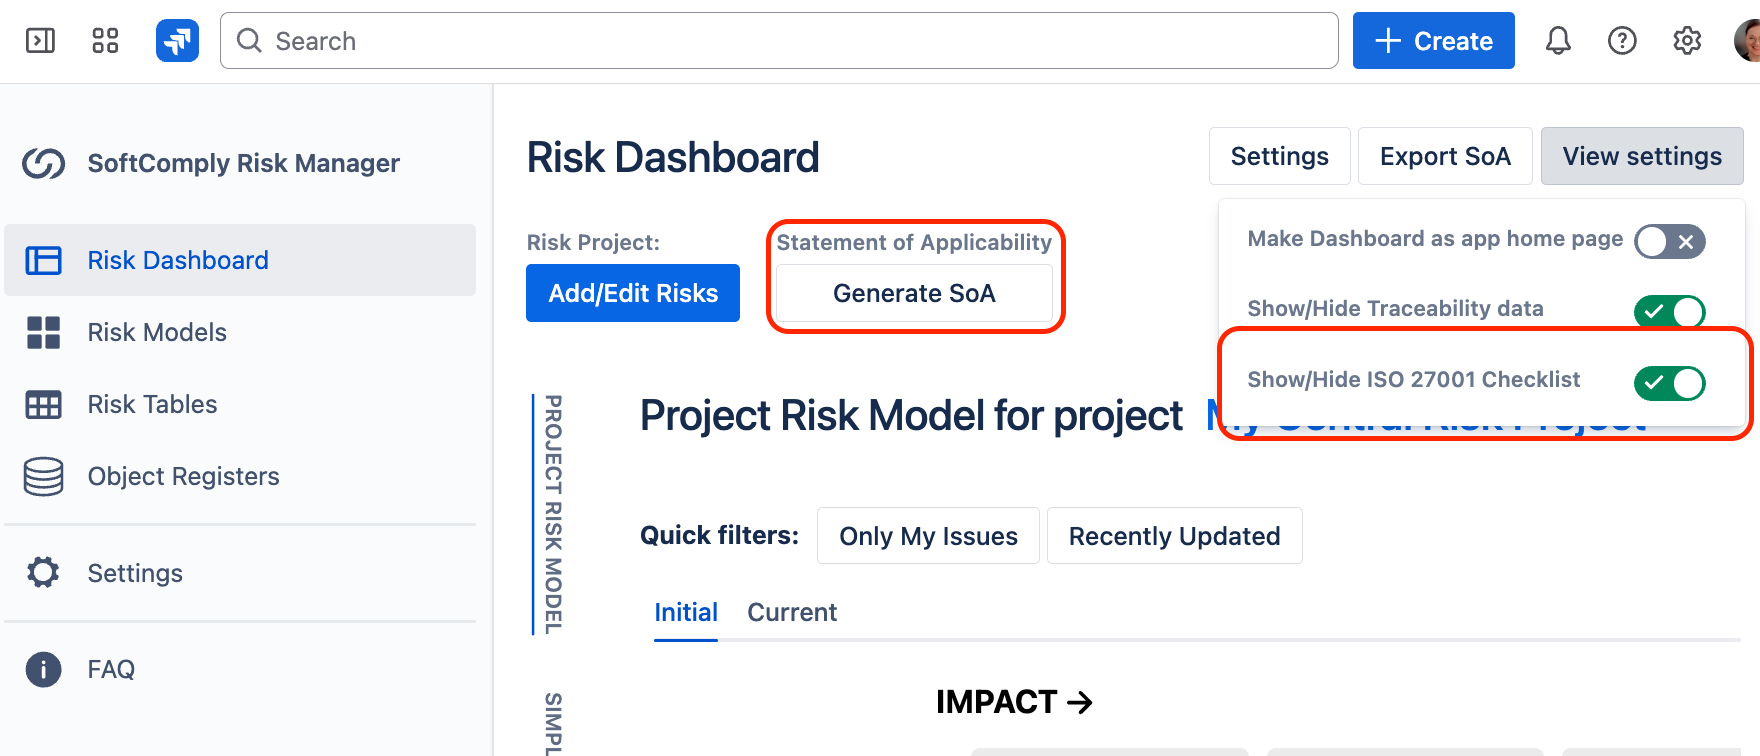
3. RISK DASHBOARD, SOA & ISO 27001 CHECKLIST
- Quick setup for Information Security project
- Set up a custom Dashboard in the Settings
4. RISK REPORTS
From the project, you can export the Risk Model and Risk Table reports.
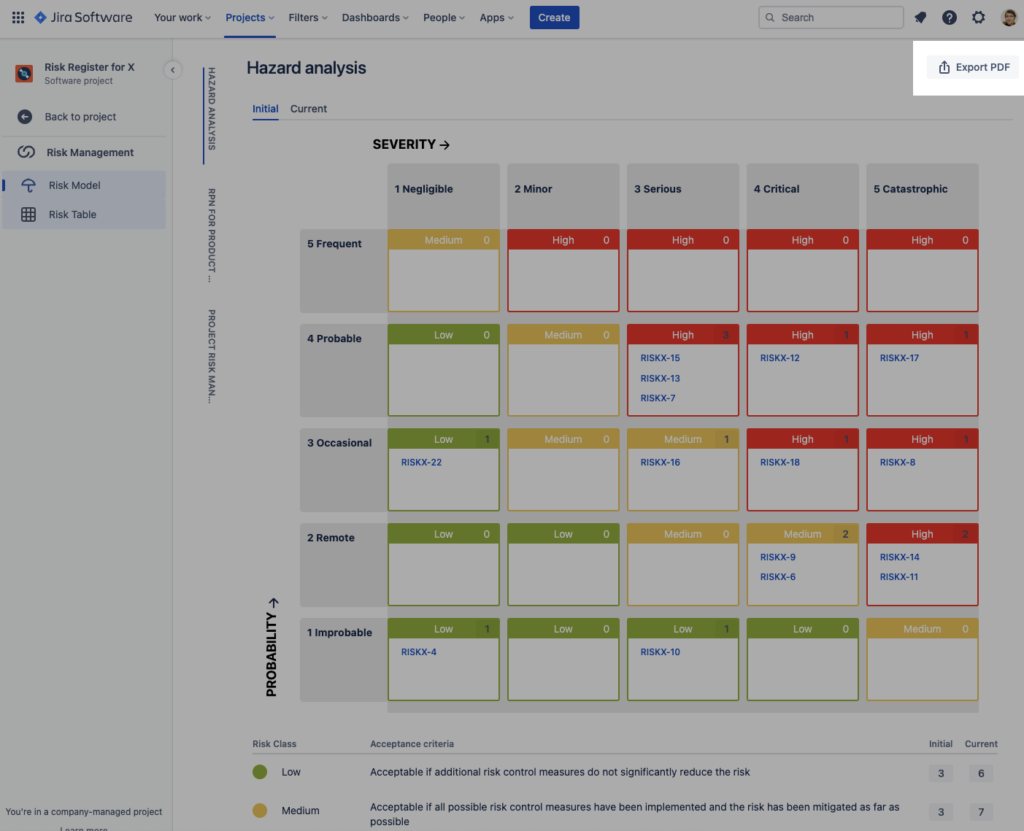
Risk Model can be exported as PDF:
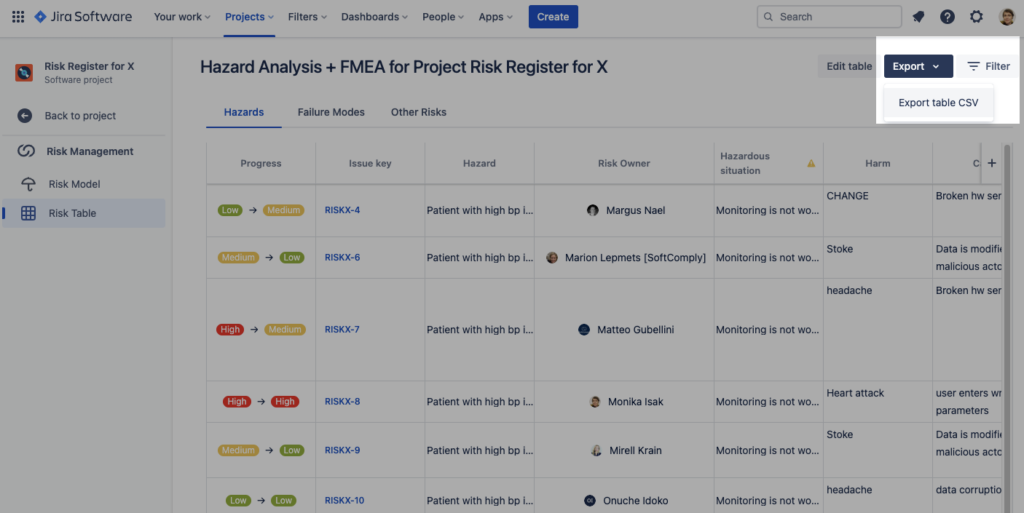
Risk Table can be exported as PDF or into CSV format:
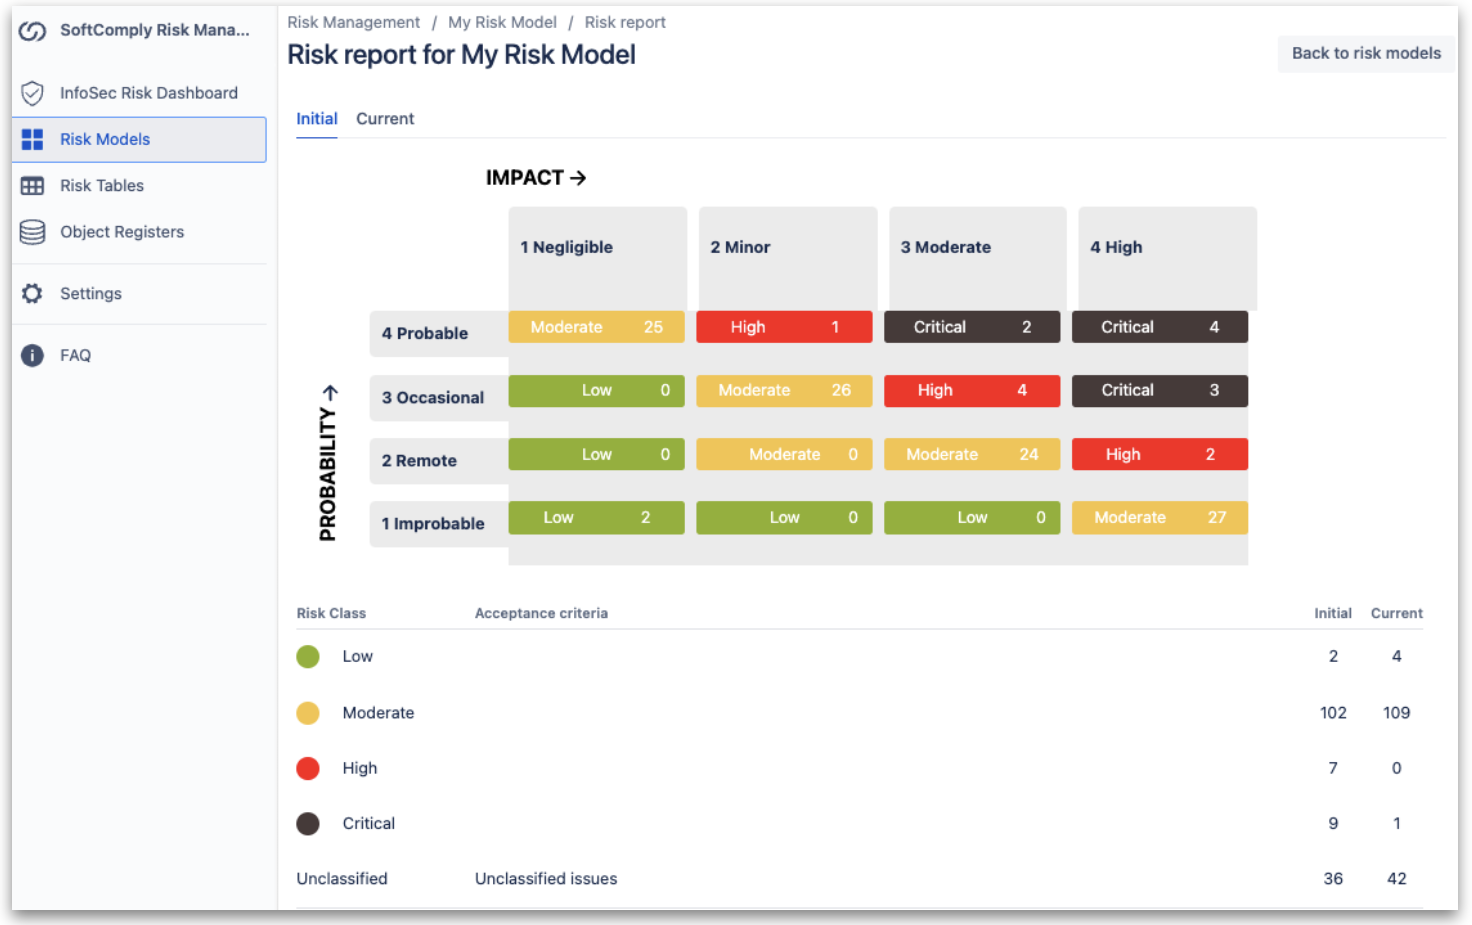
You can also get reports across different projects that use the same Risk Model (aggregated Risk Model Report):
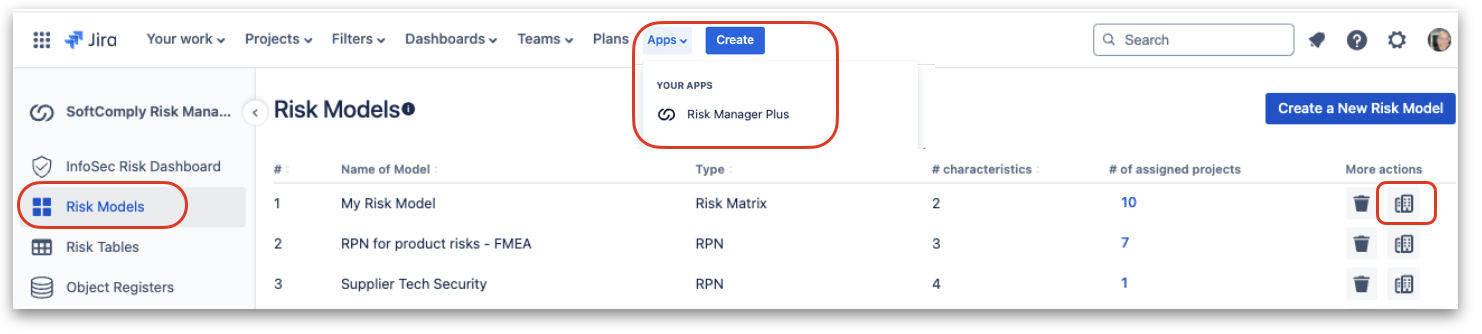
- Go to Apps > Risk Manager Plus > Risk Models
- Click on the Report icon behind the specific Risk Model
3. Choose the projects where the chosen Risk Model is used to be included in the overall risk report:
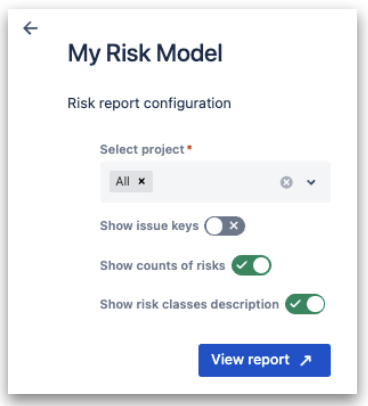
Once the report is generated, you can view the statuses of all risks across the selected Jira projects that use this specific Risk Model.
Confluence Reporting
There is a free extension of SoftComply Risk Manager apps for reporting risks on Confluence Cloud. Read more at https://softcomply.com/product/risk-confluence/
5. PERMISSIONS
5.1. Risk Manager Admin
Risk Manager Plus has one special role – Risk Management Administrator.
All Jira Administrators are Risk Management Administrators by default and you can assign this role to the users/groups under “Apps” → “Risk Manager Plus” → “Settings“ → “Permissions“.
Risk Management Administrators can:
- add/edit/remove Risk Model and Risk Table global templates;
- assign Risk Model and Risk Tables to Jira Project.
Regular Jira users can work with the Risk Manager Plus tool using the global templates created for them and provided that risk management is enabled in the project that they have access to.
6. BOOK A DEMO
To learn more about the SoftComply Risk Manager Plus on Jira Cloud, you are most welcome to book a DEMO CALL with the SoftComply team.