

Risk Manager Plus on Jira Cloud is the most advanced risk management app supporting a wide range of risk management frameworks. You can easily customize the built-in Risk Models or build your own Risk Model from scratch, e.g. 2- or 3-dimensional Risk Matrix or Risk Score based ones. You can also specify your risk assessment parameters (e.g. Impact, Likelihood, etc.) and the number of risk assessment iterations (e.g. Initial, Current and Target).
To keep your Jira instance clutter-free, the app does not create custom fields for the Risk Model. Instead, the values from your Risk Model, like Impact, Likelihood, etc., and the calculated Risk Score (Risk Level, or Risk Class that is used in this example) are stored as entity properties.
This approach provides a resource-optimal solution for this highly customizable app.
All values associated with the Risk Models that are currently stored in entity properties can be displayed in the Risk Table and the Risk Issue view.
But if you need to display Risk values in any additional Jira views (like List view) or use these in combination with other apps, having the Risk values available in custom fields might be preferred.
To accommodate this, we have developed an Automation Assistant for the Risk Manager Plus. You can use the Automation Assistant when building your Jira automation rules.
Here is a quick guide on how to use the Automation Assistant for building a Jira automation rule for Risk Manager Plus.
Prerequisites:
- You are using Risk Manager Plus app on Jira Cloud, and
- You are a Jira admin i.e. you can create custom fields and automation rules.
Example: Synchronise Risk Score/Risk Class values to a custom field as text and use the custom field for reporting
STEP 1 – Preparations
1. Create the custom field(s) you want to have updated based on your Risk Class value. In this example a simple single-line text field is used, as these are the easiest to manage.
2. Assign the custom field(s) to the relevant project screens and try the field(s) out in the project manually.
STEP 2 – Create a Global Automation Rule
1. Open the System settings, go to Global Automation and create a new automation rule.
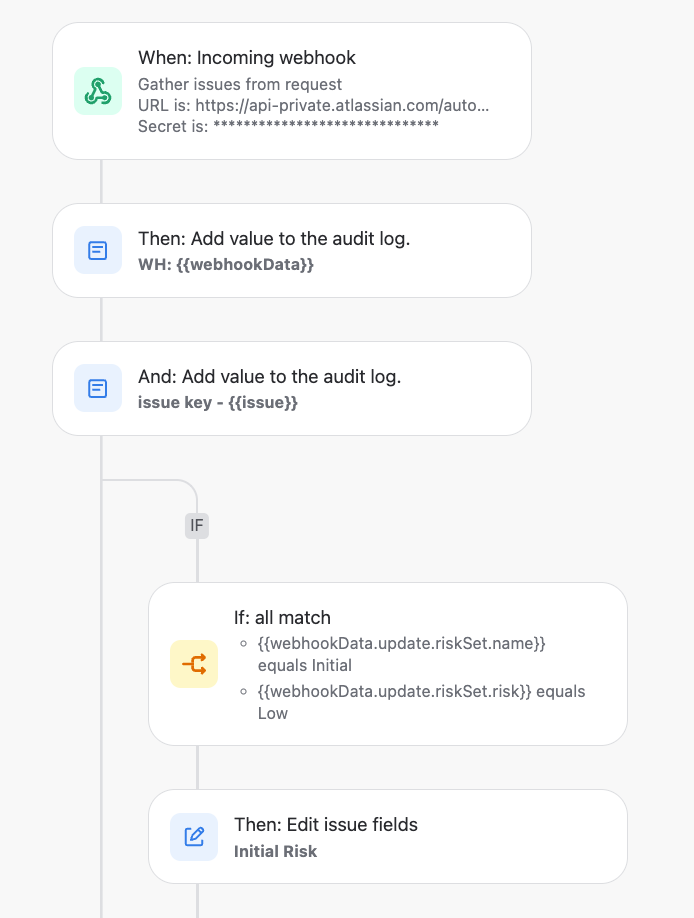
2. As a trigger, select Incoming webhook and define the first action.
3. Activate the rule.
NOTE: The automation rule needs an action to be defined, to become active. In this example, the action is to write the received values into the audit log. You can later check the audit logs to understand if the rule is working properly.

STEP 3 – Connect the Automation Rule with the SoftComply Risk Manager Plus
Once the rule is active, you will get the “Webhook URL” and the “Secret” that will be used in combination in the Risk Manager Plus Automation Assistant.
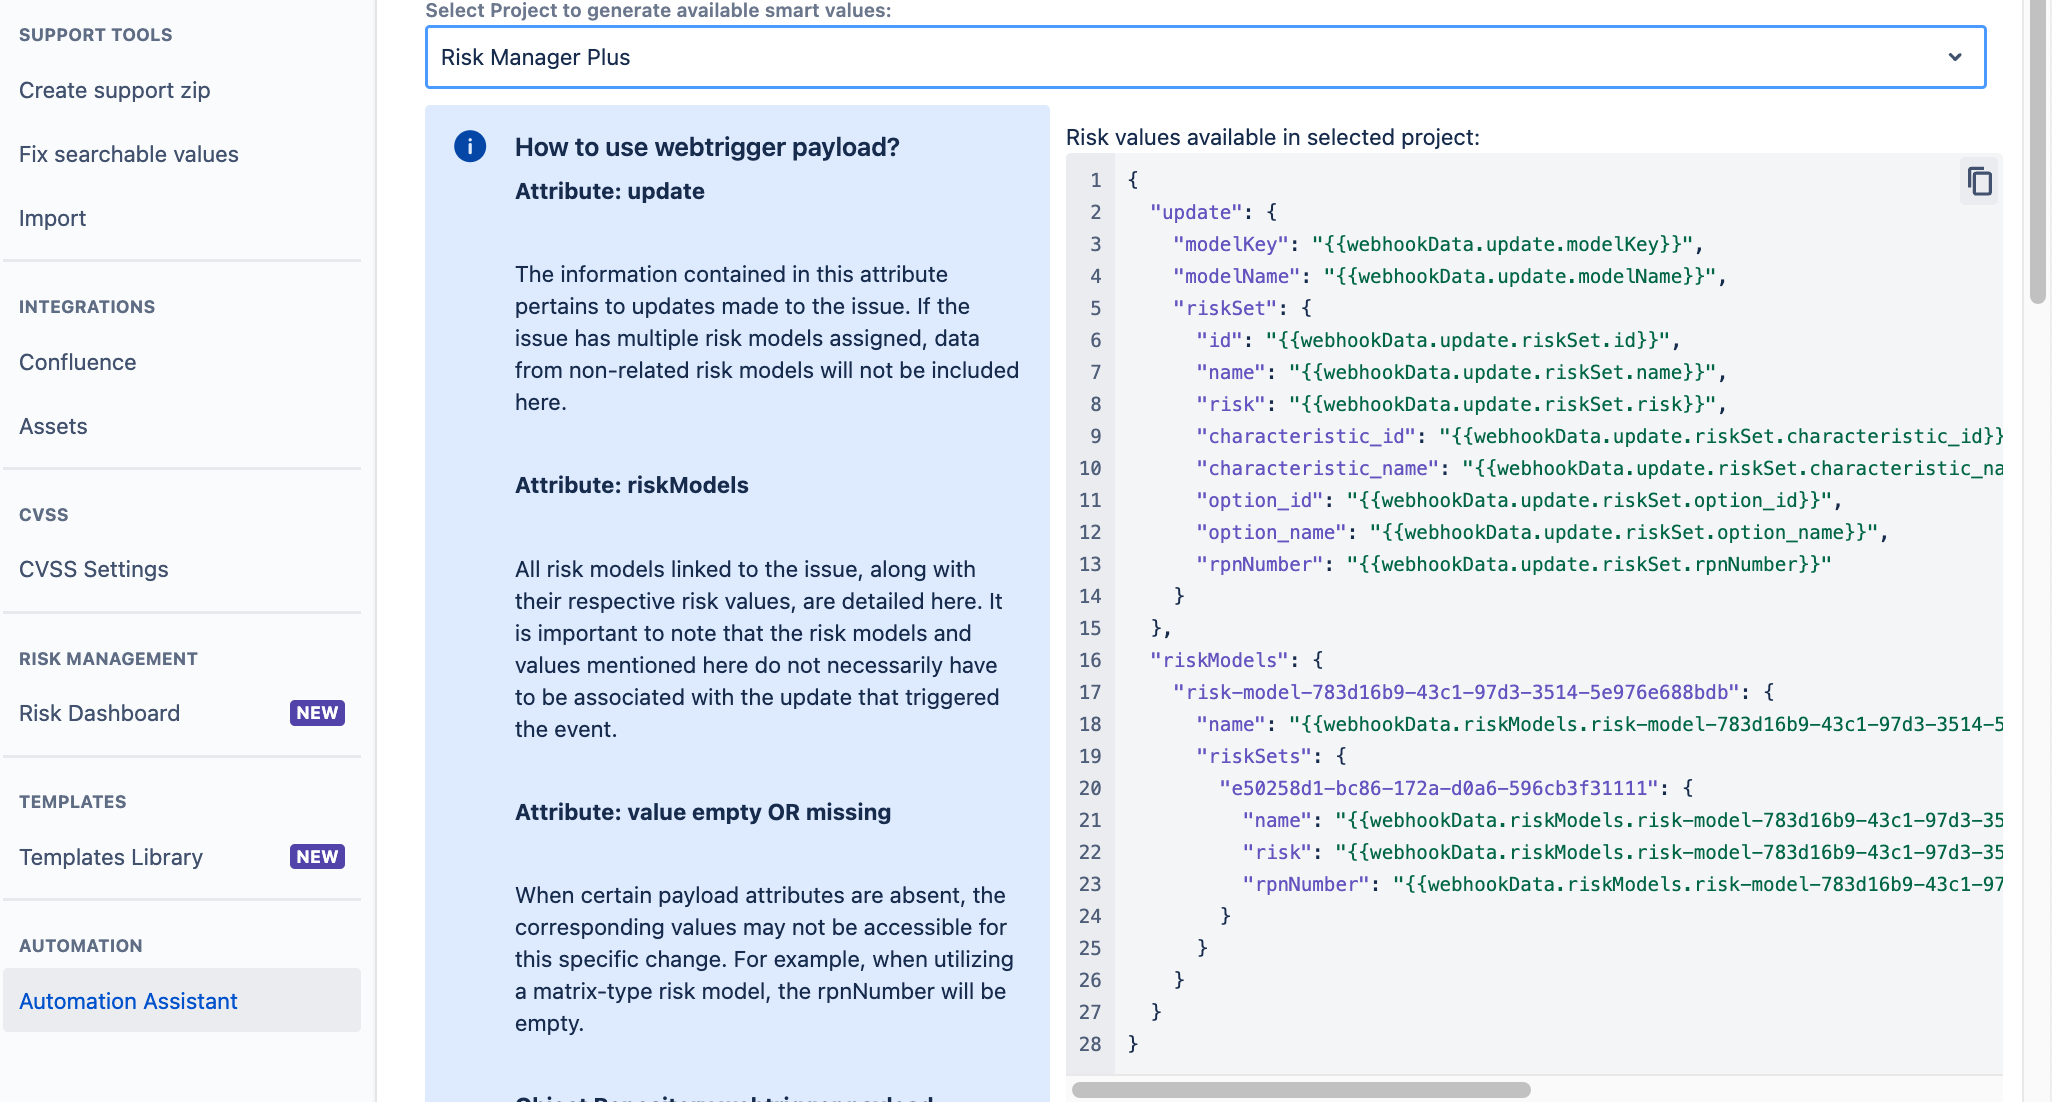
1. Go to Risk Manager Plus > Settings > Automation Assistant and copy-paste the “Webhook URL” and “Secret” (Webhook Token) to the relevant fields:

2. Select the project for which the automation will be turned on and you will get the list of smart values (data attributes) from the Risk Model(s) that are enabled in the the selected project:
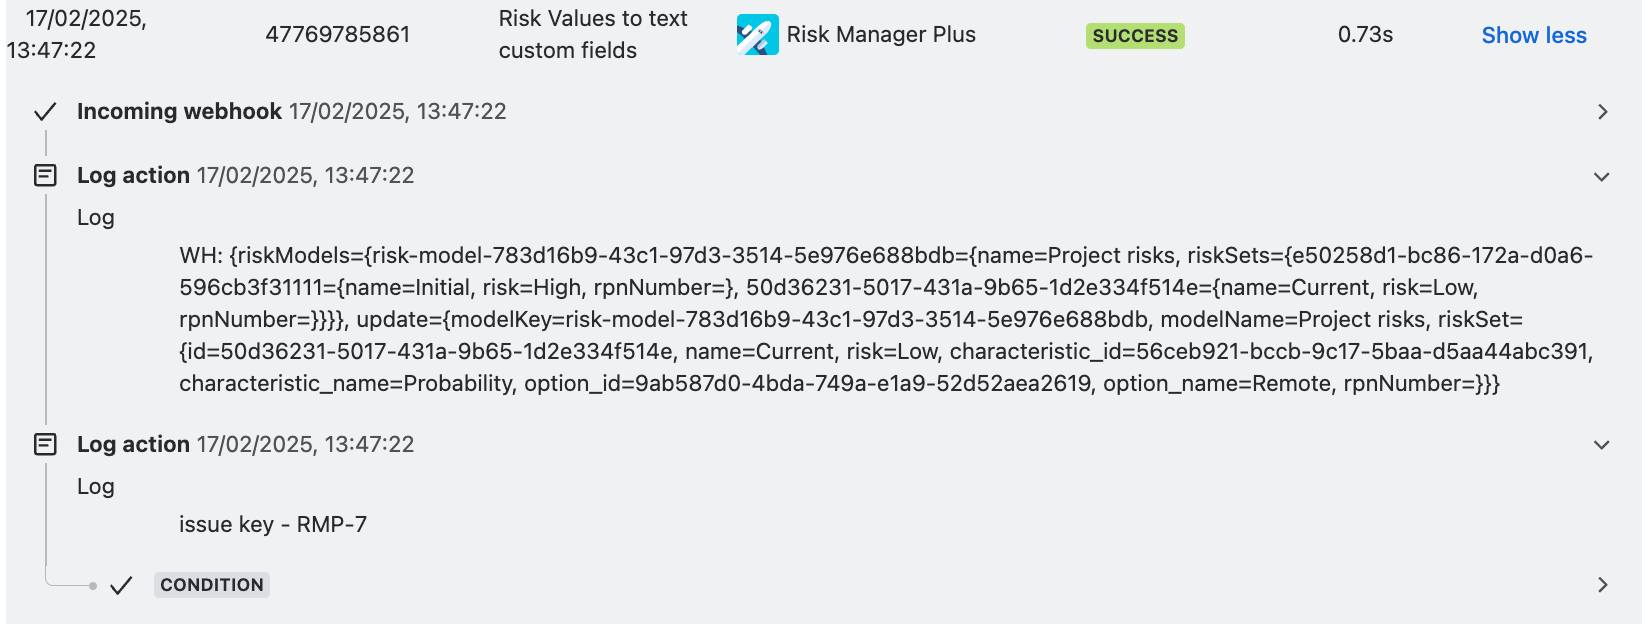
3. Verify that the connection has been established by checking the audit log of your Automation rule:
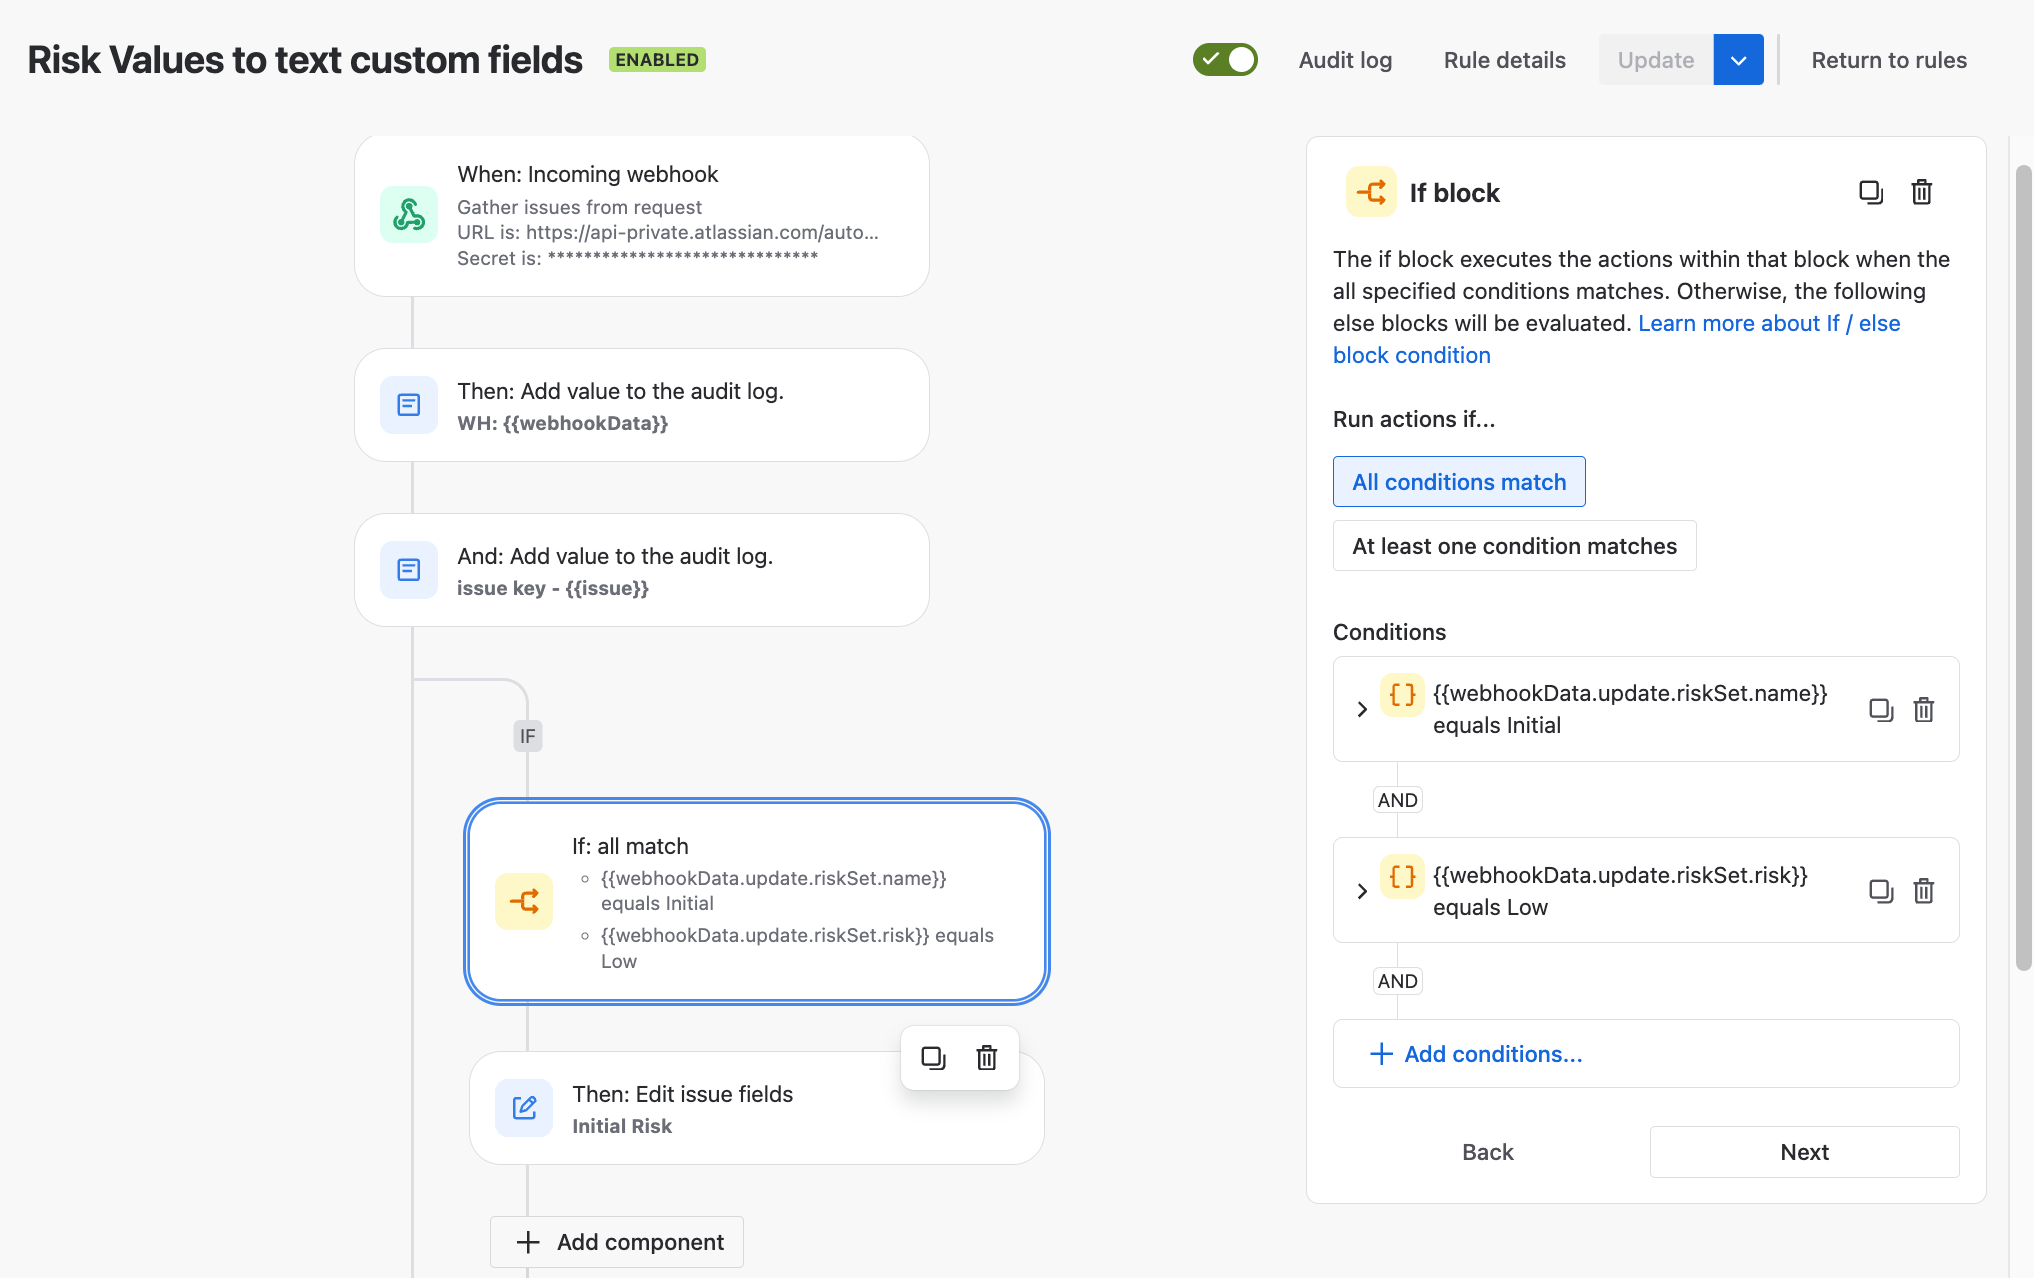
STEP 4 – Define conditions for the Automation rule
First, some further definitions might be needed for the smart values that can be used. For this example, information regarding the Risk Class is needed and you will find the available smart values for the Risk Model (name) and Risk Class (risk).
The smart values can be copied from the Automation Assistant dataset, once the Incoming webhook and Secret are added and the specific project has been defined (completed in STEP 3, point 2)
1. name = refers to the risk iterations that you have created for the Risk Model. In this example, the Risk Model has ‘Initial’ and ‘Current’ iterations.
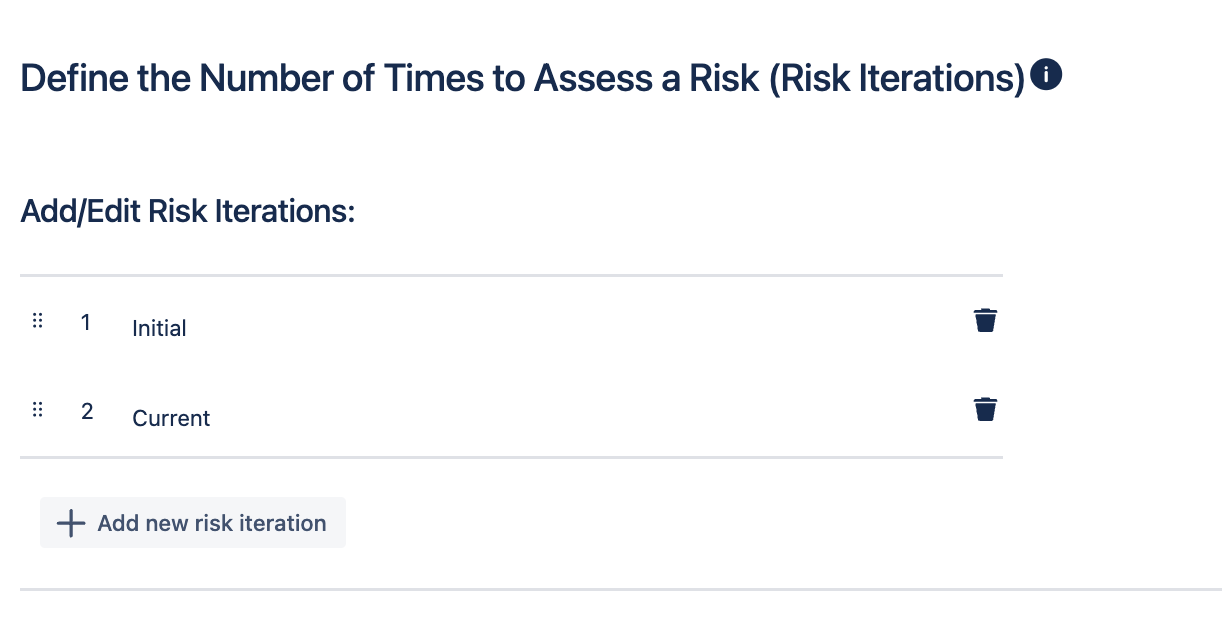 NOTE: Your Risk Model has at least one iteration (e.g. Inherent Risk, Current Risk, Final risk, etc), and you will need to use the ‘name’ of the iteration in the Automation rule.
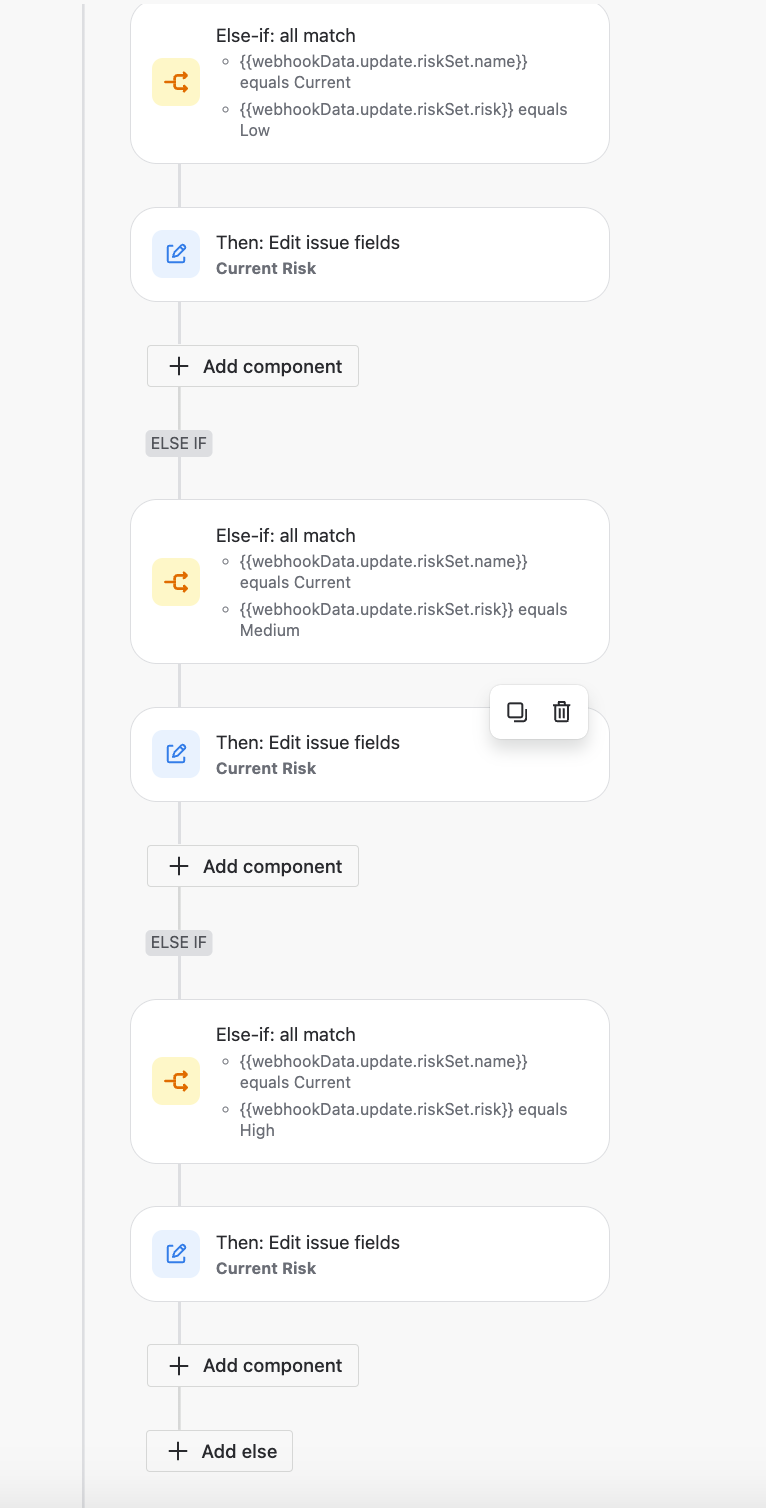
2. Use this smart value as a condition in your automation rule:
IF: smart values
Value: {{webhookData.update.riskSet.name}}
Condition: equals: “Initial”
NOTE: Iteration name will be provided as text, in this example ‘Initial’.
3. You will also need to include a condition for the Risk Class in this specific iteration.
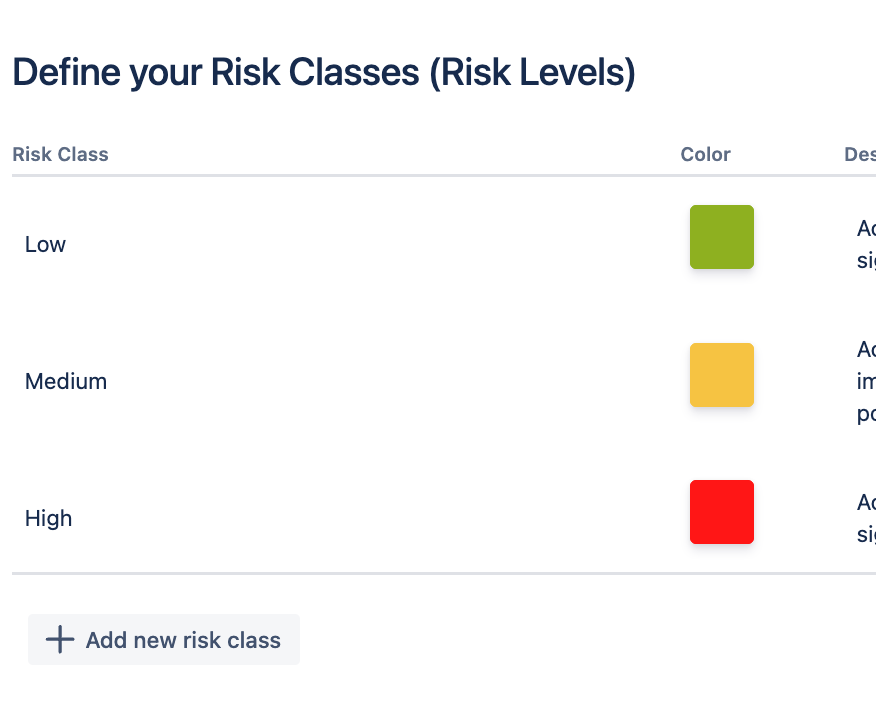
risk = refers to the Risk Class (or Risk Score, Risk Level, depending on your chosen Model) that you have defined for your Risk Model. In this example – Low, Medium, High.
To get this value, enter the following condition to the automation rule:
AND smart values
Value: {{webhookData.update.riskSet.risk}}
Condition: equals “Low”
Next step is to define what the automation should do if these conditions are met:
This example asks the automation to fill in the custom field (text field type) with defined text.
THEN
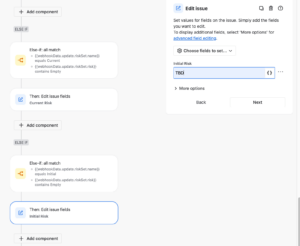
Edit issue, pick your custom field from the list – in this example ‘Initial Risk’ and ask the automation to fill it with text “Low”.
4. Continue using the Else IF for all other Risk Classes by using the same webhook values for all of the possible Risk Classes (in this example Low, Medium, High).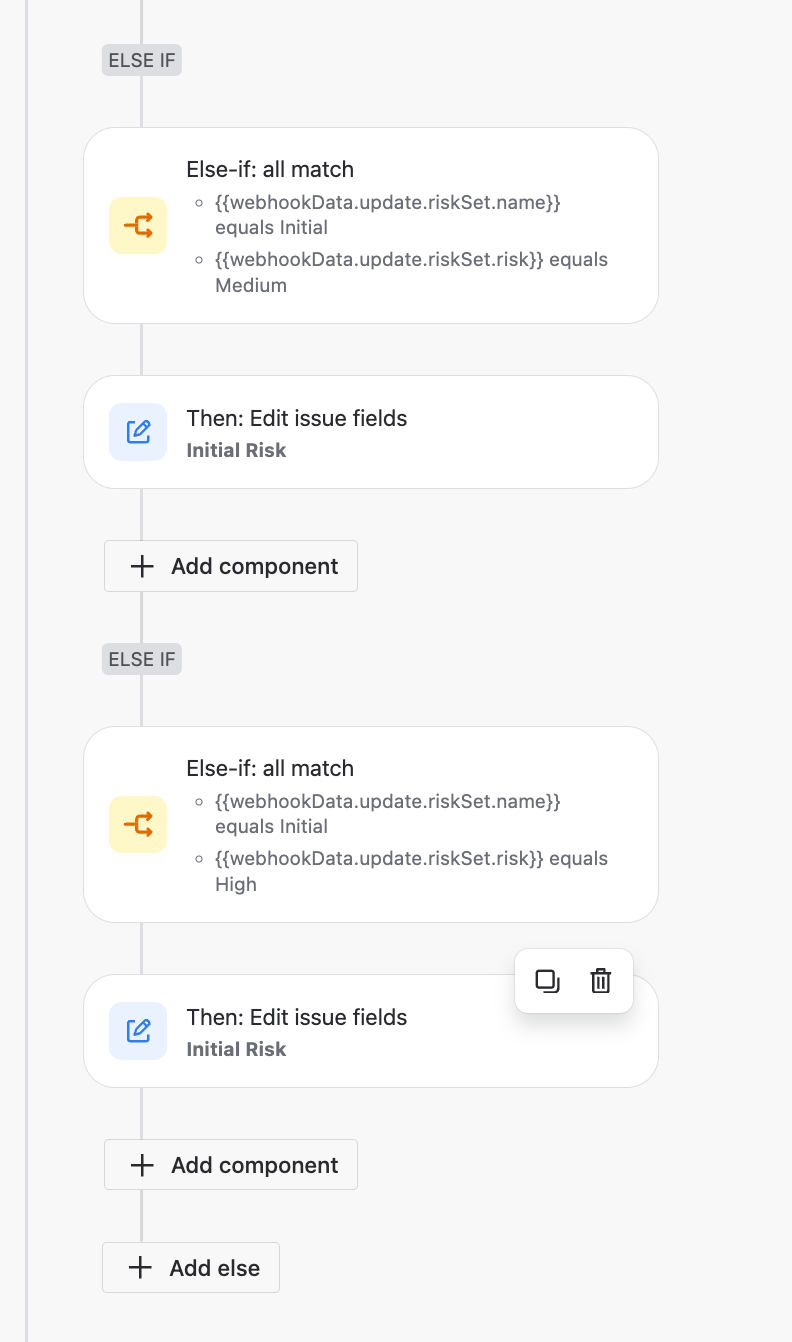
5. Keep in mind that your Risk Class can have no value, as well. This scenario should also be built into the automation as a condition. This example writes ‘TBD’ into the custom field if Risk Class is not determined.
6. If yourRisk Model includes more than one risk iteration (you will need these values in relevant custom fields), you will need to repeat the actions above for each risk iteration.
In this example, the Automation Rule also looks for the Risk Class values for the ‘Current’ risk iteration
Here is the full Automation Rule for this specific example:
STEP 5 – Automation in Action
Once you have added these custom fields to your Risk Table view, you will see the automation changing the custom field value as you update the risk characteristics (Impact and Probability levels), i.e. when the Risk Class value changes, the automation triggers the change also in the custom field.
NOTE: For best results, testing after you have set each condition, is ultimately the quickest way to make sure that the automation rule works as expected.
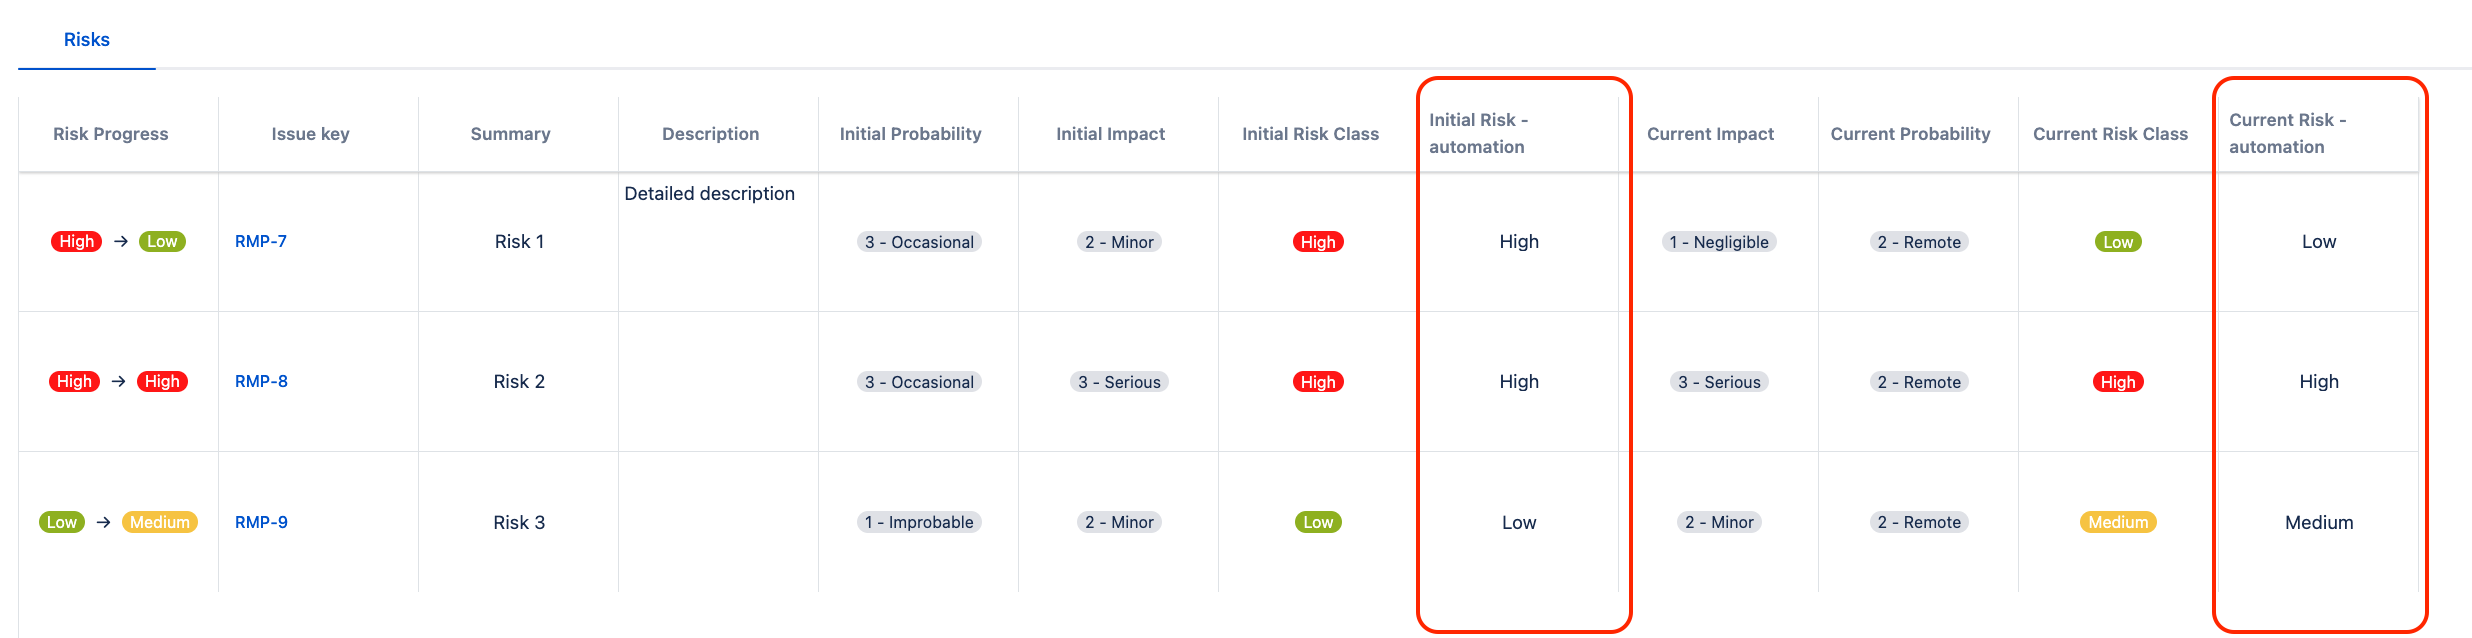
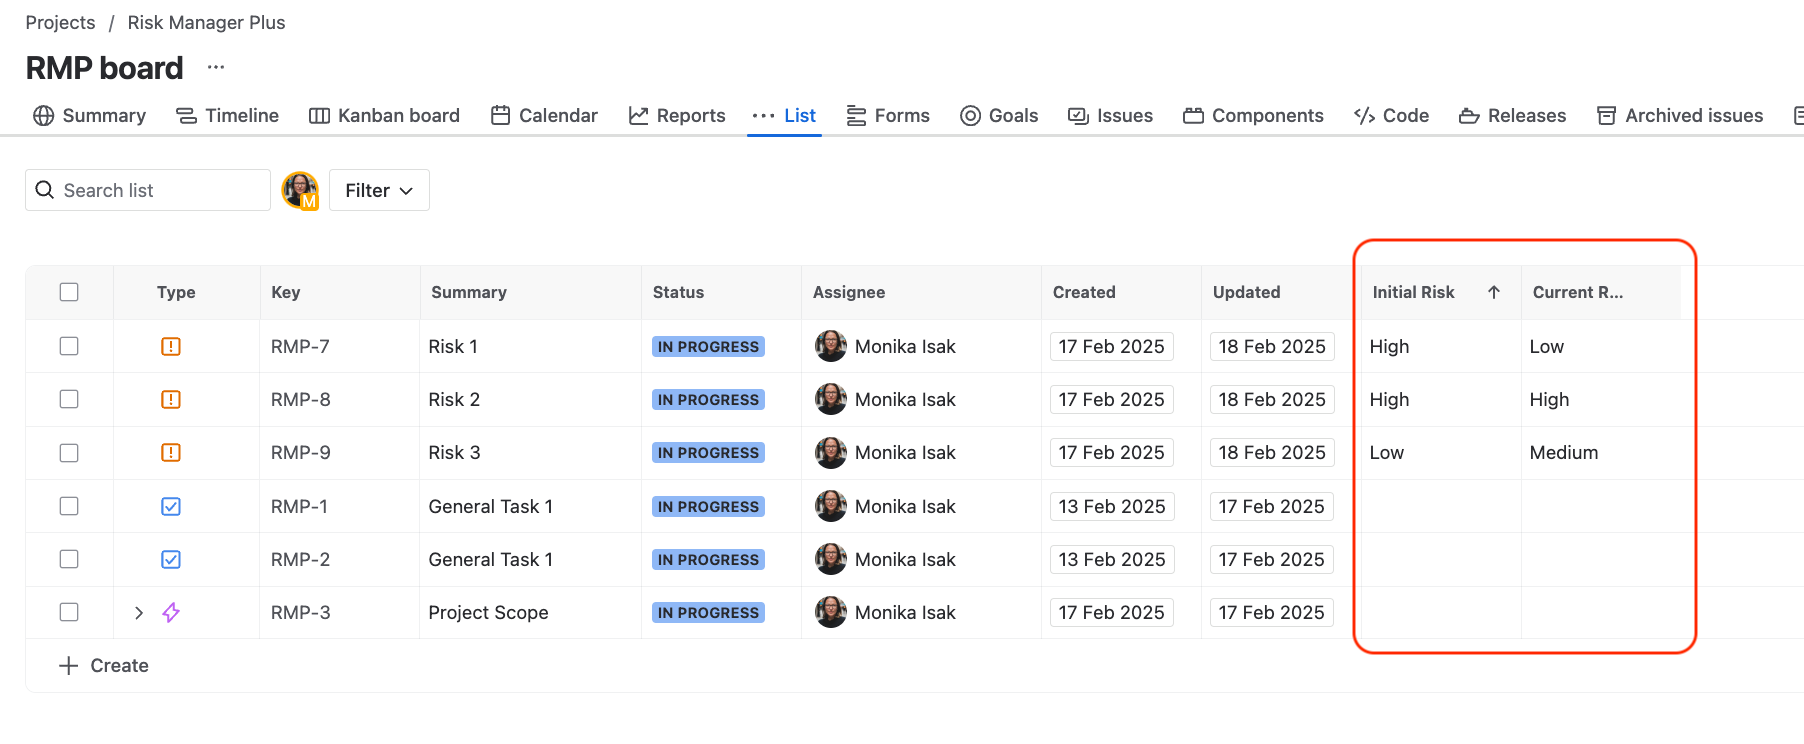
Once your automation is ready and working, you can add these automatically filled custom fields to additional Jira reports like the Jira List view. This will help your team prioritize their work based on the most critical risks (with the highest Risk Class value).
Conclusion
SoftComply Risk Manager Plus on Jira Cloud provides a highly flexible and efficient solution for risk management. It supports customization of Risk Models and automation of risk-related processes. By leveraging the Automation Assistant, Jira admins can seamlessly synchronise Risk values with custom fields, enabling additional reporting, integration, and prioritization within Jira. This automation enhances risk visibility across Jira views.
If you have specific automation needs or require additional guidance, our team is ready to assist you in optimising your risk management workflows. Book a call with us to get support for your team.


