- 1. Introduction
The SoftComply Document Manager (from hereon referred to as “Document Manager”) is a Document Management Application that operates on Atlassian Confluence Cloud.
The Document Manager processes, tracks and manages electronic documents and associated electronic signatures.
2. Glossary
Document
A document is a page in your Confluence instance. Viewing and Editing happens in the standard Confluence views. A document contains all its versions as children items. A document is identified with the information of the version in the following order:
- The latest Released version;
- If no version is Released, the latest Approved version;
- If no version is Approved, the latest Draft version;
- If no version is Draft, the latest Obsolete version.
Each document version is a separate page in Confluence.
Document Version
A Document Version is linked to a single page in Confluence. The editing history of a version is preserved in Confluence using its standard features.
Activity
In the Document Manager, Activities are objects that “carry” a document through different states of its lifecycle. Fields and Tasks can be used within Activities to add specific information and ensure all required activities are complete.
In certain cases such as CAPAs, Non-Conformities, Change Requests and Complaints, an Activity is not associated to any Confluence page, but the Activity becomes a record itself. The sum of all its fields is the content of the record.
Lifecycle
A Lifecycle is a “blueprint” of an Activity. Activity must be created from a Lifecycle. The Activity holds the same field configuration and workflow configuration of the Lifecycle, but additional setup is required before launch.
NOTE: Once an Activity is created from a Lifecycle, its configuration remains unchanged even when the parent Lifecycle is modified.
Task
A Task is an activity assigned to one or more users, that must be completed in a specific step of the workflow, before the Activity can transition to the next step.
Tasks can be one of the following types: “Regular” or “Approval”.
A “Regular” task is a general activity that needs to be completed. The assignee(s) can only confirm that the task was Completed.
An “Approval” task involves a decision from the assignee(s). The outcomes are typically referred to as “Approval” and “Rejection”. A Rejection from any assignee immediately triggers the associated transition (if any). A transition triggered by an Approval requires all assignees to Approve all tasks.
“Predefined” tasks are tasks created in an lifecycle. When creating an activity, predefined tasks are automatically generated. The owner of the Activity can only assign them but not edit or delete them. Predefine tasks can be either Regular or Approval.
3. Installation and Authentication requirements
Software Requirements
The Document Manager requires Atlassian Confluence Cloud Standard Plan or higher. If used on Confluence Free Plan, all features work correctly but the Document Manager is not able to manage permissions and protect approved documents from accidental changes.
The Document Manager is compatible with the most common browsers. It has been validated on Windows platforms with Google Chrome, MS Edge Chromium and Mozilla Firefox, and on Mac platforms with Google Chrome, Mozilla Firefox and Apple Safari.
The Document Manager is not optimized for mobile use.
Hardware Requirements
The Document Manager does not have additional hardware requirements in addition to what is necessary to use Atlassian Confluence Cloud.
Installation and Setup
- Install the Document Manager from the Atlassian Marketplace;
- In the App section of the Sidebar, select “Start Setup”:

3. As first step, you are required to select one Confluence group as App admin and another group for the general users. Please note that only users in these two groups will have access to the App, but you can modify these settings later.

4. Once confirmed, the App will go through the setup steps, creating the required spaces, pages and restrictions;
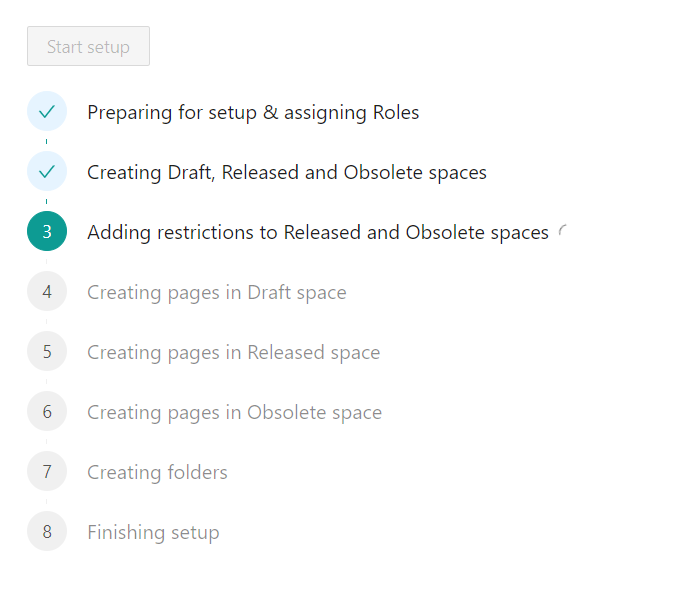
5. Once complete, the system is ready for use and you will be redirected to the App Global page.

Setup Issues
If any step fails to complete, it is possible to retry the setup. If the issue persist, contact us at info@softcomply.com.
Electronic Signatures
In order to execute electronic signatures, a user must have installed a TOTP Authenticator on their personal mobile device.
The Authenticators validated for use are listed in the “User Settings” section of this document.
NOTE: Other authenticators based on TOTP RFC 6238 are likely to work with the SoftComply Document Manager, but the responsibility to validate them resides with the user.
4. Navigation
Access
The Document Manager can be accessed by users within the Confluence interface, as long as the user is logged into Confluence.
In any space click on “SoftComply Document Manager” on the Apps list on the side bar.

You will be redirected to the Dashboard of the Document Manager.
Dashboard

Top Menu
The Top Menu of the Document Manager contains specific actions and links of the current Module. Each action will be discussed in the relevant section of this manual.
Dashboard
Returns to the main dashboard view.
Activities
The link navigates to the activity management section of the Document Manager.
In this section the user can see all activities present in the system.
Folders
This section presents the user a tree view of the documents in the Document Manager. Documents can be arranged in nested folders. The user can create or modify folders and documents from this view.
NOTE: Non-Confluence records such as CAPAs, CRs, etc. are not visible in the Folder view.
Manage

Users with appropriate permissions can manage Lifecycles, Fields, Workflows and Roles.
Manage lifecycles
This view lists all lifecycles in the system. From there lifecycles can be created, edited, made active/inactive and deleted. The user can also view lifecycles and Workflows associated to them.
Only Active Lifecycles can be used to create activities.
Manage Fields
This view lists all Fields in the system. Custom Fields can be created, edited and deleted from here.
Manage Workflows
This view list all workflows in the system. Custom Workflows can be created, edited and deleted from here. Only Active Workflows can be used in a Lifecycle.
Side Menu
The Side Menu contains links to the different modules of the system:
- QMS: where the QMS documents such as Manual, Policy, Procedures, Templates can be consulted and managed.
- CAPA: Dedicated module for the management of CAPAs.
- CR: Dedicated module for the management of Change Requests.
- Complaints: Dedicated module for the management of Complaints.
- NC: Dedicated module for the management of Non-Conformities.
Create New Activity or Document

From the Dashboard the user can directly create Documents and Activities.
The system presents the user an initial screen that requires basic information such as title, type, description, etc. Once the required fields are populated, the user can proceed to the completion of the document or activity.
Create a Document
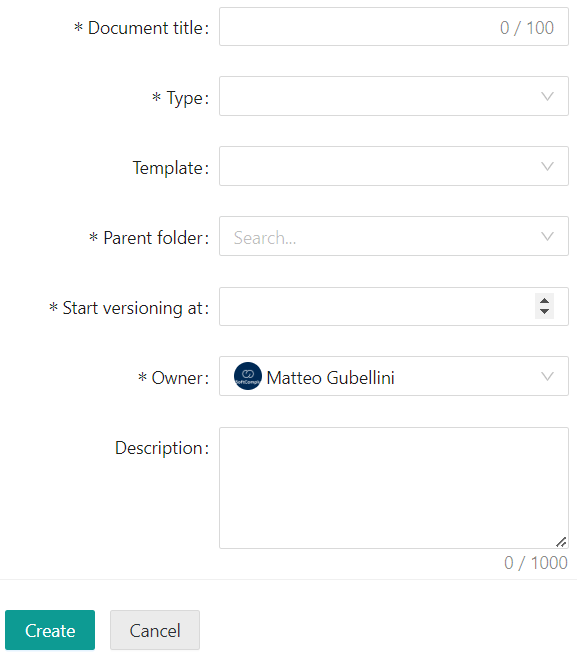
The following fields are required to create a new document:
| FIELD | DESCRIPTION |
|---|---|
| Document Title | The title that will be applied to the document |
| Type | It is possible to select the type of document from a predefined list. The selection of the type may constrain the type of activity that can be used with the specific document. NOTE: The “QMS Template” document type marks the document as QMS template. This means that the document, when released, will appear in the list of templates available when creating a new document. |
| Template | It is possible to start the creation of a document using a template. Only released documents of “QMS Template” type are available. If used, the new document will contain records of the parent template, at the bottom of the page. It is otherwise possible to start from a blank page. |
| Folder | The folder where the document will be created. NOTE: QMS-type documents can only be created inside the QMS folder. Non-QMS-type folders cannot be created inside the QMS folder. |
| Start versioning at | The initial version of the document. Default value = 1. |
| Owner | The owner of the document. By default the current user. |
| Description | A general description of the document. This description is available in the document details section. |
The user can then decide to Create the document or Cancel the creation of the document.
Edit a Document
Documents can be edited using the native Confluence editor.
Create New Activity
A modal view allows the user to create a new Activity from an lifecycle.
The user can then decide to Create the document or Cancel the creation of the activity.
After its creation, the user is brought to the Edit Activity view.
Validation Docs
From this link you can download the Validation Pack for the latest version of the App.
Help and Settings

Help
Within the Help View you can access this Manual, a quick User Guide, FAQs, Support, Arrange a Demo or Leve a review for the product.
Settings
5. Document Organization: Folders
Access From: Top Menu

In the left panel, the user sees the plain folder structure; folders can be expanded or collapsed. Folders can be moved using a Drag & Drop action.
In the main central panel, the user sees the content of the selected folder and any subfolders. All versions of a document are nested under the main document object.
Available actions for folders:
| Action | Description |
|---|---|
 | Delete Folder – Only Empty folders can be deleted |
 | Rename Folder |
Available actions for document objects:
| Action | Description |
|---|---|
| Delete: deletes the whole object. NOTE: this is possible only if there are no Approved, Released or Obsolete versions of the document. |
 | Move: moves the document to a different location. |
The user can navigate to the “Details” section of a document under the “Actions” column, or by clicking on the name of the document. In this view, all versions of a document are listed with their status and version.
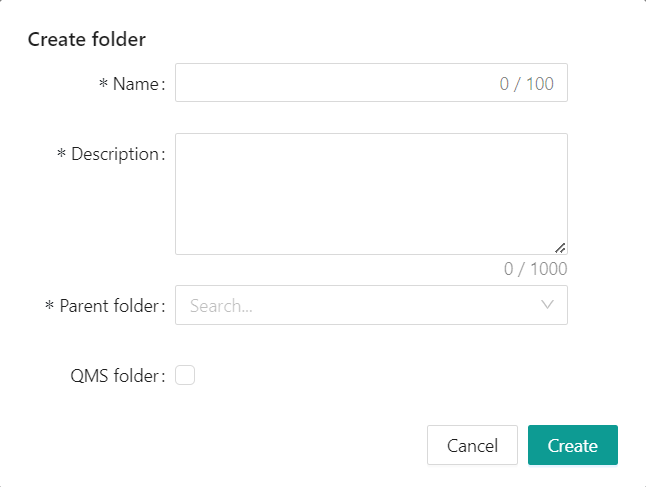
Create Folder
Select Create Folder

The system will prompt the user to enter name, description and location of the folder. If the QMS folder option is checked, the folder will be considered a QMS folder and QMS documents will be able to be placed inside it.
Document Details
Document Versions

This view includes the list of all versions for that specific document.
Each document version reports the document Type, Status and its version. The main document object reports the latest version status. It is also possible to navigate to the Activity each version is linked to.
Available actions for document versions:
| Action | Description |
|---|---|
| Delete version – Available only for Draft versions not routing in Any activity. |
| Rename: changes the name of the specific version. Available only if in Draft. |
 | Duplicate: creates a new document with the content of the selected version. |
 | Route document: Creates and Activity that includes this version, ready for routing. |
New version

New Version: creates a new version of the current document, with the content of the selected version. Available only for Released or Approved versions. The button is available in the Top-Right corner of the page. NOTE: this option is available only if there are no existing draft versions.
Link to Activity
Using the  link beside each version number, the user can navigate to the Activity the document version is in, or the Activity that transitioned the document version to the current Status. If no link is present, the document is currently not associated to any Activity.
Periodic Review
From the Document Details view, the user can set up a periodic review process for each document. A Periodic Review prompts the document owner to review the document at predefined intervals.
Periodic Review Settings

· Blank: if the Periodic Review is Off;
· Scheduled: no pending tasks and the due date is in the future;
· In progress: if a periodic review task is active;
· Overdue: if the periodic review due date is past and the periodic review task is not complete;
· Awaiting manual trigger: if the task creation date has passed and no task is active (e.g. aborted)
Start Periodic Review
Manual initiation of a Periodic Review. It will create a Periodic Review task regardless of the due date.
Note: not available if the Periodic Review is Off or a Periodic Review task is already active.
On/Off slider
On/Off slider. If turned off, no Periodic Review task will be created. It cannot be turned off if a periodic review task is active.
Interval
The period of time after which a Periodic Review is triggered, in months.
Create Task
The number of days before the due date the Periodic Review task is created.
Next Due
The due date of the next periodic review. This is calculated from either:
– The date of the last Release
– The date of the last completed Periodic Review
whichever the latest.
Periodic Review Tasks


Unlike normal tasks, Periodic Review tasks are completed in the Document Details view by clicking on the “Periodic Review” link beside “Active Task”.

The outcome of a periodic review task can be:
Abort: the task is deleted;
Reassign: the task can be assigned to another user;
No change required: the task is completed and a new due date set according to the Interval;
New Version Required: the task is completed and a new due date set according to the Interval; if not already present, a new Draft version is created.
Periodic Review Reporting
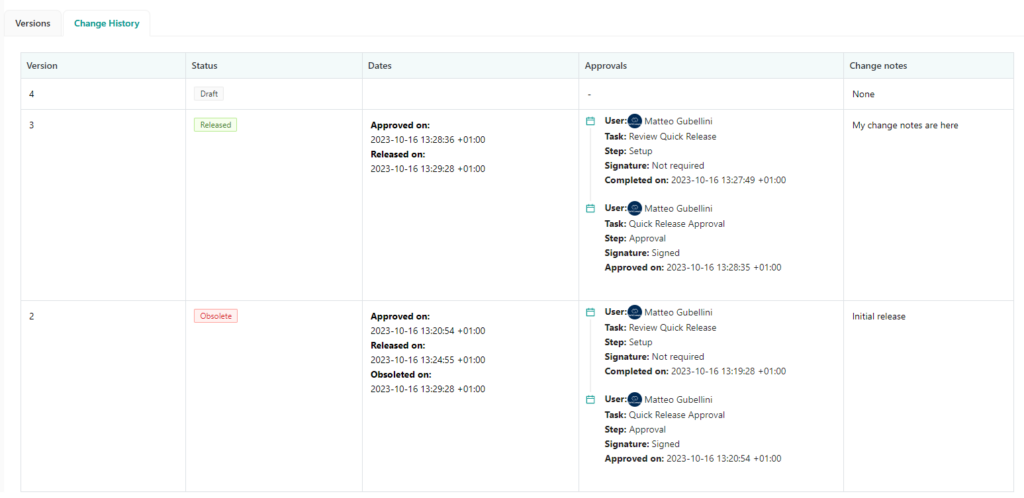
Records of the periodic review are recorded both in the Change History tab of a Document and in any Change History Table macros in the body of the document:


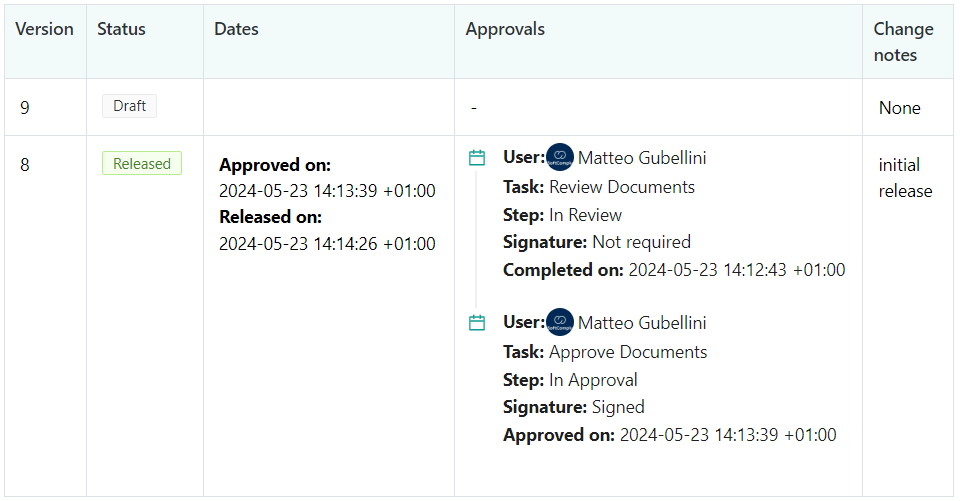
Document Change History
This tab contains the cumulative Change History table of all versions of the selected document.
6. Workflows
Access from: Top Menu → Manage

This view contains all workflows in the system, Standard (i.e. out-of-the-box, but still modifiable) and Custom.

The following Actions are available from the Actions menu:
| Action | Description |
|---|---|
| Delete version – Available only for Draft Workflows. |
Clicking on the workflow name also opens the View/Edit workflow view.
View and Edit workflows
In this view, the workflow wireframe is displayed to the user.
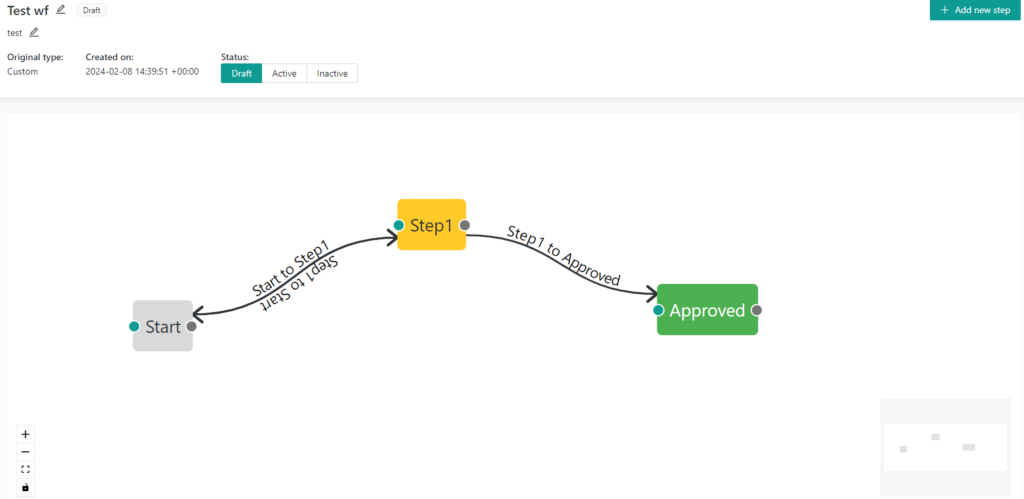
Steps colour legend:
| Grey | Initial step. An activity is placed in this step when launched. |
|---|---|
| Yellow | Intermediate step, neither initial nor final. |
| Green | Final step. When an activity reaches this step, documents become Approved. |
The view contains also additional information such as:
- Workflow status;
- Creation date and timestamp;
- Workflow type.
If the workflow is in Draft status, the user can:
- Edit the Name and Description;
- Add, edit and remove steps and transitions;
- Move the steps.
Workflow constraints
The following checks are applied to each workflow. No workflow can be made active if any of them is not met:
- Each workflow must contain at least 2 steps;
- Each workflow must have one and only one Initial step;
- Each workflow must have one and only one Final step;
- Except the Final step, all steps must have at least one outbound transition.
Workflow Status
Workflows have 3 Statuses:
- Draft: The workflow can be edited but not added to any Lifecycle
- Active: The workflow can be added to a Lifecycle but cannot be edited
- Inactive: The workflow cannot be added to a Lifecycle nor can be edited
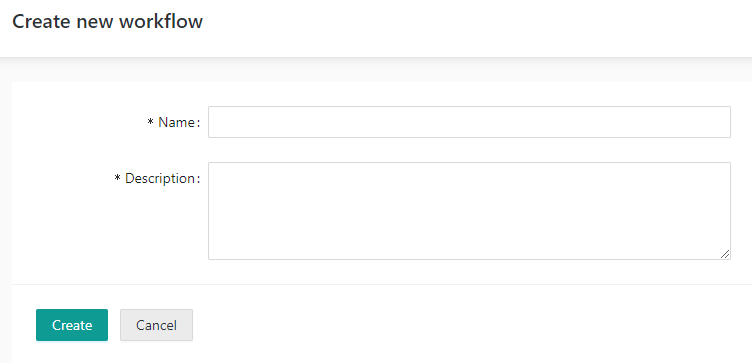
Create Custom Workflows
To create a new Custom workflow, click on the “Create new workflow” button.

Name and Description are required fields.
Edit custom workflows
To add a new step, the user can click on the “Add new step” button. Name and Type of step are required for its creation. The step is created accordingly and added to the view, without any associated transition.
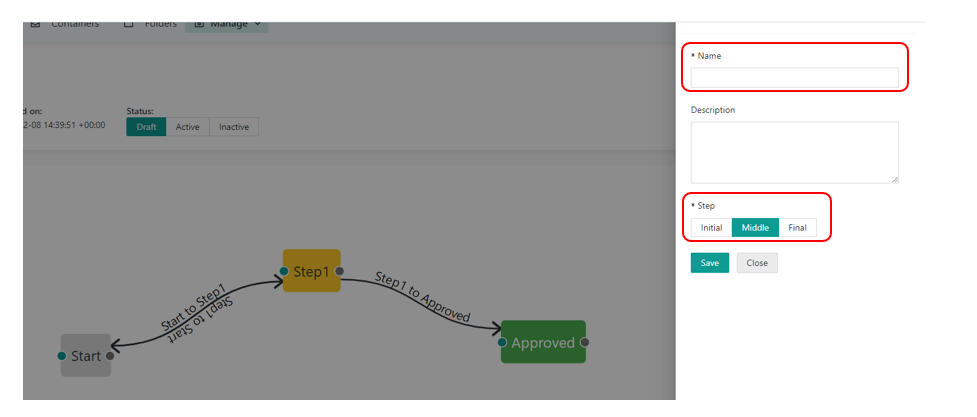
To edit a step simple double-click on the step.
To add a transition click on the GREY dot in the “from” step and while keeping the mouse button pressed drag the line to the GREEN dot of the “to” step, then release the mouse button. The transition is automatically named “<from step> to <to step>”.
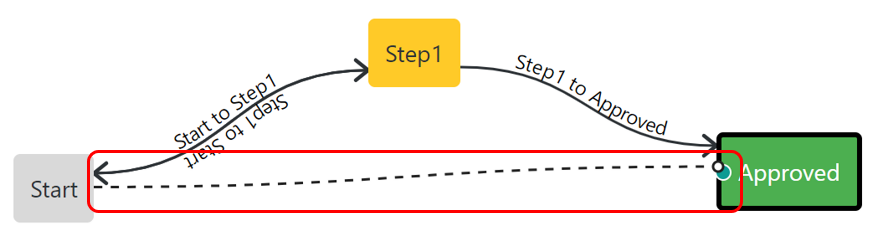
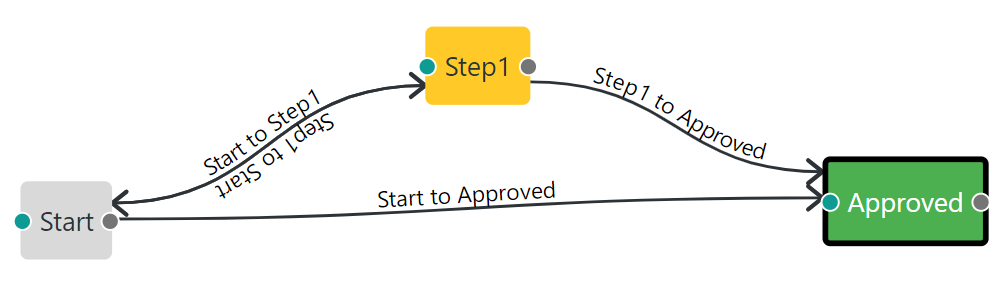
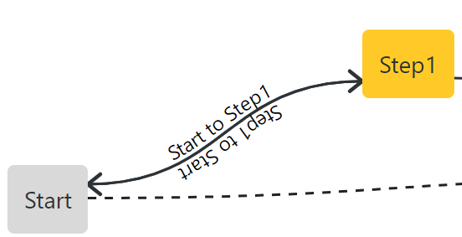
If two steps have both transitions from and to each other, the link will become a double-arrow line, where the right-to-left transition name is reported underneath the line.
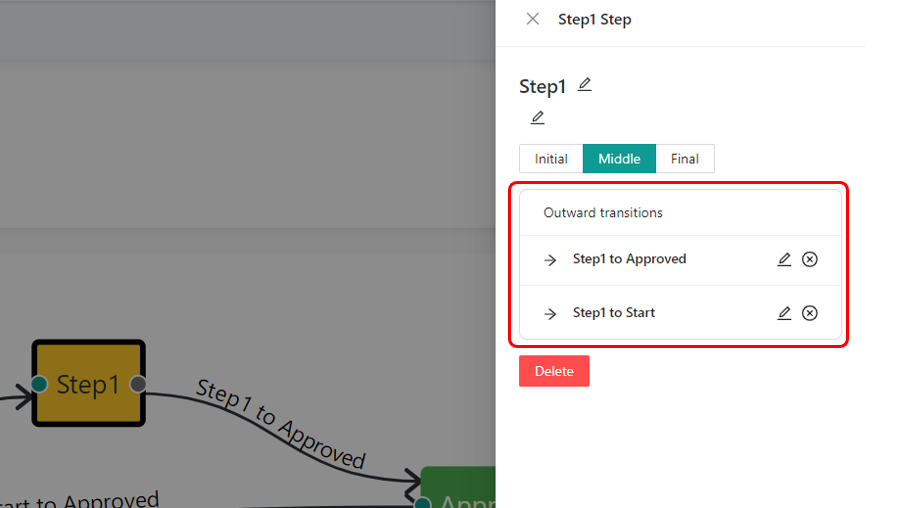
It is possible to edit a transition from the edit panel of the “from” step.
7. Activities
Manage Lifecycles
Access from: Top Menu → Manage

In this view the user can see the following information for each lifecycle in the system:
| Name | The name of the Lifecycle. |
|---|---|
| Workflow | Workflow used in the Lifecycle |
| Status | Draft: the Lifecycle is incomplete and/or not yet pushed to Active. It cannot be used to create Activities. Active: the Lifecycle is complete and can be used to create Activities; Inactive: the Lifecycle was made inactive. It cannot be used to create Activities. Obsolete: the Lifecycle was made obsolete. It cannot be used to create Activities and is not visible to non-admin users. |
| Type | The type of Activity. This attribute constraints the type of document that can be linked to a Activity. |
Available actions for each Lifecycle:
View/Edit | Activated by clicking on the name of the Lifecycle. It brings the user to the Lifecycle (edit) view. |
| Delete – Activated from the Action group. The Lifecycle is deleted. Available only for Draft Lifecycles. |
| Duplicate Lifecycle |
View workflow | Activated by clicking on the workflow name. It brings the user to the Workflow view. |
Create New lifecycle
Access from: Manage lifecycles

Users can create custom lifecycles, clicking on “Create lifecycle” in the Activity Management view.
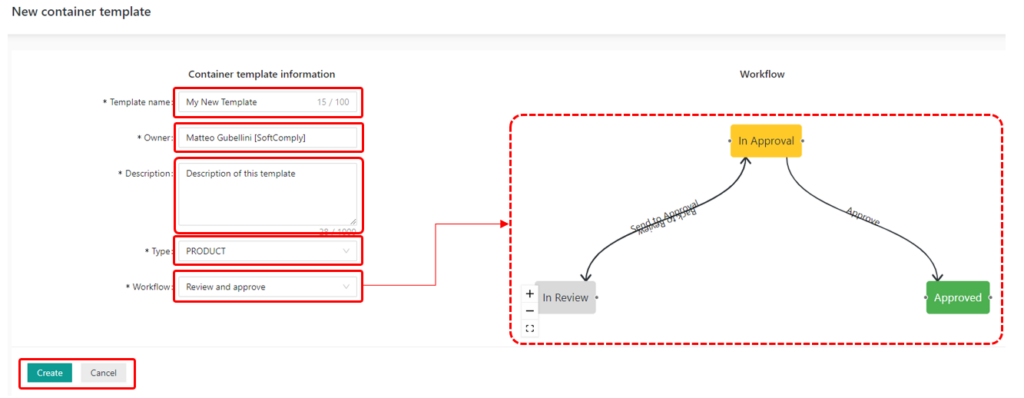
A number of information is required to create a new Lifecycle. The Lifecycle “Type” affects where the activities created from this Lifecycle are displayed for “Non Conformity”, “CAPA”, “Change Request” and “Complaint” types (e.g. a “Change Request” activity will be listed in the CR view of the system).
Once the user selects the workflow, its layout is displayed in the right section of the view.
Clicking on the “Create” button will generate a new Lifecycle and the user is presented with the Edit view (see “lifecycle edit” section of this document). “Cancel” brings the user back to the Activity Management View.
Edit lifecycle
In this view the user is allowed to edit the configuration of the lifecycle.
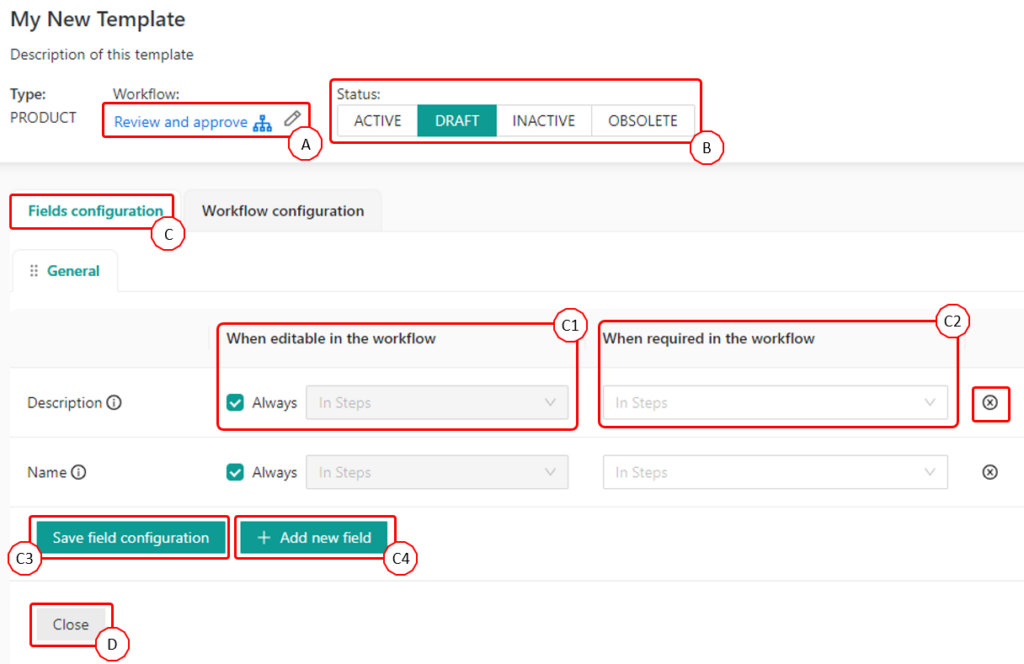
A – Workflow
The user can select the workflow associated with the Lifecycle.
NOTE: Only one active workflow can be associated with an lifecycle. Changing the associated workflow will result in the resetting of all Workflow, Activity and Fields configuration as many options depend on the workflow logic and steps.
B – Lifecycle Status
The user can change the status of the Lifecycle. Only Draft Lifecycles can be edited and only Active Lifecycle can be used
C – Field configuration tab
In this tab, the user can customize the fields contained in the Lifecycle.
C1 – When editable
The user can select in which steps this field is editable.
If “Always” is selected, the step list is not available.
C2 – When required
The user can select in which steps this field is required. Transitions are not available if this fields is not filled in.
NOTE: If a field is “required” in a step, it must also be “editable” in the same step.
C3 – Save fields configuration
NOTE: The settings of each tab must be saved separately, using the save button at the bottom of the tab.
C4 – Add new field
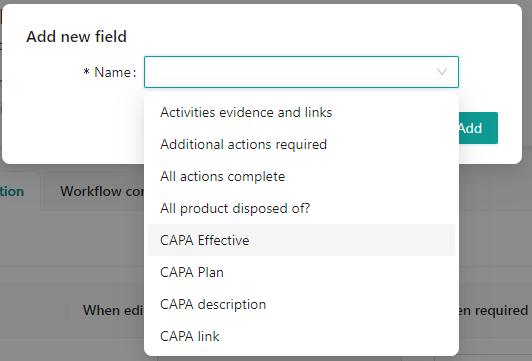
The user can add a new field in the Lifecycle, from the list of Active fields.
D – Close
The view will close without saving the settings.
E – Workflow configuration tab
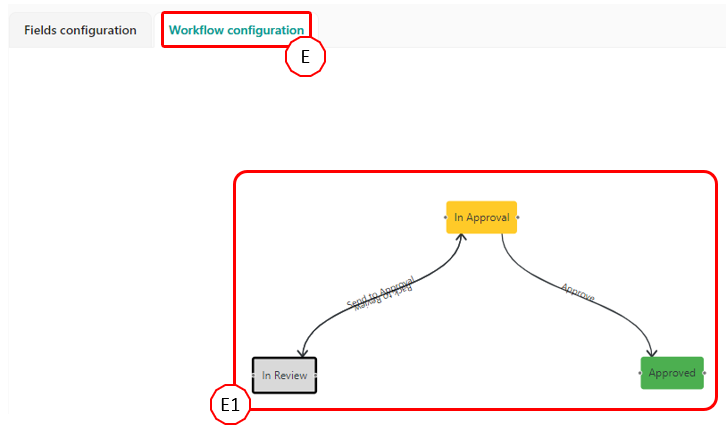
In this tab the user can define the behaviour of each step of the workflow. The user must select each step of the workflow by clicking on it and set up all options.
E1 – Workflow diagram
The user can select each step of the workflow to apply the settings in the “Task” and “Behaviour” tabs.
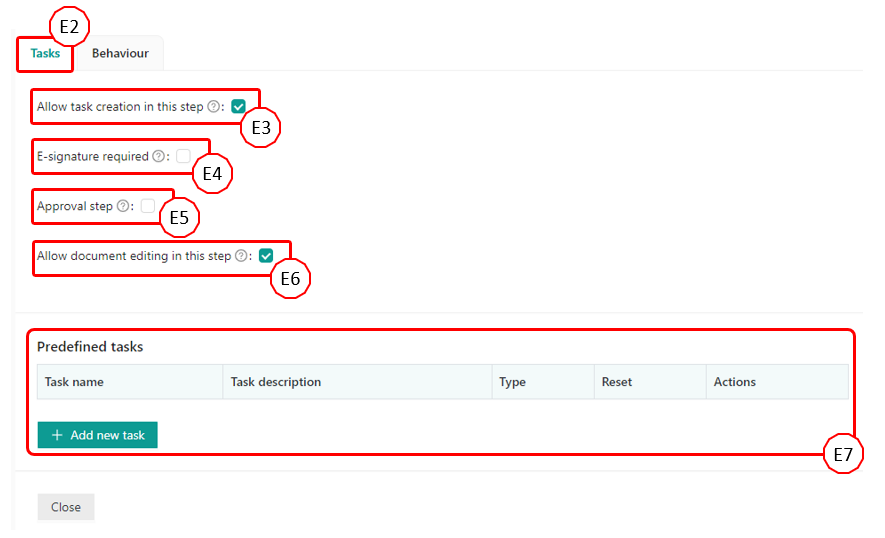
E2 – Tasks Tab
In this tab the user can define the parameters of tasks assigned to the specific step, and create predefined tasks if necessary.
E3 – Allow task creation in this step
If selected, users are able to create tasks while in the current step, when an activity is routing.
E4 – E-signatures required
If selected, the completion of any task in the step requires electronic signatures.
E5 – Approval step
If selected, all tasks in this step must be of the “Approval” type, i.e. with “Approved” and “Rejected” outcomes. If not selected, only standard tasks are allowed, i.e. tasks that simply need user confirmation of their completion.
E6 – Allow document editing in this step
If selected, assignees can edit documents linked to the Activity in this step.
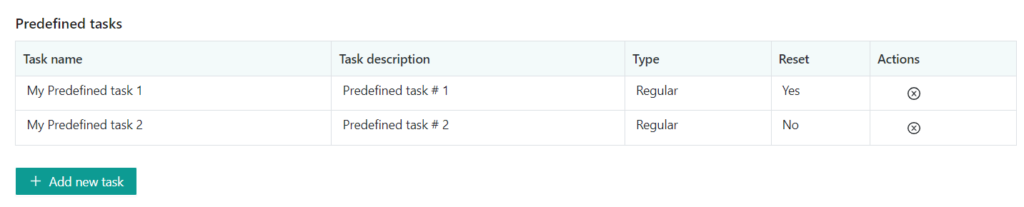
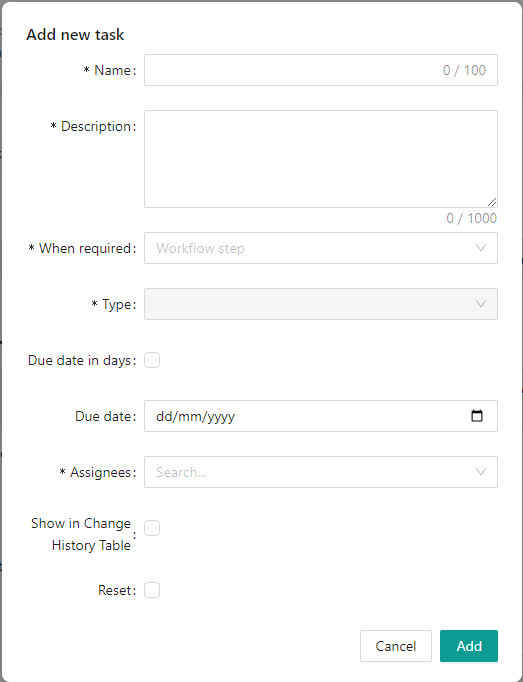
E7 – Predefined tasks
The user can add or remove predefined tasks. A predefined task is a task that is automatically created in an activity generated from this Lifecycle and cannot be removed or modified by the user, only assigned.
When “Add new task” is selected, the user is prompted to enter task name and description.
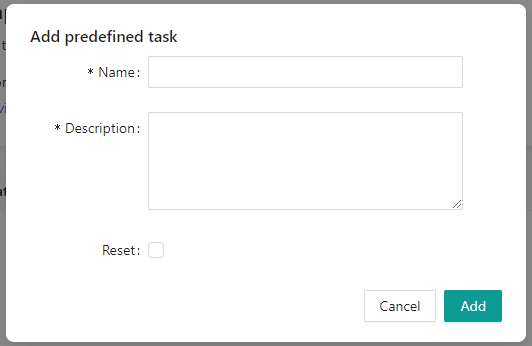
“Reset” option: if selected, all approval of a task are wiped if the activity returns to that step.
NOTE: Approval tasks are always reset
FOR EXAMPLE: Two tasks are created in step X, task A and task B. Task A is approved while task B is rejected. The activity returns to a previous step and eventually reaches step X again. When the “Reset” option is selected, both tasks A and B are re-assigned and have to be completed again. If not selected, only task B is re-opened.
Predefined tasks can be removed once created only from the lifecycle.
E8 – Behaviour Tab
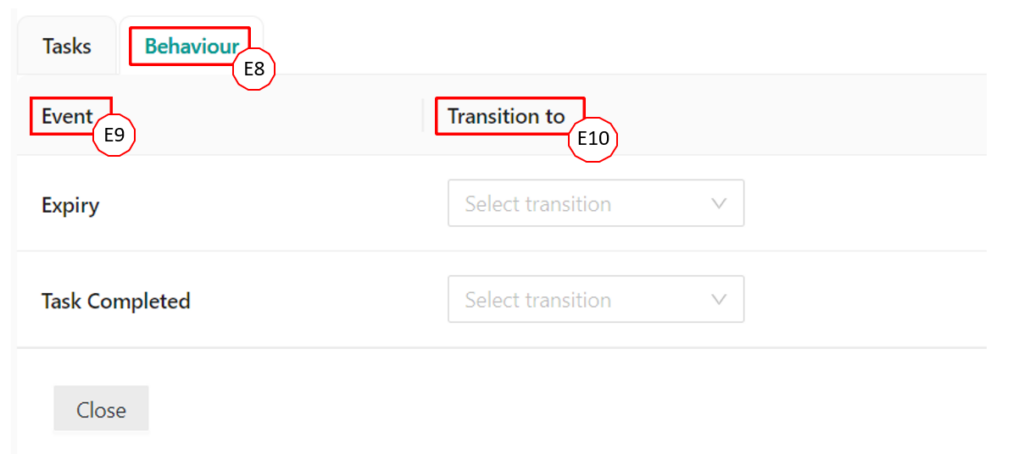
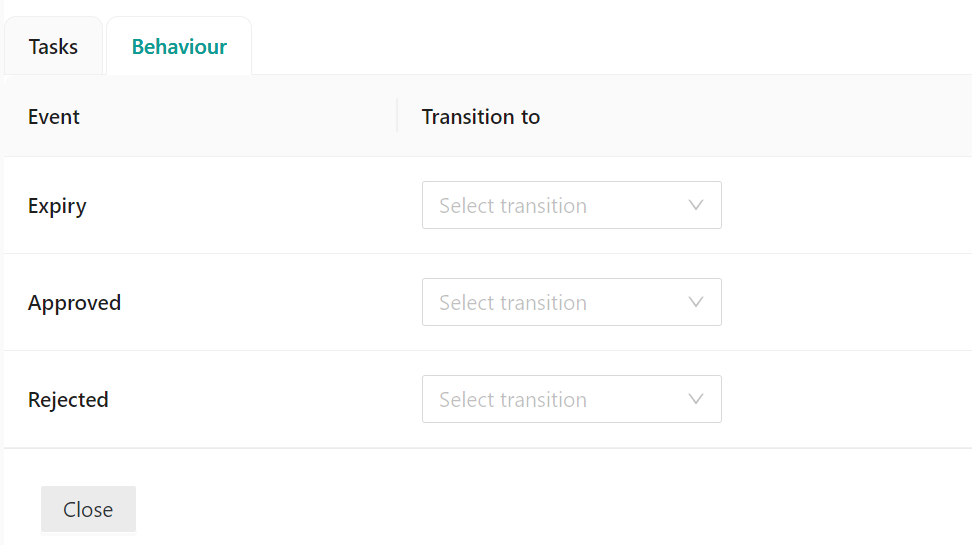
E9 – Event
- Expiry (triggered only if a due date is set up); only one transition can be selected;
- Approved (for Approval-type steps): what is triggered when all tasks are approved; only one transition can be selected;
- Rejected (for Approval-type steps): what is triggered when any task is rejected; only one transition can be selected;
- Task Completed (for standard-type steps): what transitions are made available when all tasks are complete; multiple transitions can be selected.
E10 – Transition to
The Transition that is triggered (or made available) when the event occurs. If a transition is not associated with any event, it can be manually triggered at any time.
Only transitions outbound from the selected step are listed.
Automatic Release

Lifecycle View
Access from: Manage lifecycles, from the Actions column or clicking on the Lifecycle name and the Lifecycle is not editable.
The view is identical to the lifecycle Edit view, but no file is editable.
Manage Activities
Access from: Top Menu

In this section the user can see all activities present in the system.
For each activity, the system reports the Type, ID, Time in step, Workflow step (Draft if not launched), Owner and Pending Tasks (if any). The user can navigate to the Task View of the Activity by clicking on the task number list.

Available actions for each activity:
- Edit: link to the Edit view of the activities;
- View: link to the View view of the activities;
- Delete: deletes the current activity. Note that this is only available if the content is in DRAFT or ABORTED status.
The user can also create a New Activity clicking on the “Create Activity” button. See New Activity section below for details on the creation of a new activity.
Create New Activities
The following fields are required to create a new activity:
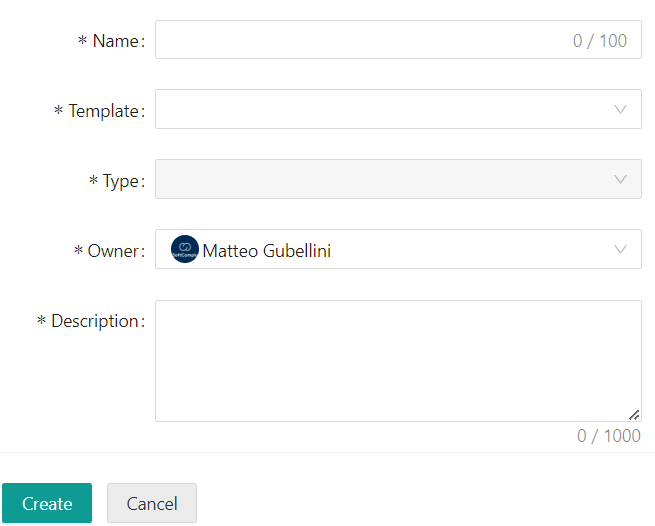
| Field | Description |
|---|---|
| Name | The name that will be assigned to the activity. |
| Type | Automatically populated based on the selected Lifecycle. |
| Lifecycle | A Activity must be created from an Active Lifecycle. |
| Owner | The owner of the activity . By default the current user. |
| Description | A general description of the activity. |
The user can then decide to Create the document or Cancel the creation of the activity.
After its creation, the user is brought to the Edit Activity view.
Create Activity from Document Details
It is possible to create an activity from the Document Details view, if there is an available draft version of the document that is not already routing. This expedites the approval and release of the document.
Under the Actions column of the document version select “Route document” icon
The system will automatically navigate to the Create Activity view and will automatically populate all fields with standard content. The user can always modify them if necessary.

Upon the creation of the activity, the Document Version is automatically added to the activity.

The activity can then be customized and launched as per the following sections.
Edit Activities
Access from: Top Menu → Activities → Click on the name of the Activity

NOTE: Only Draft and Active activities can be edited
In this view the user can see the content of the activity, documents and tasks and edit them.
Certain fields such as Name, Status, Workflow, Type, Lifecycle are not editable.
Editing an activity Before launch
The user can add, customize and assign tasks. The user can also add and remove documents.
From this view it is also possible to Launch the Activity. an activity can be launched only if all tasks have been assigned
Add and remove documents from an activity

- Click on the “+ Add” button;
- Click on the field: a dropdown menu shows the list of available documents;
- Start typing the name of the document to be added; NOTE: In order to add a document version to the Activity, this version must be Draft and not linked to another running activity.
- Select “Add”.

The document and its draft version are now listed in the Activity.
Task Management in Activity before Launch
Before launch, the Owner of the Activity must assign at least one user to each predefined task (if any).
NOTE: Only users who have access to the App and have already activated the App can be selected.
NOTE: A red dot on a tab title indicates that there are pending actions before the activity can transition.

You can also create additional tasks by clicking the “+ Add new task” button.
Unlike with the Predefined tasks, assignees must be defined immediately as the task is being created.
Editing an activity After Launch
Assignees can edit fields as per the logic set up in the lifecycle. Only fields marked as editable in this step can be edited.
Owners of Activities can edit existing tasks as long as they are not yet completed. Owners can also add new tasks if the “Allow task creation in this step” option was selected during the lifecycle setup.
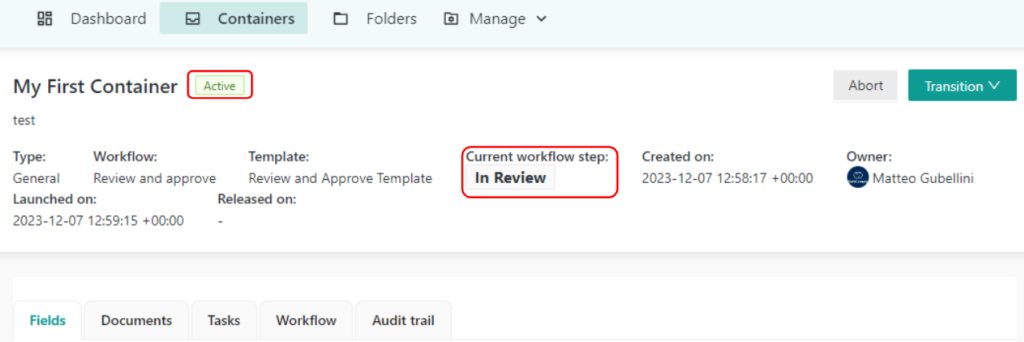
Launch an activity
An activity can be launched only by the Owner and only if all required fields are populated and all tasks have assignees.

The Status of the activity becomes “Active” and the Workflow step indicates the current step in the Workflow.
View Activities
Access from: Top Menu → Activities → Click on the name of the Activity.
The user can view the configuration and content of fields and the status of the tasks. No field or task can be edited.
Task Completion
Tasks that are assigned to the current Activity step appear in the top table and can be completed by the assignee(s).


The “Completion info” option allows the user to enter Completion Information about the task. This is usually required to describe how the task was completed and to provide the necessary evidence. This is mandatory for regular tasks, before the completion button appears.

NOTE: The “Assign” and “Remove Assignee” buttons are available only to the Owner of the Activity. The “Remove Assignee” option is available only if 2 or more users are assigned to the task.
Completing a task may require the e-signature depending on the setup of the task.
Transitions
Transitions will be triggered automatically if it has so been configured in the lifecycle, otherwise the Owner can trigger them manually once all tasks are completed and required fields filled in.
Please note that it may take a few seconds for the transition to complete.
Final step and Release

Once the activity reaches the final step (green step), all fields are locked. All linked documents move the “Approved” status. If selected, the user can then Release the activity.
Released documents are publicly available, while documents in the “Approved” status may still be subject to some access restrictions.
Aborting an activity Run
In any step of the workflow except the final step, the activity owner can abort the run of a launched activity. This action requires an electronic signature and justification to be completed.

Once aborted, an activity enters the “Aborted” status. From this status the activity can be deleted if necessary.
NOTE: document versions linked to an aborted activity cannot be linked to a new one. In order to do this, delete the aborted activity or remove the documents from it.

8. Fields
Manage Fields
Access from: Manage lifecycles

From this view the user can browse the existing fields or create new ones.
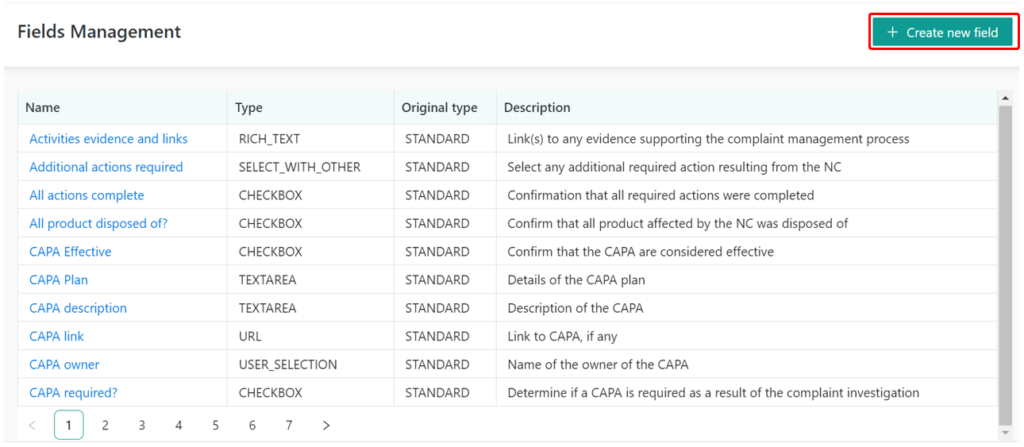
Create New Fields
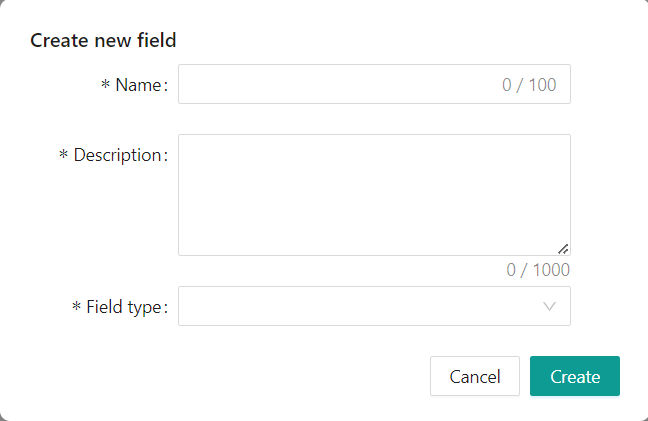
The user can create a new filed entering its name, a description and selecting the field type:
| FIELD TYPE | DESCRIPTION |
|---|---|
| TEXTFIELD | Short Text field. |
| NUMBER | Decimals, including negative. |
| USER_SELECTION | Selection of Atlassian user from a list. |
| TEXTAREA | Large text field (4000 characters max). |
| CHECKBOX | Checkbox, ticked/unticked, one option. The option must be defined at setup. |
| MULTI_CHECKBOX | Checkbox, ticked/unticked, multiple options, multiple selections allowed. The options must be defined at setup. |
| SELECT | Single select from a predefined list of values. The values must be defined at setup. |
| MULTI_SELECT | Multi select from a predefined list of values. The values must be defined at setup. |
| RADIOBUTTON | Checkbox, ticked/unticked, multiple options, single selection only. The options must be defined at setup. |
| URL | Text with valid URL value |
| DATE | dd/mm/yyyy |
| DATETIME | dd/mm/yyyy hh.mm |
| TIME | hh.mm |
Edit and Delete Custom Fields
To edit an existing Custom Field simply click on the field name or select “Details” from the Actions menu.
To delete a Custom Field, select “Delete” from the action menu. Only custom fields can be deleted.
9. Permissions
In the Document Manager, Permissions are managed using “Roles”. Each role is associated with one or more confluence groups and custom permissions.
In order to access the system, a user must be part of at least one group associated to one role.
NOTE: permissions are cumulative, meaning that a user has all permissions of all roles he/she belongs to.
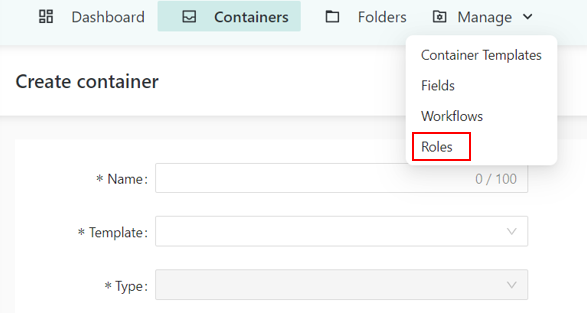
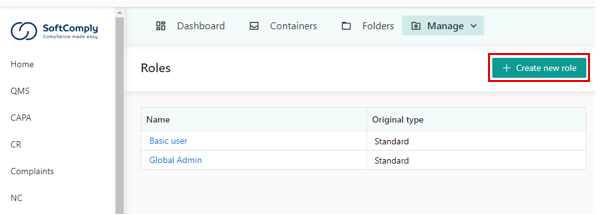
Manage Roles
Access from: Manage Roles
There are two predefined Roles that the system creates on installation:
- Basic user: users with access to documentation only. These users can create, edit and delete documents, but not CAPA, CR, Complaints or NC records. No access to obsolete versions.
- Global admin: in addition to the basic user permissions, global admins can manage Lifecycles, Fields, Workflows, Roles and e-signatures. They can also use the Import feature and access the Audit Log.
These roles cannot be edited nor removed.
Create New Role
- Click on the “Create new role” from the Role Management view:
Then enter Name and Description of the Role.
2. In the Groups tab, select the Confluence groups associated with this role; these groups are automatically retrieved from your Confluence instance. Click “Save” to confirm the settings.
3. In the Permissions tab, select the desired permissions the role members will have. Click “Save” to confirm the settings.
NOTE: The “Manage” permission includes Create, Edit, Delete and Change Status or Step
10. Confluence Macros and Widgets
Document Manager Change History Table macro
This macro displays the information related to the current version of the page:

Document Manager FULL Change History Table macro
This macro displays the information related to ALL versions of the current document:
Document version information Macro
A group or 3 macros that can display in the body of the page the current Document:
- Version
- Status
- Date of Approval, Release and Obsoletion

Dynamic Links Macros
Two macros are available to create a link to the latest Released version of a document. This macro mimics the original Confluence behaviour where linking a page always shows the latet content.

Once the Document Manager Dynamic Link macro is added to the page, it is possible to select the target page from the dropdown. The system will show if the document does not have Released versions by adding the status in brackets (e.g. “DRAFT”):


The Document Manager Dynamic Links macro works in a similar way, but it allows the user to select multiple documents, up to a maximum of 25 per macro:


Logic of dynamic links
- If the document has a Released version, clicking on the link will bring the user to this version;
- If not, and the document has an Approved version, this will be used;
- If no Released nor Approved versions are available, the latest Draft version will be used;
- If all versions are Obsolete, the link will point to the latest Obsolete version.
Inline Dynamic link macros
Assigned Tasks Homepage Feed

ByLine links
- View document versions: a link to the details view of the document inside the Document Manager;
- View the latest released version: a link to the released version of the document, if any;
- View the latest approved version: a link to the approved version of the document, if any.

11. Search, Sort and Filter

It is possible to search, filter and sort table for the following items:
| Search by | Filter By | Sort By |
My Activities | Name | Type, | Name, |
Activities | Name | Type, | Name, |
Lifecycles | Name | Type, | Name, |
Workflows | Name | Type, | Name, |
Fields | Name | Name, | Type, |
Roles | – | – | Name, |
12. User Settings
The user can review the status of his/her signing token. This token is use as “secret” to execute electronic signatures in the system.
Setup of Authenticators
If a user does not have a paired authenticator, the following view is displayed:
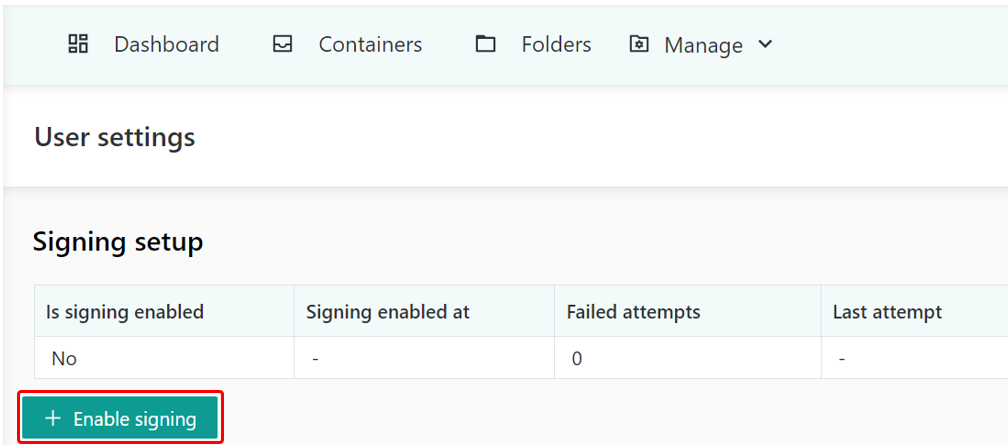
Clicking on “Enable signing” starts the process to pair an Authenticator installed on a Mobile App with the SoftComply Document Manager.

Scan the QR code with the Authenticator of your choice and enter the first token to confirm successful pairing. This code is unique for each user and is based on the user currently logged into the system. The user must scan it with an Authenticator installed on a mobile device to create a new account. A 6-digits code is then generated by the App and refreshed every 30 seconds. This is the token used to execute electronic signatures in the SoftComply Document Manager.
Validated Authenticators
The following authenticator have been validated for use with the SoftComply Document Manager:
- Google Authenticator
- Microsoft Authenticator
For both Android and iOS platforms.
Manage e-signature tokens
When set up, the user can visualize the relevant information about the e-signature token, such as setup date, last attempt and number of failed attempts.
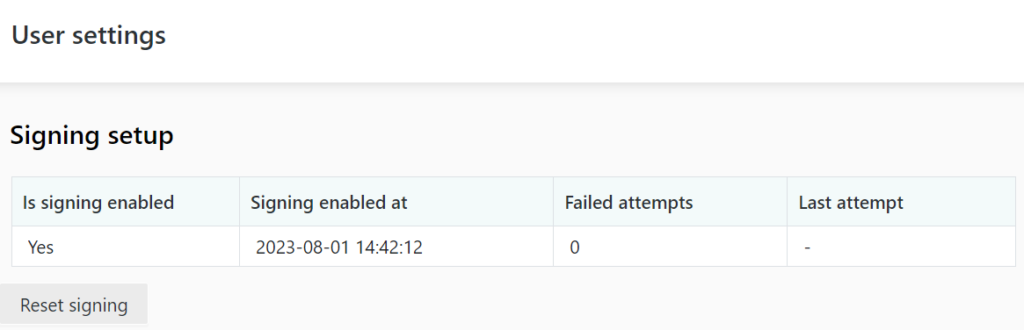
The use can Reset the token by pressing “Reset signing”. The paring with the Authenticator is sieved and the user cannot execute electronic signatures until the pairing process is completed again.
Import existing pages
For the DM to be able to manage existing Confluence pages, these pages must be moved to the Spaces controlled by the DM. The App cannot control pages outside these spaces.
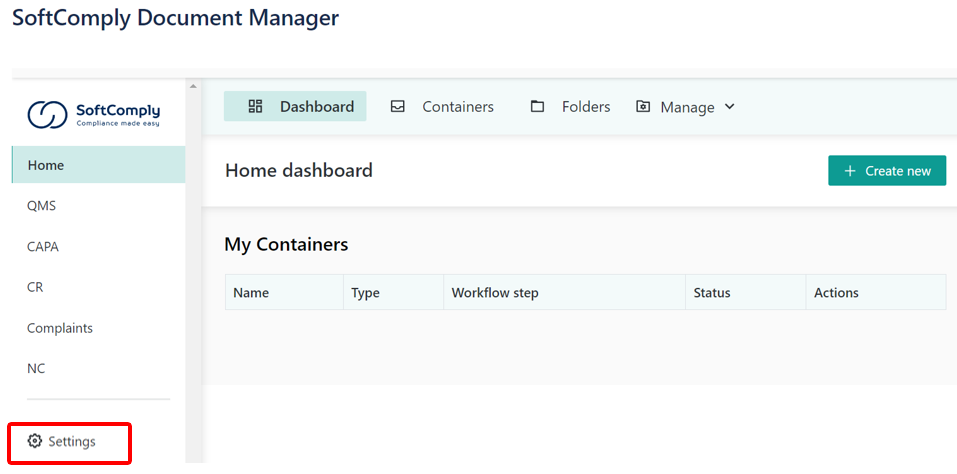
From the main view, click on the Cog in the top-Right corner:

From the Settings view, select “Import Documents”


From the import view, select:
- Space: the space the pages to be imported are in. Once the Space is selected, the list of pages will appear at the bottom of the right panel;
- Destination folder: the folder the pages will be moved to (note: it can be modified later);
- Type: the type that will be assigned to imported documents(note: it can be modified later);
- Start version at: the version that will be assigned to imported documents(note: it can be modified later);
- The pages to be imported (max 200 per run);

The list of pages will appear in the main view. From here, it is possible to modify Type, Folder and version for each document, and remove any unwanted page from the list.
Additional pages can be added repeating the same process, with a maximum of 200 per run.

Click “import” when ready.
The DM will import the pages while showing the progress bar. The time required to import pages depends on their number and content. As a rule of thumb, expect 5 seconds for every page.


Note: it is not possible to have multiple imports in parallel. All users see the progress view until the current import is complete.
Important notes regarding the import of pages into the DM
- Pages to be imported are MOVED, not copied, to maintain the current links. For this reason it is strongly recommended to BACKUP THE SPACE before import.
- A maximum of 200 pages can be moved at once. You can import the remaining pages after the previous import has been completed, repeating the process described above. Pages not imported remain in the original space.
Import Errors
There are typically two reasons why the import of certain pages may fail:
- A page with the same name existing in the Document Manager. Modify the title of the page to be imported and retry.
- The Document Manager App does not have the required permissions to move the page. Ensure that the Document Manager App can “Edit” all pages intended to be imported.
Importing Comala data
This feature allows the user to import Comala Document Management Cloud data and SoftComply Change History App for the same.
Requirements
Preparation

Import

